Plump Turkey Gnome Crochet Shelf Sitter Free Thanksgiving Pattern
Reader Favorites










Welcome Pumpkin Crochet Door Hanger Free Thanksgiving Pattern

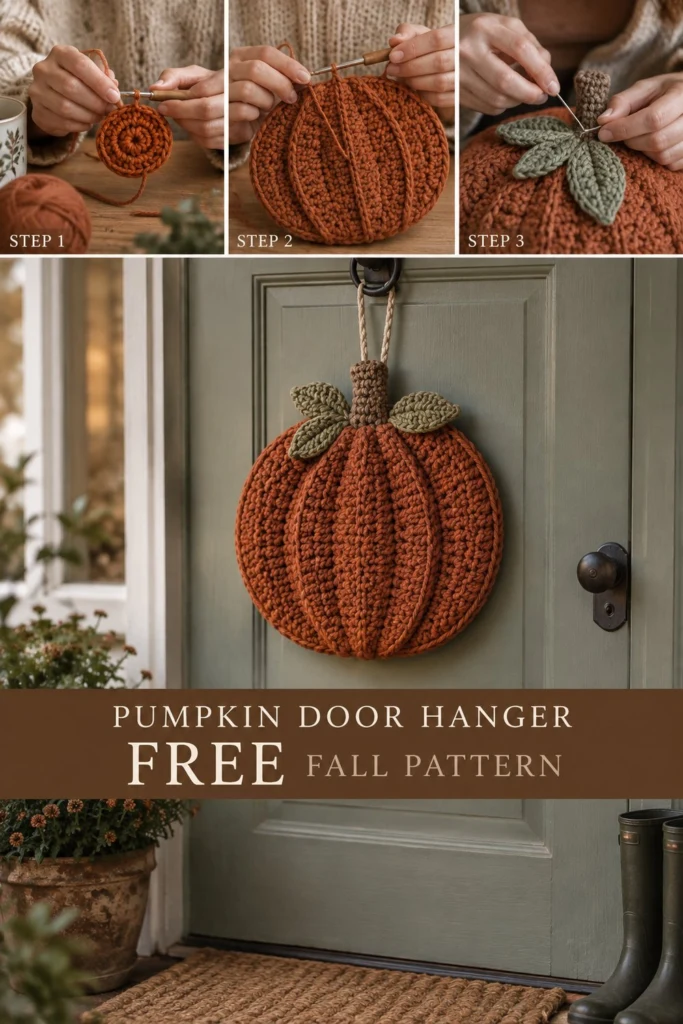
Hang a soft rust pumpkin on your front door and guests will feel warmly welcomed before they even knock! This cozy project features two flat crocheted circles adorned with raised surface ribs to define classic pumpkin segments, topped with a structured walnut stem, two sage green leaves, and a natural twisted cord for hanging. It works up quickly in an evening using worsted weight yarn, making it the perfect autumn accent for Thanksgiving week and the entire fall season.
Welcome Pumpkin Crochet Door Hanger Free Thanksgiving Pattern
Quick Facts
- Skill level: Easy / Advanced Beginner
- Finished size: 12 in (30.5 cm) wide by 14.5 in (37 cm) tall (including stem)
- Yarn: Worsted weight (#4 medium) yarn in Rust Orange, Walnut Brown, and Sage Green
- Hook: 5.0 mm (US H-8) crochet hook
- Stitches used: magic ring, chain (ch), single crochet (sc), half double crochet (hdc), double crochet (dc), surface slip stitch (surface sl st), back loop only (BLO)
- Time to make: 2 to 3 hours (1 evening)
Looking to alter the size for a smaller wall plaque or a larger wreath center? Detailed size customization tips are included further down in the guide.
What Makes This Pumpkin Door Hanger Special
This door hanger combines structured crochet shapes with textural embellishments to create a flat decor piece that lays flush against your door.
- Dimensional Surface Ribs: Instead of stuffing a heavy 3D ball that bangs against your door when opened, this pattern uses a clever surface-crochet technique across a flat circular base. The raised ribs mimic deep pumpkin ridges while keeping the decor lightweight and flat.
- Rich Earthy Palette: Vibrant Rust Orange pairs with deep Walnut Brown and soft Sage Green to capture authentic autumn tones that complement any front door finish.
- Layered Construction: Working two identical panels joined around the outer edge gives the door hanger double-layer sturdiness without requiring polyester fiberfill.
- Quick-Stitch Foliage: Simple leaves worked in a single round add an organic touch right at the base of the stem.
Skill Level
This project is rated Easy / Advanced Beginner. It is ideal for crochets who know basic stitches and want to practice flat circles and surface details.
- Working in continuous or joined rounds
- Increasing in half double crochet
- Working surface slip stitches across a finished piece
- Sewing flat pieces together with a tapestry needle
If you can crochet a basic flat circle, you can easily complete this fall door decor crochet pattern!
Finished Measurements
| Measurement | Inches | Centimeters |
|---|---|---|
| Pumpkin Diameter | 12.0 in | 30.5 cm |
| Stem Width | 2.0 in | 5.0 cm |
| Stem Height | 2.5 in | 6.5 cm |
| Leaf Length | 3.5 in | 9.0 cm |
| Total Height (with stem & loop) | 17.5 in | 44.5 cm |
Materials You Will Need
| Material / Item | Specification | Quantity / Length |
|---|---|---|
| Rust Orange Yarn | Worsted Weight (#4), 100% Acrylic or Cotton Blend | 165 yd / 151 m |
| Walnut Brown Yarn | Worsted Weight (#4), 100% Acrylic or Cotton Blend | 25 yd / 23 m |
| Sage Green Yarn | Worsted Weight (#4), 100% Acrylic or Cotton Blend | 20 yd / 18 m |
| Crochet Hook | Size 5.0 mm (US H-8) | 1 hook |
| Hanging Cord | Natural Jute or Cream Twisted Cord (1/4 in / 6 mm thick) | 12 in / 30 cm |
| Tapestry Needle | Blunt end yarn needle | 1 needle |
| Stitch Markers | Locking plastic markers | 2 to 4 markers |
| Scissors | Standard craft scissors | 1 pair |
Yarn Suggestions
| Yarn Brand & Line | Fiber Content | Skein Yardage | Notes |
|---|---|---|---|
| Lion Brand Vanna’s Choice | 100% Acrylic | 170 yd (156 m) / 100g | Excellent stitch definition, exact shades pictured (Terracotta, Radiant Lime/Sage, Chocolate). |
| Red Heart Super Saver | 100% Acrylic | 364 yd (333 m) / 198g | Durable and budget-friendly; holds flat shape extremely well on outer doors. |
| Caron Simply Soft | 100% Acrylic | 315 yd (288 m) / 170g | Soft sheen with smooth drape; use a slightly tighter tension to maintain circle flatness. |
⚠️ Note: Avoid lightweight DK yarns or single-ply roving yarns for this project. Lightweight yarns will make the door hanger too small, while delicate single-ply yarns will fray when hung outdoors or subjected to door movement.
Gauge
| Stitch Pattern | Gauge Count | Dimensions |
|---|---|---|
| Half Double Crochet (hdc) | 14 sts x 10 rows | 4 x 4 in (10 x 10 cm) |
| Flat Circle Check | Rnds 1 to 6 of Pumpkin Panel | 6.0 in (15.2 cm) diameter |
Abbreviations
| Abbreviation | Full Name (US Terms) |
|---|---|
| ch | chain |
| sl st | slip stitch |
| sc | single crochet |
| hdc | half double crochet |
| dc | double crochet |
| inc | increase (work 2 sts in the same st) |
| BLO | back loop only |
| st(s) | stitch(es) |
| rnd(s) | round(s) |
| row(s) | row(s) |
| MR | magic ring |
UK Translation: US single crochet (sc) = UK double crochet (dc); US half double crochet (hdc) = UK half treble crochet (htr); US double crochet (dc) = UK treble crochet (tr).
Special Stitches Explained
1. Magic Ring (MR)
Create a loop with yarn, leaving a 4-inch tail. Insert hook into loop, yarn over, pull up a loop. Chain 1 (does not count as a stitch), then work the required number of stitches directly into the ring. Pull tail tight to close the center hole completely.
2. Surface Slip Stitch (Surface Sl St)
Hold working yarn behind your finished front panel. Insert hook from front to back through the canvas of stitches. Yarn over on the back side and pull a loop through to the front (2 loops on hook). Insert hook into the next designated space along your line, yarn over on the back side, pull loop through the fabric and through the loop on your hook. This creates a raised chain-like line across the surface of your work.
Pattern Instructions
Pattern Notes
- The main pumpkin panels are worked in joined rounds of half double crochet. Joining chains (
ch 1) do not count as a stitch throughout. - The stem is worked flat in rows using back loop single crochet to create a realistic bark-like texture, then folded and stitched.
- Two identical circular panels (Front and Back) are crocheted and joined around the perimeter to create a sturdy, double-thick flat hanger.
Section 1: Front Pumpkin Panel (Rust Orange, Make 1)
Using Rust Orange yarn and a 5.0 mm hook:
Rnd 1: Work 8 hdc into a MR, sl st to first hdc to join. (8 hdc)
Rnd 2: Ch 1, work 2 hdc in each st around, sl st to first hdc. (16 hdc)
Rnd 3: Ch 1, (1 hdc in next st, inc in next st) x 8, sl st to first hdc. (24 hdc)
Rnd 4: Ch 1, (2 hdc in next 2 sts, inc in next st) x 8, sl st to first hdc. (32 hdc)
Rnd 5: Ch 1, (3 hdc in next 3 sts, inc in next st) x 8, sl st to first hdc. (40 hdc)
Rnd 6: Ch 1, (4 hdc in next 4 sts, inc in next st) x 8, sl st to first hdc. (48 hdc)
✅ Checkpoint: Measure your circle at the end of Round 6. It should measure exactly 6.0 in (15.2 cm) across.
Rnd 7: Ch 1, (5 hdc in next 5 sts, inc in next st) x 8, sl st to first hdc. (56 hdc)
Rnd 8: Ch 1, (6 hdc in next 6 sts, inc in next st) x 8, sl st to first hdc. (64 hdc)
Rnd 9: Ch 1, (7 hdc in next 7 sts, inc in next st) x 8, sl st to first hdc. (72 hdc)
Rnd 10: Ch 1, (8 hdc in next 8 sts, inc in next st) x 8, sl st to first hdc. (80 hdc)
Rnd 11: Ch 1, (9 hdc in next 9 sts, inc in next st) x 8, sl st to first hdc. (88 hdc)
Rnd 12: Ch 1, (10 hdc in next 10 sts, inc in next st) x 8, sl st to first hdc. (96 hdc)
Fasten off Rust Orange yarn and weave in ends on the back side.
Section 2: Raised Segment Ribs (Rust Orange, Surface Crochet)
To create the 6 deep pumpkin segment lines visible in the finished piece:
- Place the Front Panel right-side up. Using stitch markers, mark 6 evenly spaced points along the outer edge of Rnd 12 (every 16 stitches).
- Join Rust Orange yarn at the center Magic Ring on the back side of the panel.
- Working from the center outwards to the first marked point on Rnd 12, work a straight line of Surface Slip Stitches through the fabric.
- Fasten off at the outer edge, pulling the yarn tail to the back.
- Repeat this process for all 6 marked points, creating 6 raised radial lines from center to outer edge.
💡 Designer Tip: Keep your tension relaxed while working surface slip stitches. If your slip stitches are pulled too tightly, the circular panel will pucker or curl.
Section 3: Back Pumpkin Panel (Rust Orange, Make 1)
Using Rust Orange yarn and a 5.0 mm hook:
Rnd 1: Work 8 hdc into a MR, sl st to first hdc to join. (8 hdc)
Rnd 2: Ch 1, work 2 hdc in each st around, sl st to first hdc. (16 hdc)
Rnd 3: Ch 1, (1 hdc in next st, inc in next st) x 8, sl st to first hdc. (24 hdc)
Rnd 4: Ch 1, (2 hdc in next 2 sts, inc in next st) x 8, sl st to first hdc. (32 hdc)
Rnd 5: Ch 1, (3 hdc in next 3 sts, inc in next st) x 8, sl st to first hdc. (40 hdc)
Rnd 6: Ch 1, (4 hdc in next 4 sts, inc in next st) x 8, sl st to first hdc. (48 hdc)
Rnd 7: Ch 1, (5 hdc in next 5 sts, inc in next st) x 8, sl st to first hdc. (56 hdc)
Rnd 8: Ch 1, (6 hdc in next 6 sts, inc in next st) x 8, sl st to first hdc. (64 hdc)
Rnd 9: Ch 1, (7 hdc in next 7 sts, inc in next st) x 8, sl st to first hdc. (72 hdc)
Rnd 10: Ch 1, (8 hdc in next 8 sts, inc in next st) x 8, sl st to first hdc. (80 hdc)
Rnd 11: Ch 1, (9 hdc in next 9 sts, inc in next st) x 8, sl st to first hdc. (88 hdc)
Rnd 12: Ch 1, (10 hdc in next 10 sts, inc in next st) x 8, sl st to first hdc. (96 hdc)
Do not fasten off. Leave working loop on hook for joining.
Section 4: Pumpkin Stem (Walnut Brown, Make 1)
Using Walnut Brown yarn and a 5.0 mm hook:
Foundation: Ch 9. (9 ch)
Row 1: Sc in 2nd ch from hook and in each ch across, turn. (8 sc)
Rows 2 to 8: Ch 1, working in BLO, sc in each st across, turn. (8 sc)
Fasten off, leaving a 14-inch (35 cm) tail for sewing. Fold the stem strip lengthwise and mattress stitch the long edges together to form a thick ribbed stem tab.
Section 5: Sage Leaves (Sage Green, Make 2)
Using Sage Green yarn and a 5.0 mm hook:
Foundation: Ch 10. (10 ch)
Rnd 1: Sc in 2nd ch from hook, hdc in next ch, dc in next 4 ch, hdc in next ch, sc in next ch, (1 sc, ch 2, 1 sc) in last ch to turn corner; working along opposite side of foundation chain: sc in next ch, hdc in next ch, dc in next 4 ch, hdc in next ch, sc in last ch, sl st to first sc to join. (18 sts + 1 ch-2 tip space)
Fasten off, leaving a 12-inch (30 cm) tail for sewing. Make a second identical leaf.
Assembly
- Join Body Panels: Lay the Front Panel over the Back Panel with wrong sides facing together (surface ribs on the outside).
- Using the working Rust Orange yarn from the Back Panel, ch 1 and work 1 sc through both layers in each stitch around Rnd 12. Join with a sl st to the first sc. (96 sc) Fasten off and weave in end.
- Attach Stem: Center the Walnut Brown stem at the top edge of the pumpkin across 8 stitches of the outer border. Using a tapestry needle and the long yarn tail, stitch the stem securely through both panel layers.
- Attach Leaves: Position the two Sage Green leaves at the base of the stem, angled outward as shown in the step-by-step photos. Using a tapestry needle, sew the leaf bases firmly into place at the top rim.
Finishing
- Attach Hanging Cord: Thread the 12-inch natural jute cord through the top loop of the crocheted stem. Tie the ends securely in a knot on the back side, or splice into a neat continuous loop.
- Weave Ends: Secure all remaining yarn tails on the back of the piece using your tapestry needle.
- Steam Blocking: Lay the finished pumpkin face down on a blocking mat. Lightly steam with an iron (holding iron 2 inches away from fabric) to flatten any curling edges and define the surface ribs.
Size Customization Tips
Need a different size for your space? Use these gauge calculations to scale your project:
- Small Trivet / Mug Rug (6.0 in / 15 cm): Stop after Rnd 6 on both panels (48 hdc per panel). Work surface ribs to Rnd 6, then join edge with sc. Use 100% cotton yarn for hot dish trivets!
- Large Wreath Centerpiece (15.0 in / 38 cm): Continue increasing pattern for 3 additional rounds:
- Rnd 13: (11 hdc, inc) x 8 (104 hdc)
- Rnd 14: (12 hdc, inc) x 8 (112 hdc)
- Rnd 15: (13 hdc, inc) x 8 (120 hdc)
Each additional round adds approximately 1.0 inch (2.5 cm) to the overall diameter.
Care Instructions
- Cleaning: Spot clean with a damp cloth and mild soap. Lay flat to dry.
- Outdoor Use: If hanging on an exterior front door, keep under a covered porch or overhang to prevent sun fading and rain damage.
- Storage: Store flat between sheets of cardboard during off-seasons to maintain crisp segment definition.
FAQ
Can I make this easy crochet pumpkin door hanger in cotton yarn instead of acrylic?
Yes! 100% worsted weight cotton yarn works wonderfully. Cotton creates a slightly heavier hanger with zero fuzziness, which is ideal if your front door gets direct sunlight or wind.
How do I stop my circular pumpkin panels from rippling?
If your flat circle begins to wave or ripple, your tension may be too loose or your increase placement too stacked. Ensure you maintain even tension and consider offsetting your increase stitches on even-numbered rounds.
Can I turn this flat pumpkin pattern into a stuffed 3D pillow?
Absolutely. Follow the pattern as written, but before joining the final 15 stitches around the outer border in Assembly, stuff the interior with polyester fiberfill to your desired plushness, then seal shut.
Happy Crocheting!
Your Welcome Pumpkin Crochet Door Hanger is ready to add handmade autumn warmth to your home! Save this pattern to your favorite Thanksgiving crochet decor board on Pinterest, and share your finished color combinations with us in the comments below!
📄 Your free PDF pattern
⏳ Preparing your free PDF… 30s
Like this one? Save it for later.