Plump Turkey Gnome Crochet Shelf Sitter Free Thanksgiving Pattern
Reader Favorites










Mini Granny Square Crochet Christmas Ornament Free Christmas Pattern

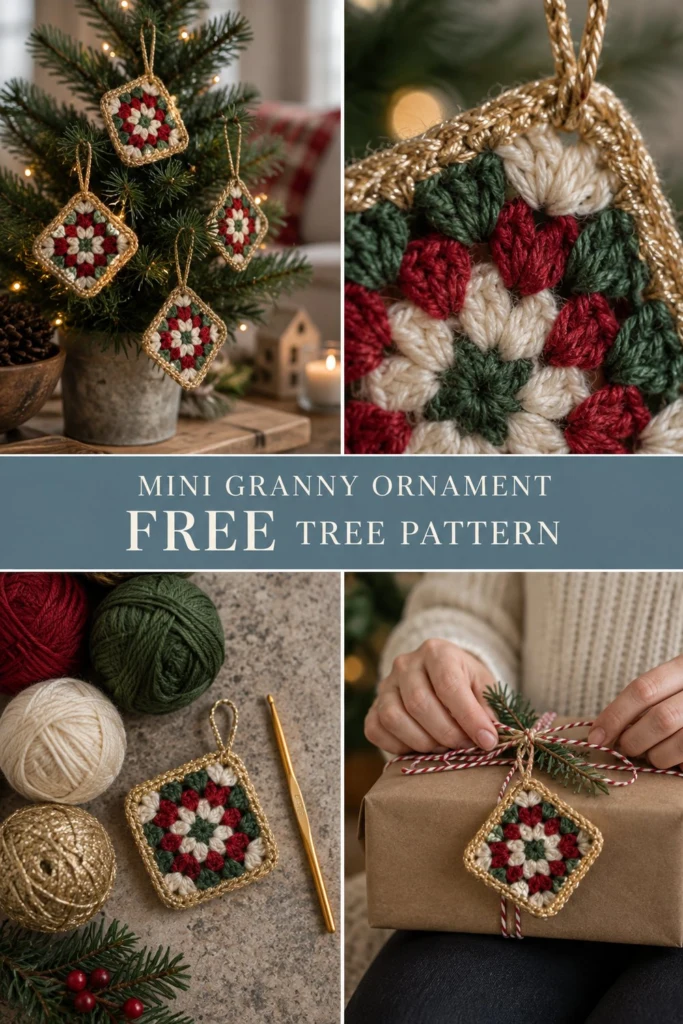
Brighten your tree and holiday packages with these classic mini granny square ornaments, crocheted in traditional shades of forest green, crimson red, and warm cream. Framed by a shimmering metallic gold single crochet edge and turned on point like delicate diamond pendants, these quick motifs make a wonderful festive addition to your holiday crafting. Sandwiching a thin square of craft felt between two granny motifs keeps each ornament perfectly flat, crisp, and ready to hang.
Mini Granny Square Crochet Christmas Ornament Free Christmas Pattern
Quick Facts
- Skill level: Easy / Advanced Beginner
- Finished size: 3.5 in x 3.5 in (9 cm x 9 cm) per square ornament (excluding hanging loop)
- Yarn: Light Worsted / DK (Weight 3) yarn in Forest Green, Crimson Red, Cream, and Metallic Gold
- Hook: 3.75 mm (US F/5) crochet hook
- Stitches used: Chain (ch), single crochet (sc), double crochet (dc), slip stitch (sl st)
- Time to make: 30 to 40 minutes per ornament
Custom size adjustments and scaling options are included later in this guide.
What Makes This Mini Granny Square Ornament Special
- Sturdy Double-Layer Construction: Joining two granny motifs back-to-back with an inner felt core prevents curling and gives the ornament a weighted, high-end feel.
- Metallic Frame & Hanging Loop: A continuous gold border binds the layers together while forming an integrated loop at the top corner in one seamless round.
- Scrap-Buster Friendly: Requires minimal yarn per motif, making this an ideal scrap yarn christmas stash-buster.
- Multi-Use Holiday Decor: Hang them on your tree as a crochet christmas ornament, string them into bunting garlands, or tie them to wrapped packages as handmade gift tags.
Skill Level
To make this project, you should be comfortable with:
* Starting rounds with a magic ring.
* Basic stitches: chain, single crochet, double crochet, and slip stitch.
* Changing colors neatly between rounds.
* Working into chain spaces.
If you are looking for an easy crochet ornament or a quick granny square christmas project, this step-by-step tutorial is gentle on beginners and quick to complete.
Finished Measurements
| Measurement | Inches | Centimeters |
|---|---|---|
| Square Width & Length | 3.5 in x 3.5 in | 9.0 cm x 9.0 cm |
| Diagonal Point-to-Point | 5.0 in | 12.5 cm |
| Hanging Loop Length | 3.0 in | 7.5 cm |
Materials You Will Need
| Material / Color | Yarn Weight / Description | Quantity Needed (Per Ornament) | Quantity Needed (Set of 6) |
|---|---|---|---|
| Color A: Forest Green | Light Worsted / DK (100% Acrylic or Cotton) | 7 yds / 6.4 m | 42 yds / 38 m |
| Color B: Crimson Red | Light Worsted / DK (100% Acrylic or Cotton) | 6 yds / 5.5 m | 36 yds / 33 m |
| Color C: Cream | Light Worsted / DK (100% Acrylic or Cotton) | 7 yds / 6.4 m | 42 yds / 38 m |
| Color D: Metallic Gold | DK Metallic Yarn or Gold Thread | 8 yds / 7.3 m | 48 yds / 44 m |
| Crochet Hook | 3.75 mm (US F/5) aluminum hook | 1 hook | 1 hook |
| Stiff Craft Felt | Cream or White felt sheet (3.25 in x 3.25 in insert) | 1 piece | 6 pieces |
| Tapestry Needle | Yarn needle with large eye | 1 needle | 1 needle |
| Scissors | Precision yarn snips | 1 pair | 1 pair |
Yarn Suggestions
| Yarn Brand & Line | Fiber Content | Skein Details | Notes |
|---|---|---|---|
| Paintbox Yarns Simply DK | 100% Acrylic | 302 yds (276 m) / 100 g | Excellent stitch definition with vibrant holiday shade options. |
| Scheepjes Catona | 100% Mercerized Cotton | 137 yds (125 m) / 50 g | Smooth cotton thread finish that holds sharp corners. |
| Rico Creative Rico Essentials Metallic | 70% Viscose, 30% Polyester | 262 yds (240 m) / 50 g | Provides metallic shimmer for the gold framing round. |
⚠️ Note: Avoid novelty, fuzzy, or bouclé yarns for this mini granny square ornament. Clean, smooth yarns ensure that the cluster stitches and corner chain spaces stay neat and crisp.
Gauge
| Measurement Type | Count | Dimensions |
|---|---|---|
| Granny Motif Gauge | Rounds 1 to 4 of motif complete | 3.5 in x 3.5 in (9.0 cm x 9.0 cm) |
| Stitch Gauge (dc) | 18 dc x 9 rnds | 4 in x 4 in (10 cm x 10 cm) |
Abbreviations
| Abbreviation | Full Term (US Crochet Terminology) |
|---|---|
| ch | chain |
| ch-sp | chain space |
| dc | double crochet |
| rnd(s) | round(s) |
| sc | single crochet |
| sk | skip |
| sl st | slip stitch |
| st(s) | stitch(es) |
UK Conversion: sc = dc (double crochet), dc = tr (treble crochet).
Special Stitches Explained
1. Magic Ring (Magic Loop)
Wrap yarn around your index and middle fingers to form a loop. Insert hook into loop, yarn over, pull up a loop, ch 1 to secure. Work specified first-round stitches inside the adjustable loop, then pull the tail tightly to close the hole.
2. Granny Cluster (3-dc Group)
A group of 3 double crochet stitches worked into the same chain space: yarn over, insert hook into space, yarn over, pull up a loop, [yarn over, draw through 2 loops] twice. Work 3 total dc into the designated chain space.
Pattern Instructions
Pattern Notes
- Work in joined rounds with standard US crochet terms.
- The ornament is made of 2 identical 4-round mini granny squares (Front Motif and Back Motif), joined along the outer edge with a 5th round in Metallic Gold single crochet.
- Starting ch 3 counts as 1 double crochet throughout.
- Color sequence for sample: Rnd 1: Forest Green, Rnd 2: Crimson Red, Rnd 3: Cream, Rnd 4: Forest Green, Rnd 5: Metallic Gold.
Section 1: Front Granny Square Motif (Make 1)
With Color A (Forest Green), form a magic ring.
Rnd 1: Ch 3 (counts as dc), 2 dc into magic ring, ch 2, [3 dc into magic ring, ch 2] 3 times. Pull tail to close magic ring. Join with sl st to top of starting ch-3. Fasten off Color A. (16 sts and spaces: 12 dc, 4 ch-2 sps)
✅ Checkpoint: You should have 4 green 3-dc clusters separated by 4 corner ch-2 spaces.
Rnd 2: Join Color B (Crimson Red) with a sl st in any corner ch-2 sp. Ch 3 (counts as dc), (2 dc, ch 2, 3 dc) in same corner sp. *Ch 1, (3 dc, ch 2, 3 dc) in next corner ch-2 sp; rep from * 2 more times, ch 1. Join with sl st to top of starting ch-3. Fasten off Color B. *(32 sts and spaces: 24 dc, 4 ch-1 sps, 4 ch-2 sps)*
Rnd 3: Join Color C (Cream) with a sl st in any corner ch-2 sp. Ch 3 (counts as dc), (2 dc, ch 2, 3 dc) in same corner sp. *Ch 1, 3 dc in next side ch-1 sp, ch 1, (3 dc, ch 2, 3 dc) in next corner ch-2 sp; rep from * 2 more times, ch 1, 3 dc in last side ch-1 sp, ch 1. Join with sl st to top of starting ch-3. Fasten off Color C. *(48 sts and spaces: 36 dc, 8 ch-1 sps, 4 ch-2 sps)*
Rnd 4: Join Color A (Forest Green) with a sl st in any corner ch-2 sp. Ch 3 (counts as dc), (2 dc, ch 2, 3 dc) in same corner sp. *[Ch 1, 3 dc in next side ch-1 sp] 2 times, ch 1, (3 dc, ch 2, 3 dc) in next corner ch-2 sp; rep from * 2 more times, [ch 1, 3 dc in next side ch-1 sp] 2 times, ch 1. Join with sl st to top of starting ch-3. Fasten off Color A. *(64 sts and spaces: 48 dc, 12 ch-1 sps, 4 ch-2 sps)*
Weave in all yarn ends neatly on the wrong side.
Section 2: Back Granny Square Motif (Make 1)
Repeat Rnds 1 to 4 exactly as written in Section 1 using the same color sequence. Weave in all yarn ends on the wrong side.
✅ Checkpoint: You now have 2 matching 4-round squares measuring 3.5 in x 3.5 in (9 cm x 9 cm).
Section 3: Border & Joining Round (Metallic Gold)
- Cut a square of stiff craft felt measuring 3.25 in x 3.25 in (8.25 cm x 8.25 cm).
- Place the Front Motif and Back Motif with wrong sides facing together, inserting the felt square inside between both layers.
- Align all four corners and edges so the stitch clusters and corner spaces match.
Rnd 5 (Border & Hanging Loop): Working through both layers simultaneously, join Color D (Metallic Gold) with a sl st in any corner ch-2 space designated as the top corner.
- Top Corner: Ch 1, 1 sc in corner ch-2 sp through both layers, ch 25 (hanging loop), 1 sc in same corner ch-2 sp.
- Side 1: [1 sc in each of next 3 dc, 1 sc in side ch-1 sp, 1 sc in each of next 3 dc, 1 sc in side ch-1 sp, 1 sc in each of next 3 dc] through both layers (15 sc across side).
- Corner 2: (1 sc, ch 2, 1 sc) in corner ch-2 sp through both layers.
- Side 2: Work 15 sc across side through both layers.
- Corner 3: (1 sc, ch 2, 1 sc) in corner ch-2 sp through both layers.
- Side 3: Work 15 sc across side through both layers.
- Corner 4: (1 sc, ch 2, 1 sc) in corner ch-2 sp through both layers.
- Side 4: Work 15 sc across side through both layers.
Join with a sl st to the first sc at the base of the hanging loop. Fasten off Color D. (72 sts, spaces, and loop: 68 sc, 3 corner ch-2 sps, 1 hanging loop)
Assembly
- Orient the square so it hangs turned on point (diamond orientation), keeping the hanging loop positioned at the top point.
- Gently pull out the four corners to straighten the edges and center the inner felt core.
Finishing
- Using a tapestry needle, weave the gold tail into the back of the gold single crochet border stitches.
- If necessary, steam block the completed ornament lightly from 2 inches away to smooth out any small creases. Do not touch acrylic yarn directly with a hot iron.
✅ Checkpoint: Your finished ornament will lie flat, hold its square shape, and display a metallic gold border with an integrated hanging loop.
Size Customization Tips
- Miniature Gift Tag (2.5 in / 6.5 cm): Stop after Round 3 of the motif (omitting Round 4) before completing the metallic gold border round.
- Larger Tree Ornament (4.5 in / 11.5 cm): Add a 5th granny motif round using Crimson Red before working the gold border round:
- Rnd 5 (Extra Motif Round): Corner (3 dc, ch 2, 3 dc), *[ch 1, 3 dc in next ch-1 sp] 3 times, ch 1, corner (3 dc, ch 2, 3 dc); rep around.
- Adds 16 stitches per layer (64 dc total per square).
Care Instructions
- Spot Cleaning: Wipe surface spots gently with cold water and mild soap. Avoid soaking to protect the internal felt pad.
- Drying: Lay flat on a clean dry towel.
- Storage: Store flat in a dry container between holiday seasons to prevent metallic threads from snagging.
FAQ
Can I make this pattern as a single-layer ornament?
Yes. Work Section 1 only, then finish with Round 5 (Metallic Gold border and loop) around that single square layer. Lightly spray with starch or fabric stiffener to help the single layer maintain its shape on the tree.
What yarn works best for crisp granny square ornaments?
Mercerized cotton yarn (such as Scheepjes Catona) delivers sharp stitch definition and clean corners. Acrylic DK yarns (like Paintbox Yarns Simply DK) provide a soft finish and vibrant holiday colors.
How do I attach these ornaments to holiday gifts?
Thread baker’s twine or satin ribbon through the gold hanging loop at the top corner and tie it securely around wrapped gifts, gift boxes, or wine bottle necks for a handmade tag embellishment.
Happy Crocheting!
Enjoy making these quick mini granny square ornaments for your home and holiday gifting! Pin this free crochet pattern to your Christmas boards on Pinterest, and share your finished color combinations with fellow crafters.
📄 Your free PDF pattern
⏳ Preparing your free PDF… 30s
Like this one? Save it for later.