Plump Turkey Gnome Crochet Shelf Sitter Free Thanksgiving Pattern
Reader Favorites










Christmas Pudding Crochet Earbuds Case Free Christmas Pattern

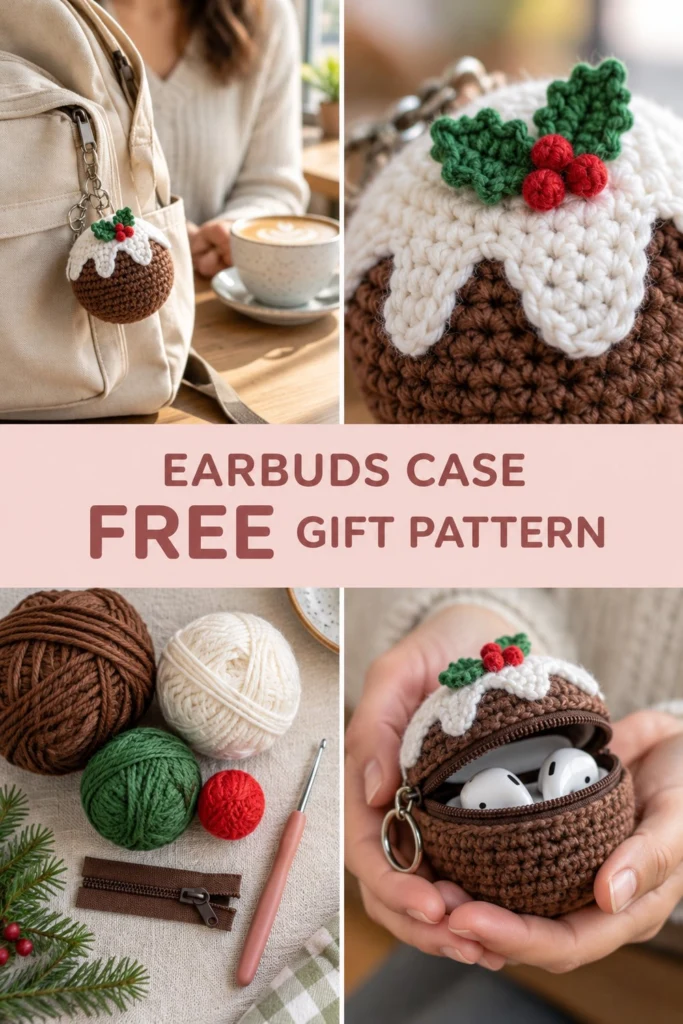
This little Christmas pudding earbuds case is the ultimate stocking stuffer and a joyful way to carry your daily tech. Shaped like a classic holiday dessert with a snowy white drizzle and a handcrafted holly sprig, it clips neatly onto your backpack or key ring so you never misplace your earbuds.
Christmas Pudding Crochet Earbuds Case Free Christmas Pattern
Quick Facts
- Skill level: Intermediate
- Finished size: 3 inches (7.6 cm) wide and 3 inches (7.6 cm) high
- Yarn: Sport-weight mercerized cotton (Brown, Cream, Forest Green, Bright Red)
- Hook: 2.5 mm (C/2) crochet hook
- Stitches used: Chain, single crochet, half double crochet, double crochet, slip stitch, increase, decrease, back loop only
- Time to make: 2 to 3 hours
Size customization tips and gauge notes are included further down to help you adjust your case if needed.
What Makes This Crochet Earbuds Case Special
This adorable pouch combines amigurumi shaping with functional everyday accessories. The bottom half is worked in continuous spiral rounds of single crochet using the standard 6-start amigurumi increase formula to create a firm, rounded bowl shape. A secure half-zip closure is sewn directly into the opening, allowing the case to hinge open smoothly while keeping your earbuds safely tucked inside. On top, textured white icing drips over the brown pudding base, finished off with three plump red berries and a pair of ribbed green holly leaves.
Skill Level
- Working in the round and in rows
- Basic amigurumi shaping (increases and decreases)
- Basic sewing and zipper installation
- Reassurance line: Don’t let the zipper intimidate you; hand-sewing it into place with matching thread is simple when pinned securely!
Finished Measurements
| Dimension | Inches | Centimeters |
|---|---|---|
| Width | 3.0 in | 7.6 cm |
| Height | 3.0 in | 7.6 cm |
| Circumference | 9.4 in | 24.0 cm |
Materials You Will Need
| Item | Color | Yarn Weight / Type | Yards | Meters |
|---|---|---|---|---|
| Pudding Base | Brown | Sport-weight cotton | 45 yds | 41 m |
| Icing | Cream | Sport-weight cotton | 20 yds | 18 m |
| Leaves | Forest Green | Sport-weight cotton | 10 yds | 9 m |
| Berries | Bright Red | Sport-weight cotton | 5 yds | 5 m |
- Crochet Hook: 2.5 mm (US C/2)
- Notions: 3-inch (7.6 cm) brown or beige zipper, sewing needle, matching thread, tapestry needle, stitch markers, polyester fiberfill stuffing, metal keyring with short chain clip.
Yarn Suggestions
| Brand | Yarn Line | Skein Yardage | Notes |
|---|---|---|---|
| Schachenmayr | Catania | 137 yds (125 m) per 50g | Firm stitch definition, perfect for amigurumi |
| Hobbii | Rainbow Cotton 8/4 | 180 yds (165 m) per 50g | Smooth texture, excellent color range |
| Patons | Grace | 136 yds (124 m) per 50g | 100% mercerized cotton with a lovely sheen |
⚠️ Note: Avoid fuzzy acrylic yarns or roving wools for this project. Cotton yarn ensures crisp stitches, sturdy structure, and prevents the zipper teeth from catching on stray fibers.
Gauge
- Stitch Gauge: 24 sts x 26 rows = 4 inches (10 cm) in single crochet
- Circle Gauge: Rnds 1 to 6 of the flat circle = 1.5 inches (3.8 cm) across
Abbreviations
- ch: chain
- sc: single crochet
- hdc: half double crochet
- dc: double crochet
- sl st: slip stitch
- inc: single crochet 2 in same stitch (increase)
- dec: invisible single crochet 2 together (decrease)
- BLO: back loop only
- st(s): stitch(es)
- Rnd(s): round(s)
- Row(s): row(s)
- sk: skip
- FO: fasten off
UK terms translation: sc = dc, hdc = htr, dc = tr.
Special Stitches Explained
- Magic Ring: Wrap yarn around your index finger twice to form a loop. Insert hook into center, pull up a loop, ch 1, and work the required number of sc into the ring. Pull the tail to close.
- Invisible Decrease (dec): Insert hook into the front loop only of the next stitch, then insert hook into the front loop only of the following stitch. Yarn over, pull through both front loops, yarn over, and pull through remaining two loops on hook.
- Puff Stitch: Yarn over, insert hook into stitch, pull up a loop (3 loops on hook). Repeat 3 more times in the same stitch (9 loops on hook). Yarn over and pull through all 9 loops, ch 1 to secure.
Pattern Instructions
Section 1: Pudding Base (Brown, make 2 identical halves)
Working in continuous spiral rounds without joining. Use a stitch marker to track the first stitch of each round.
- Rnd 1: In Brown, start 6 sc in a magic ring (6 sc)
- Rnd 2: Inc in each st around (12 sc)
- Rnd 3: (1 sc, inc) x 6 (18 sc)
- Rnd 4: (2 sc, inc) x 6 (24 sc)
- Rnd 5: (3 sc, inc) x 6 (30 sc)
- Rnd 6: (4 sc, inc) x 6 (36 sc)
- Rnd 7: Working in BLO, sc in each st around (36 sc)
- Rnds 8 to 11: Sc in each st around (36 sc)
FO the first half, leaving a long tail for sewing. On the second half, do not fasten off yet; leave the working yarn attached for zipper installation.
✅ Checkpoint: You should have two bowl-shaped brown pieces measuring about 3 inches across, with a distinct ridge around Rnd 7.
Section 2: Icing Drizzle (Cream, make 2)
Working in joined rounds, slip stitch to join each round and chain 1 to start.
- Rnd 1: In Cream, start 6 sc in a magic ring, sl st to join (6 sc)
- Rnd 2: Ch 1, 2 sc in same st, (sc in next st, 2 sc in next st) x 2, sl st to join (9 sc)
- Rnd 3: Ch 1, (sc in next 2 sts, 2 sc in next st) x 3, sl st to join (12 sc)
- Rnd 4: Ch 1, sc in next st, hdc in next st, (dc, ch 2, dc) in next st, hdc in next st x 3, sl st to join (24 sts)
- Rnd 5: Ch 1, working into the drip points, sc in next 2 sts, (2 sc, ch 1, 2 sc) in ch-2 space, sc in next 2 sts, sl st into next sc from previous round x 3, sl st to join. FO leaving a long tail (36 sts)
Section 3: Holly Leaves (Forest Green, make 2)
- Row 1: In Forest Green, ch 7, sc in 2nd ch from hook, hdc in next ch, dc in next ch, hdc in next ch, sc in next ch, (1 sc, ch 2, 1 sc) in last ch. Working along the opposite side of foundation chain: sc in next ch, hdc in next ch, dc in next ch, hdc in next ch, sc in next ch, sl st to first st to join. FO leaving a long tail (14 sts)
Section 4: Berries (Bright Red, make 3)
- Rnd 1: In Bright Red, start 5 sc in a magic ring, sl st to join (5 sc)
- Rnd 2: Ch 1, sc2tog x 2, sc in last st, sl st to join. FO leaving a short tail to pull the berry into a tight sphere (3 sc)
Assembly
- Zipper Setup: Pin the closed zipper along the inner raw edge of Rnds 8 to 11 of both brown halves so that half the zipper tape sits inside the opening. Using matching thread, hand-sew the zipper tape securely to the inside of both brown halves, leaving the zipper pull accessible on the side.
- Stuffing: Lightly stuff fiberfill into both halves behind the zipper structure to give the pudding its rounded dome shape without bulging into the earbud cavity.
- Icing Placement: Sew one Cream icing piece onto the top half of the pudding dome using the long tail, aligning the drip points so they cascade naturally over the brown base.
- Holly & Berries: Stitch the two Forest Green holly leaves overlapping slightly near the top center of the icing. Cluster the three Bright Red berries tightly in the center where the leaves overlap, anchoring them securely.
- Keyring Attachment: Sew the metal keyring loop securely through several stitches at the back top edge of the pudding base where the zipper ends meet.
Finishing
Weave in all remaining yarn ends securely on the inside of the case. Trim thread tails and inspect the zipper to ensure it opens and closes smoothly without catching on the cotton stitches.
Size Customization Tips
- To make a slightly larger case for bulkier wireless earbuds, work an extra increase round in the pudding base: Rnd 7: (5 sc, inc) x 6 (42 sc), then adjust your icing pattern by adding an extra repeat.
- Each additional 6-stitch increase round adds approximately 0.8 inches (2 cm) to the overall diameter of the case.
Care Instructions
Spot clean gently with a damp cloth and mild soap. Do not submerge completely in water to protect the metal zipper and maintain the shape of the stuffed case. Air dry flat.
FAQ
Can I use acrylic yarn instead of cotton?
Cotton yarn is strongly recommended because it provides the crisp stitch definition and firm structure needed to hold the shape of a zippered case. Acrylic yarn tends to stretch and may catch on the zipper teeth.
How do I install the zipper without a sewing machine?
Hand-sewing the zipper is actually much easier for small amigurumi projects! Use straight pins or sewing clips to hold the zipper tape firmly against the wrong side of the crochet fabric, then use a backstitch with matching thread to secure it stitch by stitch.
Is this case safe for toddlers?
While the case is adorable, it contains small parts (the red berries) and metal hardware. If making this as a toy for a child under 3, embroider French knots for the berries instead of crocheting 3D spheres, and omit the metal keyring.
Happy Crocheting!
I hope you love making this festive little Christmas pudding earbuds case as much as I loved designing it for you! Be sure to save this pin on Pinterest to your holiday crochet boards, and leave a comment below letting me know what colors you chose for your pudding. Happy holidays and happy crocheting!
📄 Your free PDF pattern
⏳ Preparing your free PDF… 30s
Like this one? Save it for later.