Plump Turkey Gnome Crochet Shelf Sitter Free Thanksgiving Pattern
Reader Favorites










Chunky Christmas Crochet Doormat Free Christmas Pattern

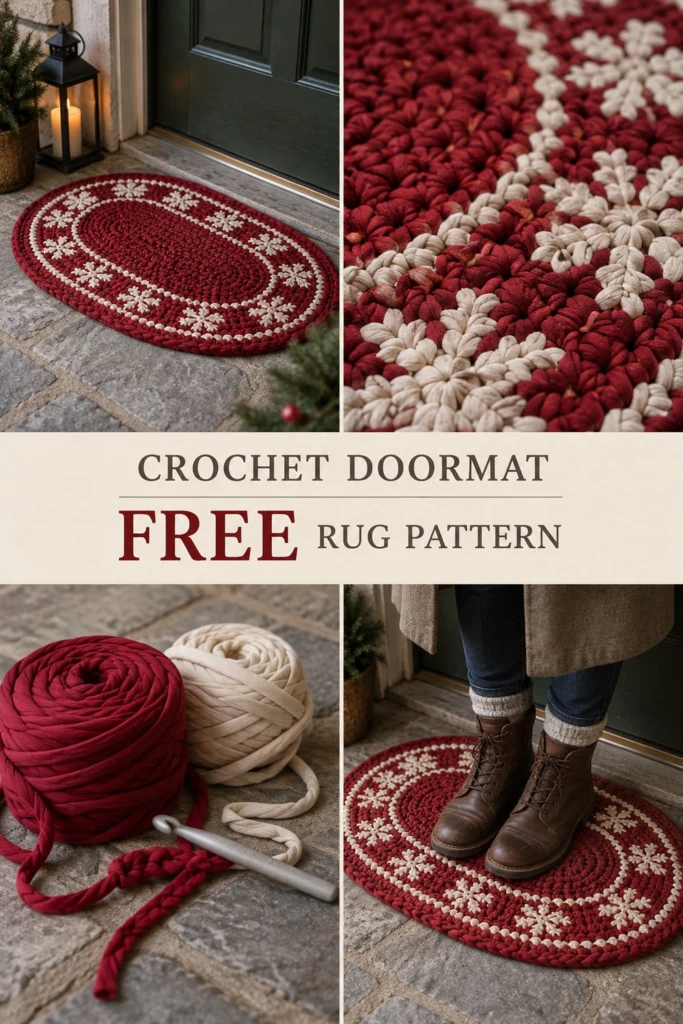
Welcome holiday guests to your front porch with this thick, heavy-duty holiday entrance rug. Worked with plush jumbo t-shirt yarn and a large hook, this oval rug works up quickly in dense single crochet stitches that easily withstand snowy boots. The rich Cranberry Red center is framed by a Cream snowflake motif band, adding a classic festive accent to your winter home decor.
Chunky Christmas Crochet Doormat Free Christmas Pattern
Quick Facts
- Skill level: Easy / Advanced Beginner
- Finished size: 22 in wide x 34 in long (56 cm x 86 cm)
- Yarn: Jumbo T-Shirt Yarn (Weight 7 / Super Bulky) in Cranberry Red and Cream
- Hook: 15.0 mm (US Size Q / P-19)
- Stitches used: Chain (ch), single crochet (sc), single crochet increase (inc), slip stitch (sl st), spike/snowflake stitch (SF st)
- Time to make: 2 to 3 hours (1 weekend project)
Note: Specific guidance on modifying the length or width of this mat is provided in the Size Customization Tips section below.
What Makes This Chunky Christmas Crochet Doormat Special
- Durable Heavyweight Texture: Thick t-shirt yarn gives this rug structural weight, ensuring it stays firmly in place on hard porch stone, tile, or wood decking.
- Oval Construction: Built from a central foundation chain worked in continuous oval rounds, producing smooth curved ends without corner curling.
- Fair-Isle Snowflake Motif Ring: Colorwork spikes form a repeating star/snowflake graphic ring between two solid accent rows, creating an iconic Scandinavian holiday aesthetic.
- Rapid Weekend Project: Thanks to the 15.0 mm hook and jumbo gauge, you can complete this entire doormat in just 10 simple rounds.
Skill Level
This project is rated Easy / Advanced Beginner. Beginners who know basic stitches will find this straightforward, while intermediate crocheters will enjoy the fast finish.
- Working in joined rounds around a central foundation chain
- Basic single crochet increases (2 sc in one stitch)
- Changing yarn colors at the end of a round
- Working spike stitches over previous rounds (explained below)
If you can chain and work single crochet stitches, you have all the skills needed to make this rug!
Finished Measurements
| Dimension | Inches | Centimeters |
|---|---|---|
| Length | 34 in | 86 cm |
| Width | 22 in | 56 cm |
| Thickness | 0.75 in | 2 cm |
Materials You Will Need
| Material | Details | Quantity / Yardage |
|---|---|---|
| Main Color (MC) | Jumbo T-Shirt Yarn (Weight 7), Cranberry Red | 250 yds / 228 m |
| Contrast Color (CC) | Jumbo T-Shirt Yarn (Weight 7), Cream | 80 yds / 73 m |
| Crochet Hook | 15.0 mm (US Size Q / P-19) aluminum or ergonomic hook | 1 hook |
| Tapestry Needle | Extra-large blunt yarn needle (or 8.0 mm hook for weaving ends) | 1 needle |
| Stitch Marker | Locking stitch marker | 1 marker |
Yarn Suggestions
| Yarn Brand & Line | Fiber Content | Skein Details | Designer Notes |
|---|---|---|---|
| Hoooked Zpagetti | 100% Recycled Cotton Jersey | 131 yds (120 m) / 700g cake | Excellent weight and density; ideal for outdoor porch wear. |
| Fox Yarn Jumbo T-Shirt | 100% Recycled Cotton Blend | 110 yds (100 m) / 500g cake | Uniform width strand; smooth finish with zero fraying. |
| Bernat Textile T-Shirt | 100% Recycled Cotton/Polyester | 120 yds (110 m) / 600g cake | Soft yet rugged texture; holds oval shape extremely well. |
⚠️ Note: Avoid delicate acrylic yarns, soft roving, or fuzzy wool for this project. Because this doormat is designed to handle heavy foot traffic and damp winter boots on your porch, stick to high-density t-shirt yarn, cotton tape, or durable recycled jersey yarn. Standard soft plied wool will wear out and pill quickly under footwear.
Gauge
5.5 single crochet stitches and 5 rounds = 4 inches (10 cm) worked in single crochet with a 15.0 mm hook.
| Measurement | Stitches / Rounds | Size |
|---|---|---|
| Stitch Gauge | 5.5 sc | 4 in / 10 cm |
| Row/Round Gauge | 5 rnds | 4 in / 10 cm |
| Center Oval Check | Rnds 1 to 4 | 18 in x 6 in (46 cm x 15 cm) |
Abbreviations
| Abbreviation | Full Term (US Crochet Terms) |
|---|---|
| ch | chain |
| sc | single crochet |
| inc | single crochet increase (work 2 sc into the same stitch) |
| sl st | slip stitch |
| st(s) | stitch(es) |
| rnd(s) | round(s) |
| MC | Main Color (Cranberry Red) |
| CC | Contrast Color (Cream) |
| SF st | Snowflake Spike Stitch (see Special Stitches) |
UK Conversion: sc = double crochet (dc); hdc = half treble (htr); dc = treble (tr).
Special Stitches Explained
Snowflake Spike Stitch (SF st)
- Using Cream (CC), yarn over and insert hook into the indicated stitch 1 round below the current working round.
- Yarn over and pull up a long loop to the full height of the current round ( do not pull tight).
- [Yarn over, insert hook into the exact same stitch 1 round below, yarn over and pull up a loop to full working height] 2 times (7 loops on hook).
- Yarn over and pull through all 7 loops on hook.
- Ch 1 to close and lock the cluster spike. (This ch 1 counts as part of the stitch).
Pattern Instructions
Pattern Notes
- The rug is worked in joined oval rounds from the center out.
- The starting Ch 1 at the beginning of each round does not count as a stitch.
- Always slip stitch into the top of the first single crochet of the round to join (never into the turning chain).
- Carry unused yarn colors loosely along the back of the rug or enclose them inside the single crochet stitches as you work.
Main Doormat Body
Using Cranberry Red (MC) and a 15.0 mm hook, ch 16.
Rnd 1: Sc in 2nd ch from hook and in next 13 ch. Work 3 sc in the last ch. Turn chain work around to stitch down the opposite side of the foundation chain: sc in next 13 ch, work 2 sc in the underside of the starting ch (joining the first sc to complete 3 end sts). Sl st to first sc to join. (32 sc)
Rnd 2: Ch 1, sc in first 13 sts along the straight edge, inc in next 3 sts at the curved end, sc in next 13 sts along the opposite straight edge, inc in next 3 sts at the second curved end. Sl st to first sc to join. (38 sc)
Rnd 3: Ch 1, sc in first 13 sts, [sc in next st, inc in next st] 3 times, sc in next 13 sts, [sc in next st, inc in next st] 3 times. Sl st to first sc to join. (44 sc)
Rnd 4: Ch 1, sc in first 13 sts, [sc in next 2 sts, inc in next st] 3 times, sc in next 13 sts, [sc in next 2 sts, inc in next st] 3 times. Sl st to first sc to join. (50 sc)
✅ Checkpoint: Measure your oval across the middle. It should measure approximately 18 inches (46 cm) long by 6 inches (15 cm) wide.
Rnd 5: Ch 1, sc in first 13 sts, [sc in next 3 sts, inc in next st] 3 times, sc in next 13 sts, [sc in next 3 sts, inc in next st] 3 times. Sl st to first sc to join. (56 sc)
Rnd 6: Ch 1, sc in first 13 sts, [sc in next 4 sts, inc in next st] 3 times, sc in next 13 sts, [sc in next 4 sts, inc in next st] 3 times. Sl st to first sc to join. Fasten off MC. (62 sc)
Snowflake Accent Band
Rnd 7 (Inner Accent Ring): Join Cream (CC) with a sl st in the first st. Ch 1, sc in first 13 sts, [sc in next 5 sts, inc in next st] 3 times, sc in next 13 sts, [sc in next 5 sts, inc in next st] 3 times. Sl st to first sc to join. (68 sc)
Rnd 8 (Snowflake Motif Round): Join Cranberry Red (MC), carrying Cream (CC) behind. Ch 1, sc in first 13 sts. Along the curved end: work [sc in next 6 sts, inc in next st], substituting every 6th stitch with 1 SF st in CC worked 1 round below. Work sc in next 13 sts along straight edge, then [sc in next 6 sts, inc in next st] 3 times around the second curved end with Cream SF st accents. Sl st to first sc to join. (74 sts)
Rnd 9 (Outer Accent Ring): Switch to Cream (CC). Ch 1, sc in first 13 sts, [sc in next 7 sts, inc in next st] 3 times, sc in next 13 sts, [sc in next 7 sts, inc in next st] 3 times. Sl st to first sc to join. Fasten off CC. (80 sc)
Outer Border
Rnd 10: Join Cranberry Red (MC) with a sl st. Ch 1, sc in first 13 sts, [sc in next 8 sts, inc in next st] 3 times, sc in next 13 sts, [sc in next 8 sts, inc in next st] 3 times. Sl st to first sc to join. (86 sc)
Fasten off MC, leaving an 8-inch (20 cm) tail for finishing.
Assembly & Finishing
- Seamless Invisible Join: Thread the ending tail onto your large tapestry needle. Pass the needle under both loops of the second stitch of Rnd 10 (skipping the initial join), then back down into the center of the final sc stitch. Pull snug to mimic a regular stitch loop.
- Weaving Tails: Using your tapestry needle or a smaller crochet hook (8.0 mm), weave all yarn tails through the dense back loops of the matching color sections for at least 3 inches (8 cm). Trim excess fabric yarn closely.
- Steam Blocking (Optional): Flatten the rug on a dry surface. If the edges curl slightly, lay a damp towel over the mat and press lightly with a steam iron on a warm setting. Allow to cool completely before placing outdoors.
Size Customization Tips
- Adding Extra Length: To make the doormat longer while keeping the same width, simply increase the starting foundation chain. Each extra 2 chains added to the foundation chain increases the overall finished rug length by approximately 1.5 inches (3.8 cm).
- Adding Extra Width: To enlarge the entire rug (making it both wider and longer), add additional increase rounds before starting the snowflake band. Maintain the standard oval increase rule: add 6 increase stitches per round divided evenly across the two curved ends (3 increases per end).
Care Instructions
- Daily Maintenance: Shake out dust, dirt, and dried snow vigorously outside.
- Washing: Machine wash separately in cold water on a gentle cycle using mild detergent.
- Drying: Lay flat to dry on a towel or drying rack. Do not tumble dry, as high heat can shrink cotton jersey fabric yarn.
FAQ
Can I use double strands of bulky yarn instead of jumbo t-shirt yarn?
Yes! You can substitute the jumbo t-shirt yarn by holding two or three strands of Super Bulky (Category 6) cotton yarn together to match the 15.0 mm gauge. Make sure your combined yarn thickness produces a stiff fabric so the rug lies flat.
How do I prevent the doormat from slipping on smooth porch floors?
Because t-shirt yarn is made of pure cotton jersey, it has natural grip. However, for polished tile or sealed wood porches, apply a few lines of clear silicone caulk or fabric rubber backing to the underside of the rug and let it dry completely before use.
Is this rug suitable for outdoor winter weather?
Absolutely. T-shirt yarn is thick, absorbent, and durable enough to withstand snow, frost, and muddy winter boots. Simply shake it out clean or machine wash cold as needed.
Happy Crocheting!
You now have a warm, handmade festive rug ready to brighten up your holiday entrance! Save this project to your holiday board on Pinterest and share your finished color combinations with the Hook & Hearth community. Happy crocheting!
📄 Your free PDF pattern
⏳ Preparing your free PDF… 30s
Like this one? Save it for later.