Pocket Advent Crochet Countdown Garland Free Christmas Pattern
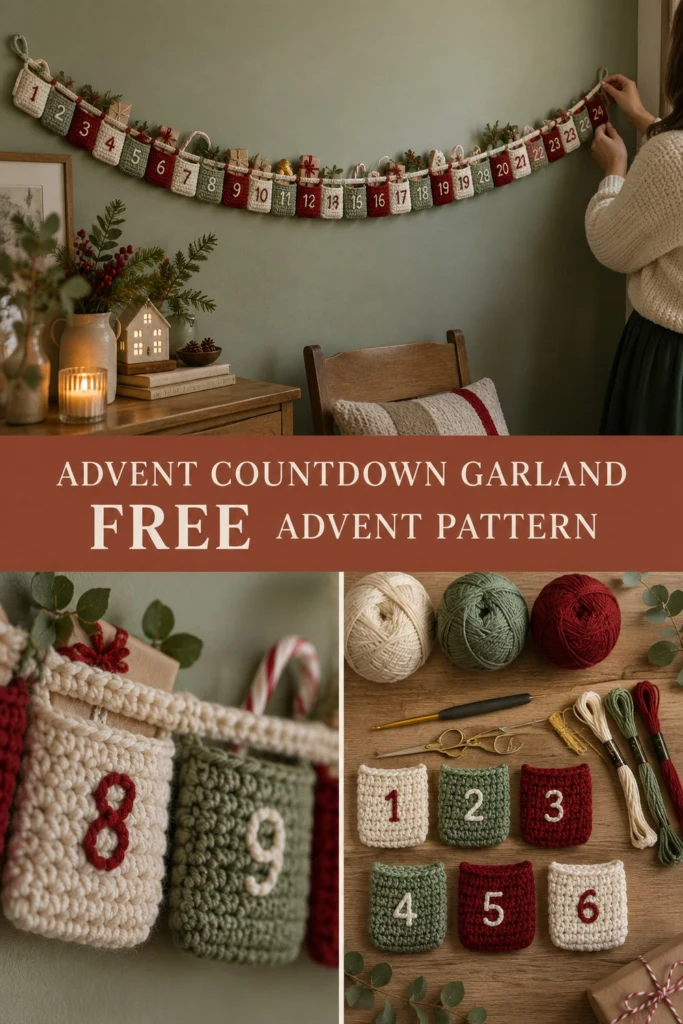
Bring warmth, rustic charm, and an enduring holiday tradition into your home with this heirloom-quality Advent countdown garland. Crafted with sturdy single crochet stitches in timeless tones of Natural Cream, Sage Green, and Crimson Red, each of the 24 numbered pockets holds tiny treasures, sweet notes, or daily treats throughout December. Suspended across a fireplace mantle, entryway wall, or festive shelf, this reusable holiday piece brings handcrafted joy to your home year after year.
Pocket Advent Crochet Countdown Garland Free Christmas Pattern
Quick Facts
- Skill level: Easy / Advanced Beginner
- Finished size: Total garland length approx. 73 in (185 cm); individual pockets approx. 2.8 in x 3.1 in (7 cm x 8 cm)
- Yarn: Worsted weight (Category 4) wool or acrylic blend in Natural Cream, Sage Green, and Crimson Red
- Hook: 4.0 mm (US G/6) crochet hook
- Stitches used: Chain (ch), single crochet (sc), slip stitch (sl st)
- Time to make: 8 to 10 hours total (approx. 15–20 minutes per pocket)
💡 Designer Tip: Need to adjust the length for a smaller banister or display space? Size customization tips are included further down in the article!
What Makes This Pocket Advent Garland Special
Unlike disposable cardboard calendars that end up in the recycling bin each January, this crocheted countdown garland is designed to become a cherished family heirloom.
- Dense, Pill-Resistant Fabric: Worked in tight single crochet rows to ensure pockets maintain their clean rectangular structure without gaping or sagging when filled with goodies.
- Classic Holiday Palette: Alternating shades of Natural Cream, Sage Green, and Crimson Red bring a cozy, Scandinavian-inspired rustic elegance to your festive wall decor.
- Surface Embroidered Numerals: Clean, high-contrast numbers (1 through 24) are stitched onto the flat panels prior to seaming, creating crisp, readable countdown digits.
- Integrated Hanging Cord: A continuous, non-stretch chained single crochet cord carries all 24 pockets with finished hanging loops at both ends for effortless display.
Skill Level
This project is suitable for an advanced beginner.
Required Skills:
– Working simple flat rows in single crochet
– Keeping even tension across small rectangular panels
– Basic seaming using slip stitches or a yarn needle
– Simple surface embroidery (backstitch or duplicate stitch) for numbers 1–24
Even if you are new to making holiday decor, the repeated pocket construction makes this a relaxing, rhythmic project to complete over a few cozy evenings.
Finished Measurements
| Component | Width / Length (Inches) | Width / Length (Metric) |
|---|---|---|
| Flat Pocket Panel (Unfolded) | 2.8 in W x 6.3 in L | 7 cm W x 16 cm L |
| Finished Folded Pocket | 2.8 in W x 3.1 in H | 7 cm W x 8 cm H |
| Main Garland Cord Length | 73 in total length | 185 cm total length |
| Pocket Spacing on Cord | 0.6 in between pockets | 1.5 cm between pockets |
Materials You Will Need
| Material / Item | Details / Specification | Quantity Needed |
|---|---|---|
| Main Yarn – Natural Cream | Worsted Weight (Category 4) | 120 yds (110 m) / 1 ball |
| Main Yarn – Sage Green | Worsted Weight (Category 4) | 100 yds (92 m) / 1 ball |
| Main Yarn – Crimson Red | Worsted Weight (Category 4) | 100 yds (92 m) / 1 ball |
| Embroidery Floss | Stranded cotton in Cream, Crimson, & Green | 1 skein of each |
| Crochet Hook | 4.0 mm (US G/6) or size needed for gauge | 1 hook |
| Tapestry Needle | Blunt tip for weaving ends and seaming | 1 needle |
| Embroidery Needle | Sharp point for numerical stitchwork | 1 needle |
| Scissors | Craft or embroidery scissors | 1 pair |
Yarn Suggestions
| Yarn Brand & Line | Fiber Content | Skein Specs | Notes |
|---|---|---|---|
| Lion Brand Wool-Ease | 80% Acrylic, 20% Wool | 197 yds / 85g | Excellent stitch definition; rustic matte texture. |
| Paintbox Yarns Simply Aran | 100% Premium Acrylic | 201 yds / 100g | Wide color selection, washable, soft, and durable. |
| Knit Picks Mighty Stitch | 80% Acrylic, 20% Superwash Wool | 208 yds / 100g | Smooth finish with vibrant, deep Christmas tones. |
⚠️ Note: Avoid using overly slippery yarns or lightweight DK/sport yarns without adjusting your hook size. Slippery synthetic yarns may cause the pocket seams to stretch or warp when weighted with advent treats.
Gauge
- 18 sc x 20 rows = 4 in x 4 in (10 cm x 10 cm) worked in single crochet with a 4.0 mm hook.
- Single Unfolded Pocket Panel: 13 sts x 32 rows = 2.8 in x 6.3 in (7 cm x 16 cm).
💡 Designer Tip: Taking time to match gauge ensures your 24 pockets turn out identical in size and fit neatly along the total length of the garland cord!
Abbreviations
| Abbreviation | Meaning (US Crochet Terms) |
|---|---|
| ch | chain |
| sc | single crochet |
| sl st | slip stitch |
| st(s) | stitch(es) |
| rep | repeat |
| RS | right side |
| WS | wrong side |
UK Conversion Note: US single crochet (sc) = UK double crochet (dc); US slip stitch (sl st) = UK single crochet (sc).
Special Stitches Explained
Surface Backstitch (Embroidery)
To create smooth, bold numbers on the front of each crocheted pocket:
1. Thread your sharp embroidery needle with 4 to 6 strands of contrasting embroidery floss.
2. Bring the needle up from the WS to the RS at the starting point of your written numeral.
3. Insert the needle back down one stitch length backward along your trace line, then bring it back up one stitch length ahead.
4. Continue stitching backward into the end of the previous stitch to form a solid, continuous embroidered line.
Pattern Instructions
Pattern Notes
- Turning chains do not count as a stitch throughout this pattern.
- Pockets are crocheted flat as rectangular strips (13 sts wide by 32 rows tall), embroidered on the front lower half, and then folded in half and seamed up the sides.
- Color breakdown for 24 pockets:
- 8 Pockets in Natural Cream (embroidered with Crimson Red numbers)
- 8 Pockets in Sage Green (embroidered with Natural Cream numbers)
- 8 Pockets in Crimson Red (embroidered with Natural Cream numbers)
Section 1: Advent Pockets
(Make 8 in Natural Cream, 8 in Sage Green, and 8 in Crimson Red — 24 total)
For each pocket, begin with your selected yarn color:
Foundation: Ch 14.
Row 1 (RS): Sc in 2nd ch from hook and in each ch across, turn. (13 sc)
Row 2 (WS): Ch 1, sc in each st across, turn. (13 sc)
Rows 3–32: Rep Row 2. (13 sc per row)
Fasten off yarn, leaving an 8-inch (20 cm) tail for side seaming.
✅ Checkpoint: Lay your completed rectangle flat. It should measure approximately 2.8 inches (7 cm) wide by 6.3 inches (16 cm) long.
Section 2: Number Embroidery
Before folding and seaming your pockets into pouches, embroider the numerals 1 through 24 onto the lower front panel of each rectangle.
- Lay the pocket strip flat with the RS facing up.
- Fold the bottom edge up by 16 rows to locate the front face of the pocket (Rows 1 to 16 form the front face; Rows 17 to 32 form the back face).
- Using contrasting embroidery floss (Red on Cream pockets; Cream on Green and Red pockets), stitch the numbers centered between Rows 4 and 12, leaving 2 sts free on the left and right margins.
- Secure floss ends tightly on the inner WS of the panel.
Section 3: Pocket Assembly & Side Seams
Once all 24 pocket panels are embroidered:
- Fold the panel in half with RS facing out, aligning Row 1 (bottom edge) with Row 32 (top edge).
- With your 4.0 mm hook and matching pocket yarn, attach yarn at the bottom folded corner.
- Side Seam 1: Sl st evenly through both thicknesses through the row-ends from Row 1 up to Row 16 (16 sl st). Fasten off.
- Side Seam 2: Reattach yarn at the opposite bottom folded corner and sl st through both thicknesses up to the top edge (16 sl st). Fasten off and weave in ends.
Repeat for all 24 pockets.
✅ Checkpoint: You should now have 24 sturdy open-topped pockets measuring approx. 2.8 in wide by 3.1 in tall (7 cm x 8 cm).
Section 4: Garland Mounting Cord
(Make 1 in Natural Cream or Sage Green)
The continuous cord holds all 24 pockets securely across your space.
Foundation: Ch 435.
Row 1 (Cord Base & Loops):
– First Hanging Loop: Sl st into the 12th ch from hook to form a end hanging loop (12 ch loop).
– Main Cord: Sc in each of the next 411 chs across (411 sc).
– Second Hanging Loop: Ch 12, sl st into the base of the last sc worked to form the second end loop (12 ch loop). Do not turn.
Row 2 (Attaching Pockets):
Working along the opposite side of the foundation chain / cord:
– Sc in first 15 sts of the cord (lead-in spacing).
– Hold Pocket 1 behind the cord. Sc through both the top back loops of Pocket 1 (13 sts) and the cord sts simultaneously to attach (13 sc). Sc in next 3 sts along cord alone (spacer).
– Repeat from * to * across for Pockets 2 through 23.
– Hold Pocket 24 behind the cord, sc through Pocket 24 and cord sts (13 sc).
– Sc in remaining 15 sts along cord (tail spacing).
Fasten off and weave in all yarn ends securely.
Total Stitch Accounting for Row 2 Cord Joining:
15 sc (lead-in) + [24 pockets x 13 sc] + [23 spacers x 3 sc] + 15 sc (lead-out) = 411 sc total.
Section 5: Hanging & Final Assembly
- Lay the completed advent countdown garland flat on a blocking mat or steam gently with an iron held 2 inches away to smooth out any curling along the cord.
- Ensure pockets sit flat in numerical order from 1 to 24.
- Hang the garland using decorative brass hooks, wooden pegs, or mantle clips attached to the end cord loops.
- Fill each pocket with small wooden toys, wrapped candies, mini gifts, or seasonal activity scrolls!
Size Customization Tips
- Shorter Display Space (Mantle or Wall): To reduce total garland length to approx. 50 in (127 cm), reduce the spacing between pockets to 1 chain stitch instead of 3, and reduce the lead-in/lead-out spaces to 8 sts each.
- Larger Pockets: To make larger pouches for bigger treats (e.g., 4 in x 4 in / 10 cm x 10 cm), increase foundation chain to 18 chs (17 sc per row) and work 40 rows per panel. Adjust spacing on the main cord accordingly.
Care Instructions
- Washing: Spot clean only with mild wool detergent and lukewarm water. Do not submerge completely if mixed fiber yarns are used.
- Drying: Reshape flat on a towel; air dry thoroughly before filling or storing.
- Storage: Roll the garland gently around cardboard tubing to prevent creasing and store in a cool, dry bin during the off-season.
FAQ
Can I crochet the numbers directly instead of embroidering them?
Yes! If you prefer not to embroider, you can use surface slip stitch during crocheting or attach pre-cut felt numbers using fabric adhesive for a quick, clean finish.
How do I stop the pockets from stretching under heavy gifts?
Working single crochet stitches tightly with a 4.0 mm hook creates a firm, dense fabric that resists stretching. For heavy gifts (like small jam jars or solid toys), line the back interior of each pocket with a scrap piece of matching cotton fabric or stiff felt.
Is this pattern suitable for beginners?
Absolutely! The construction relies on simple flat single crochet rectangles. The main skill required beyond basic stitches is seaming and basic line embroidery for the numbers.
Happy Crocheting!
You are all set to create a lovely, reusable holiday centerpiece that your family will treasure year after year! Save this pattern to your favorite Pinterest Christmas board, and share your finished color choices in the comments below.