Little Corn Cob Crochet Shelf Sitter Free Thanksgiving Pattern

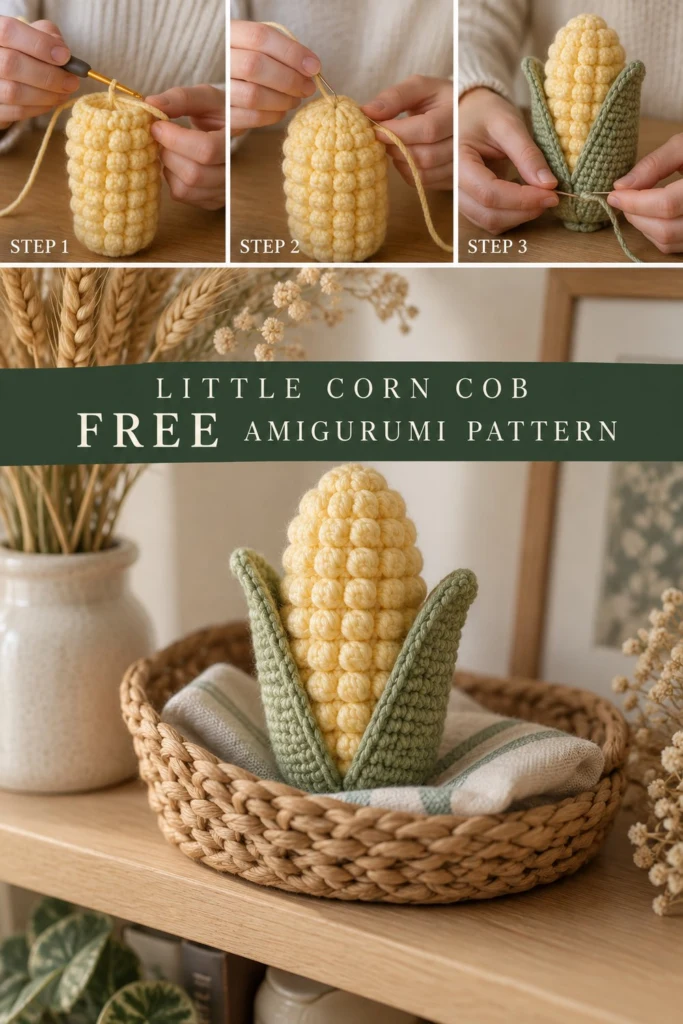
Every Thanksgiving shelf has a pumpkin on it already, so this little crochet corn cob brings something fresh and charming to your fall decor. Stuffed in butter yellow with textured bobble rows and cradled by sage green husk leaves, it stands right on its flat base.
Little Corn Cob Crochet Shelf Sitter Free Thanksgiving Pattern
Quick Facts
- Skill level: Intermediate
- Finished size: 14 cm tall by 9 cm wide
- Yarn: Worsted weight (Category 4) in Butter Yellow and Sage Green
- Hook: 3.5 mm (E-4)
- Stitches used: ch, sl st, sc, bobble, inc, dec
- Time to make: 4 to 5 hours
Size adjustment tips and gauge details are included further down.
What Makes This Little Corn Cob Special
This design relies on continuous amigurumi rounds for a seamless body. Working bobble stitches every third round creates the signature plump kernel texture without extra sewing. The two flat sage green husk leaves are worked in rows and then whip-stitched directly to the base of the cob to give it stability and a realistic nested look.
Skill Level
- Working in the round and in turned rows
- Basic amigurumi increases and invisible decreases
- Bobble stitch technique
- Basic sewing and assembly
Don’t worry if you are new to bobbles; the special stitch guide below breaks it down step by step!
Finished Measurements
| Measurement | Inches | Centimeters |
|---|---|---|
| Height | 5.5 in | 14 cm |
| Diameter at Widest | 3.5 in | 9 cm |
Materials You Will Need
| Material | Color | Yarn Weight / Type | Yards | Meters |
|---|---|---|---|---|
| Main Yarn | Butter Yellow | Worsted / Acrylic-Cotton blend | 85 yds | 78 m |
| Secondary Yarn | Sage Green | Worsted / Acrylic-Cotton blend | 60 yds | 55 m |
- Crochet Hook: 3.5 mm (US E-4)
- Notions: Stitch marker, tapestry needle, polyester fiberfill stuffing, scissors
Yarn Suggestions
| Yarn Line | Weight | Skein Yardage | Notes |
|---|---|---|---|
| Lion Brand Basic Stitch Anti-Pilling | Worsted (4) | 185 yds / 170 m | Excellent stitch definition for bobbles |
| Paintbox Yarns Simply Aran | Worsted (4) | 201 yds / 184 m | Wide range of precise harvest colors |
| Caron Simply Soft | Worsted (4) | 315 yds / 288 m | Soft sheen, great drape for husk leaves |
⚠️ Note: Avoid novelty, eyelash, or extremely fuzzy yarns for this project. They hide the texture of the bobble stitches and make the kernels look muddy rather than crisp.
Gauge
| Stitch Type | Gauge Over 4 in (10 cm) |
|---|---|
| Single Crochet | 20 sts x 22 rows |
| Flat Circle (Rnds 1 to 6) | 2 in (5 cm) across |
Abbreviations
| Abbreviation | US Term |
|---|---|
| ch | chain |
| sl st | slip stitch |
| sc | single crochet |
| bobble | 5-dc bobble stitch |
| inc | single crochet increase (2 sc in one st) |
| dec | invisible single crochet decrease |
| st(s) | stitch(es) |
| rnd(s) | round(s) |
| rep | repeat |
| inv | invisible |
UK crocheters note: US sc = UK dc, US hdc = UK htr, US dc = UK tr.
Special Stitches Explained
- Magic Ring: Wrap yarn around your index finger twice to create a ring. Insert hook into ring, draw up a loop, ch 1, and work the required number of sc into the ring. Pull the tail to close.
- 5-dc Bobble Stitch: [Yarn over, insert hook into stitch, yarn over and pull up loop, yarn over and draw through 2 loops] 5 times in the same stitch. You will have 6 loops on your hook. Yarn over and draw through all 6 loops.
- Invisible Decrease (dec): Insert hook into the front loop only of the next two stitches. Yarn over and pull through both front loops. Yarn over and pull through remaining two loops on hook.
Pattern Instructions
Note: The main cob body is worked in continuous spiral rounds without joining. Use a stitch marker to keep track of the first stitch of each round.
Section 1: Corn Cob Body (Butter Yellow, make 1)
- Rnd 1: Work 6 sc in a magic ring (6 sc)
- Rnd 2: [inc] x 6 (12 sc)
- Rnd 3: [1 sc, inc] x 6 (18 sc)
- Rnd 4: [2 sc, inc] x 6 (24 sc)
- Rnd 5: [3 sc, inc] x 6 (30 sc)
- Rnd 6: [4 sc, inc] x 6 (36 sc)
- Rnd 7: sc in each st around (36 sc)
- Rnd 8: [bobble, 2 sc] x 12 (36 sts)
- Rnds 9 to 10: sc in each st around (36 sc)
- Rnd 11: [1 sc, bobble, 2 sc] x 9 (36 sts)
- Rnds 12 to 13: sc in each st around (36 sc)
- Rnd 14: [bobble, 2 sc] x 12 (36 sts)
- Rnds 15 to 16: sc in each st around (36 sc)
- Rnd 17: [1 sc, bobble, 2 sc] x 9 (36 sts)
- Rnds 18 to 19: sc in each st around (36 sc)
- Rnd 20: [bobble, 2 sc] x 12 (36 sts)
- Rnds 21 to 22: sc in each st around (36 sc)
- Rnd 23: [4 sc, dec] x 6 (30 sc)
- Rnd 24: [3 sc, dec] x 6 (24 sc)
✅ Checkpoint: Stuff the corn cob firmly with polyester fiberfill now before the opening gets too small to maneuver. Shape the cylinder so it stands flat at the bottom.
- Rnd 25: [2 sc, dec] x 6 (18 sc)
- Rnd 26: [1 sc, dec] x 6 (12 sc)
- Rnd 27: [dec] x 6 (6 sc)
Fasten off, leaving a 20 cm tail. Thread the tail through the front loops of the final 6 stitches and pull tight to close the top of the cob. Weave in the end.
Section 2: Husk Leaves (Sage Green, make 2)
Husk leaves are worked in flat rows, turning at the end of each row.
- Ch 9
- Row 1: sc in 2nd ch from hook and in each ch across, turn (8 sc, ch 1)
- Row 2: inc in first st, sc across to last st, inc in last st, turn (10 sc, ch 1)
- Row 3: sc in each st across, turn (10 sc, ch 1)
- Row 4: inc in first st, sc across to last st, inc in last st, turn (12 sc, ch 1)
- Rnds 5 to 16: Repeat Rows 3 and 4 alternately until piece measures 12 sc across (12 sc, ch 1)
- Rnds 17 to 20: sc in each st across, turn (12 sc, ch 1)
- Row 21: dec, sc across to last 2 sts, dec, turn (10 sc, ch 1)
- Row 22: dec, sc across to last 2 sts, dec, turn (8 sc, ch 1)
- Row 23: dec, sc across to last 2 sts, dec, turn (6 sc, ch 1)
- Row 24: dec 3 times, fasten off leaving a long tail for sewing (3 sc)
Assembly
- Position the two Sage Green husk leaves against opposite sides of the Butter Yellow corn cob base, covering the lower third of the cob.
- Align the bottom edge of the husk leaves flush with the flat bottom of the cob so the piece stands upright without tipping.
- Using the long yarn tails and a tapestry needle, whip-stitch the lower edges of the leaves securely to Rnds 3 through 8 of the corn cob body. Leave the upper portions of the leaves loose so they flare outward.
- Secure all remaining yarn ends, trim neatly, and tuck them inside the stitching.
Finishing
Give your corn cob a gentle squeeze to distribute the fiberfill evenly. Check that the base sits level on a flat surface. No blocking is required for the amigurumi body, but you can lightly steam-press the husk leaves if they curl at the edges.
Size Customization Tips
To make a larger corn cob, start with 8 sc in Rnd 1, increase up to 48 sts wide, and add extra straight rounds between bobble rounds. Each additional 6-stitch increase repeat adds roughly 1 inch to the diameter of the finished cob.
Care Instructions
Spot clean gently with a damp cloth and mild soap. Do not submerge in water or machine wash to prevent the polyester stuffing from clumping and losing its shape. Air dry thoroughly.
FAQ
Can I use cotton yarn instead of acrylic?
Yes! Cotton yarn works wonderfully and gives the corn kernels a crisp, defined structure. Just make sure to match the yarn weight to keep the gauge consistent.
How do I make the corn cob stand up straight?
Make sure you push a flat pad of fiberfill directly against the bottom magic ring before stuffing the rest of the cob. Sewing the husk leaves evenly around the bottom ring also anchors the base securely.
Is this pattern beginner-friendly?
If you are comfortable working in continuous rounds and understand basic increases and decreases, you will find this project very straightforward. The bobble stitch is fully explained in the special stitches section.
Happy Crocheting!
I hope you enjoyed making this little corn cob for your autumn decor! Be sure to save this pin on Pinterest and leave a comment below with the colors you chose for your Thanksgiving table.