Snowy Spiral Crochet Christmas Tree Free Christmas Pattern

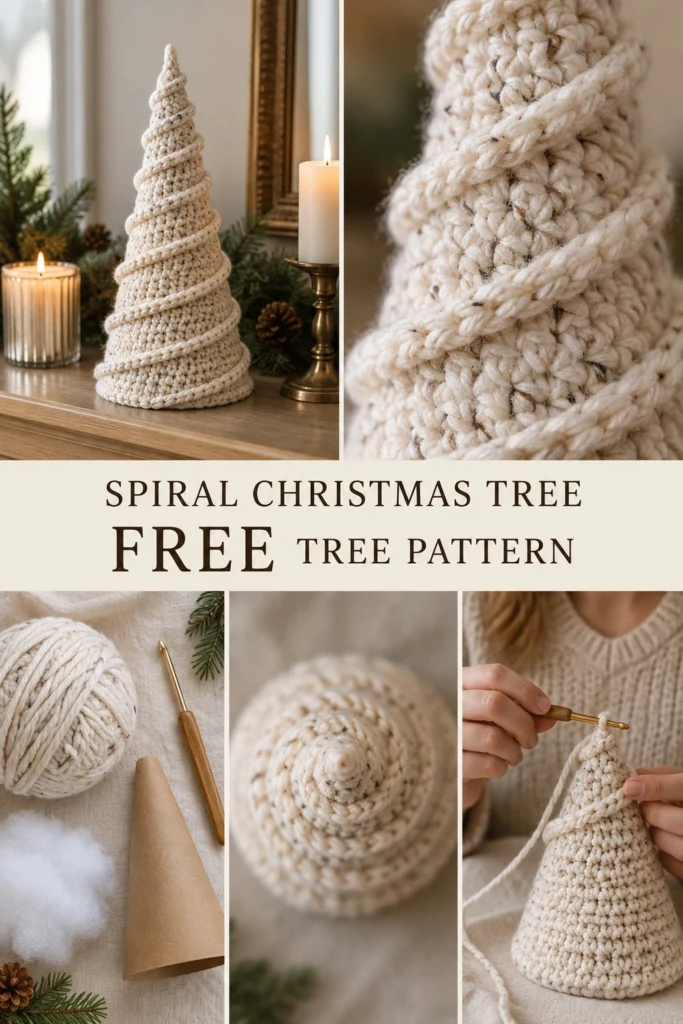
There is something truly magical about mantel decor that makes guests pause mid-sentence, and this snow-flecked cream tree always gets that reaction. By working every round in the back loop only, you leave behind an unbroken spiral of front loops that wind smoothly from base to tip, transforming a simple stuffed cone into a modern heirloom.
Snowy Spiral Crochet Christmas Tree Free Christmas Pattern
Quick Facts
- Skill level: Intermediate
- Finished size: Approximately 11 inches (28 cm) tall and 5.5 inches (14 cm) wide at the base
- Yarn: Lion Brand Wool-Ease Thick & Quick (Oatmeal or Fisherman), Bulky weight #6, approx. 120 yards (110 meters)
- Hook: US J/10 (6.0 mm) crochet hook
- Stitches used: ch, sc, hdc, sl st, BLO, FLO
- Time to make: 3 to 4 hours
Size customization tips and gauge adjustments are included further down.
What Makes This Spiral Crochet Tree Special
Every round of the cone is worked exclusively in the back loop only (BLO). This construction technique leaves a clean, uninterrupted line of unused front loops winding all the way from the wide base up to the sharp tip. Once the cone and base are complete and stuffed, you return to those exposed front loops and work half double crochet stitches into them from the bottom up, instantly raising them into a striking 3D spiral ridge.
Skill Level
- Working in the round in a continuous spiral without joining
- Working into back loops only (BLO) and front loops only (FLO)
- Basic shaping with simple decreases
- Seaming a flat base circle to a three-dimensional cone
You can easily master this design with a little patience and a stitch marker.
Finished Measurements
| Dimension | Inches | Centimeters |
|---|---|---|
| Height | 11 in | 28 cm |
| Base Diameter | 5.5 in | 14 cm |
Materials You Will Need
| Material | Description | Amount |
|---|---|---|
| Yarn | Lion Brand Wool-Ease Thick & Quick (Oatmeal / Snow-flecked Cream) | 120 yards / 110 meters |
| Crochet Hook | US J/10 (6.0 mm) | 1 hook |
| Notions | Stitch markers, yarn needle, fiberfill stuffing, cardboard or heavy paper cone form (optional inner support) | As needed |
Yarn Suggestions
| Yarn Line | Weight | Notes |
|---|---|---|
| Lion Brand Wool-Ease Thick & Quick | Bulky (6) | Gives the ideal rustic texture and structure |
| Bernat Softee Chunky | Bulky (6) | A smooth acrylic alternative with great stitch definition |
| Paintbox Yarns Wool Mix Super Chunky | Super Bulky (6) | Excellent warmth and dense body for cones |
⚠️ Note: Avoid lightweight yarns or loosely spun single-ply rovings for this project. The tree needs a sturdy bulky wool-blend yarn to hold its conical shape and support the raised spiral ridges without sagging.
Gauge
- 10 sc and 11 rows = 4 inches (10 cm) using a 6.0 mm hook.
- Rnds 1 to 5 of the flat circle = 3 inches (7.5 cm) across.
Abbreviations
- ch: chain
- sc: single crochet
- hdc: half double crochet
- sl st: slip stitch
- BLO: back loop only
- FLO: front loop only
- inc: increase (work 2 sc in the same stitch)
- dec: decrease (work 2 sc together)
- st(s): stitch(es)
- rnd(s): round(s)
- rep: repeat
- sk: skip
- t-ch: turning chain
UK terms equivalent: sc = dc, hdc = htr, sl st = sl st.
Special Stitches Explained
- Magic Ring: Form an adjustable loop with the yarn tail, working the first round of stitches directly into the center and pulling the tail tight to close the opening.
- Back Loop Only (BLO): Insert your hook under the back loop of the designated stitch, leaving the front loop unworked.
- Front Loop Only (FLO): Insert your hook under the single exposed front loop left from a previous BLO round to build the raised spiral ridge.
- Invisible Decrease (dec): Insert hook into the front loop only of the next two stitches, yarn over, pull through both front loops, yarn over, and pull through remaining two loops on hook.
Pattern Instructions
Pattern Notes:
– The tree body is worked in a continuous spiral from the tip down to the base. Do not join rounds with a slip stitch; use a stitch marker to track the first stitch of each round.
– Every single round of the tree body is worked in the BLO to preserve the spiral front-loop line.
– Stuff the cone firmly as you go before closing the base.
Section 1: Tree Cone (Oatmeal, make 1)
- Rnd 1: Start 4 sc in a magic ring (4 sc)
- Rnd 2: Working in BLO, sc in each st around (4 sc)
- Rnd 3: Working in BLO, (sc in next st, inc) x 2 (6 sc)
- Rnds 4 to 5: Working in BLO, sc in each st around (6 sc)
- Rnd 6: Working in BLO, (sc in next 2 sts, inc) x 2 (8 sc)
- Rnds 7 to 8: Working in BLO, sc in each st around (8 sc)
- Rnd 9: Working in BLO, (sc in next 3 sts, inc) x 2 (10 sc)
- Rnds 10 to 11: Working in BLO, sc in each st around (10 sc)
- Rnd 12: Working in BLO, (sc in next 4 sts, inc) x 2 (12 sc)
- Rnds 13 to 14: Working in BLO, sc in each st around (12 sc)
- Rnd 15: Working in BLO, (sc in next 3 sts, inc) x 3 (15 sc)
- Rnds 16 to 17: Working in BLO, sc in each st around (15 sc)
- Rnd 18: Working in BLO, (sc in next 4 sts, inc) x 3 (18 sc)
- Rnds 19 to 20: Working in BLO, sc in each st around (18 sc)
- Rnd 21: Working in BLO, (sc in next 2 sts, inc) x 6 (24 sc)
- Rnds 22 to 23: Working in BLO, sc in each st around (24 sc)
- Rnd 24: Working in BLO, (sc in next 3 sts, inc) x 6 (30 sc)
- Rnds 25 to 26: Working in BLO, sc in each st around (30 sc)
- Rnd 27: Working in BLO, (sc in next 4 sts, inc) x 6 (36 sc)
- Rnds 28 to 29: Working in BLO, sc in each st around (36 sc)
- Rnd 30: Working in BLO, (sc in next 5 sts, inc) x 6 (42 sc)
- Rnds 31 to 32: Working in BLO, sc in each st around (42 sc)
- Rnd 33: Working in BLO, (sc in next 6 sts, inc) x 6 (48 sc)
- Rnds 34 to 35: Working in BLO, sc in each st around (48 sc)
- Rnd 36: Working in BLO, (sc in next 7 sts, inc) x 6 (54 sc)
- Rnd 37: Working in BLO, sc in each st around (54 sc)
Fasten off, leaving a long tail of 12 inches (30 cm).
✅ Checkpoint: At the end of Round 37, you should have a firm, perfectly pointed cone measuring about 11 inches tall with 54 stitches around the wide bottom opening.
Section 2: Base Circle (Oatmeal, make 1)
- Rnd 1: Start 6 sc in a magic ring, join with sl st to first sc (6 sc)
- Rnd 2: Ch 1, 2 sc in each st around, join (12 sc)
- Rnd 3: Ch 1, (1 sc, inc) x 6, join (18 sc)
- Rnd 4: Ch 1, (2 sc, inc) x 6, join (24 sc)
- Rnd 5: Ch 1, (3 sc, inc) x 6, join (30 sc)
- Rnd 6: Ch 1, (4 sc, inc) x 6, join (36 sc)
- Rnd 7: Ch 1, (5 sc, inc) x 6, join (42 sc)
- Rnd 8: Ch 1, (6 sc, inc) x 6, join (48 sc)
- Rnd 9: Ch 1, (7 sc, inc) x 6, join (54 sc)
Fasten off with a 12-inch (30 cm) tail.
Section 3: Spiral Ridge Detail (Oatmeal)
- Turn the stuffed tree upside down so you are looking at the base.
- Join yarn with a sl st into the very bottom-most exposed front loop left from your BLO rounds.
- Working upwards along the continuous spiral of front loops, work 1 hdc in each unworked front loop all the way from the base to the tip of the tree.
- At the tip, fasten off securely and weave the ending tail invisibly into the top of the tree.
Assembly
- Stuff the tree cone firmly with fiberfill (inserting an optional cardboard cone inside first helps maintain crisp structural lines).
- Align the Base Circle (54 sc) with the bottom opening of the Tree Cone (54 sts).
- Using the yarn tail from the base circle, whipstitch the base securely to the bottom edge of the tree through both loops, catching the final round securely.
- Fasten off and weave in all remaining yarn ends inside the base.
Size Customization Tips
- To make a shorter tree, stop working increase rounds earlier (for example, ending at Round 27 with 36 sts) and work a smaller matching base circle.
- Each omitted set of increase rounds reduces the tree height by about 1 inch (2.5 cm).
- To make a wider tree, continue adding increase rounds in the pattern of
(sc in next N sts, inc) x 6before finishing with the final straight rounds.
Care Instructions
- Spot clean gently with a damp cloth and mild wool detergent as needed.
- Do not submerge completely in water if you use an internal cardboard support cone.
- Reshape gently while damp and allow to air dry flat on a towel.
FAQ
Can I use a different yarn weight for this tree?
Yes, you can use worsted weight yarn with a 4.0 mm hook for a smaller ornament-sized tree, or super bulky yarn with an 8.0 mm hook for a much larger floor decoration. Just make sure your base circle matches the final stitch count of your cone.
How do I keep the tree cone from getting lumpy when stuffing?
Stuff the cone in small amounts at a time, pushing the fiberfill firmly into the sharp tip first using the back of a crochet hook or a wooden chopstick, then work your way down toward the base. Alternatively, insert a rolled cardstock cone inside the work before final seaming.
Is this pattern suitable for complete beginners?
While it uses basic stitches (sc and hdc), working continuously in back loops only requires careful stitch counting and marker placement, making it ideal for confident beginners and intermediate crocheters ready to try textured shaping.
Happy Crocheting!
I hope you love creating your own snowy spiral crochet tree to add handcrafted warmth to your holiday mantel. Save this pin on Pinterest to your holiday crochet boards, and leave a comment below to let me know what color yarn you are using for your forest!