Jolly Reindeer Crochet Shelf Sitter Free Christmas Pattern

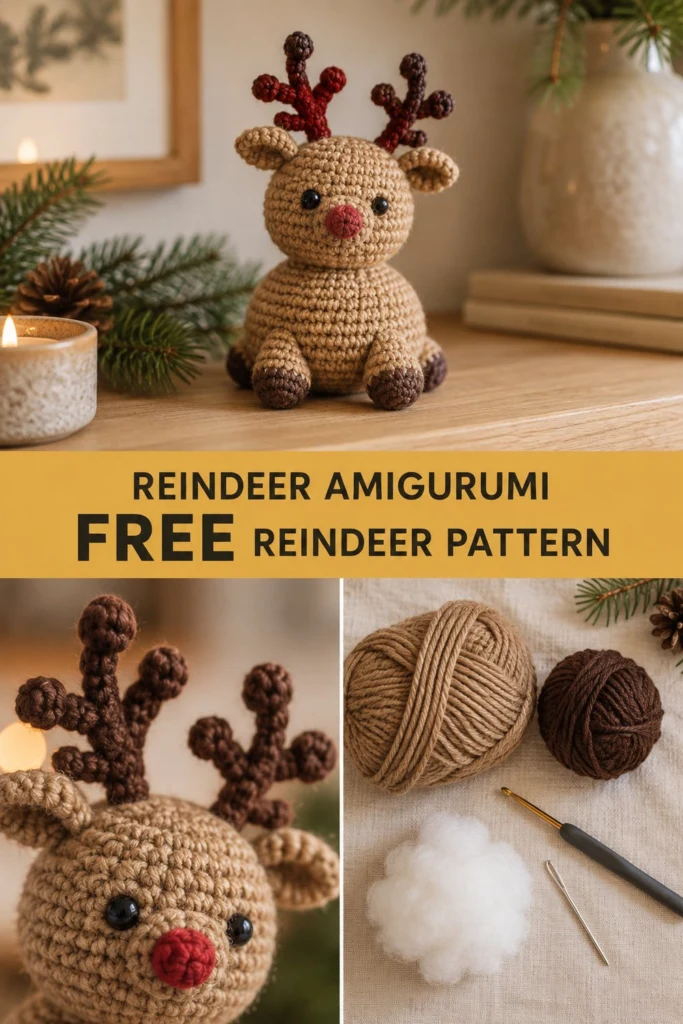
Bring cozy, festive cheer into your home this holiday season with this adorable crochet reindeer shelf sitter. Crafted in warm toffee and chocolate brown yarn, this amigurumi reindeer features clean single crochet stitches, a bright red nose, stubby legs that keep it sitting flat, and flexible branching antlers. It is the perfect handmade touch for your mantelpiece, bookshelf, or holiday display tray.
Jolly Reindeer Crochet Shelf Sitter Free Christmas Pattern
Quick Facts
- Skill level: Intermediate
- Finished size: 18 cm (7 inches) tall when seated
- Yarn: Worsted weight (Medium 4) acrylic yarn in Toffee, Dark Brown, and Red
- Hook: 3.5 mm (US E/4) crochet hook
- Stitches used: ch, sl st, sc, inc, dec, BLO
- Time to make: 4 to 6 hours
Size customization tips are included further down to help you adjust your reindeer if you wish to use a different yarn weight.
What Makes This Reindeer Special
This pattern uses smart amigurumi proportioning so the reindeer sits upright independently without tipping over. The body and head are separate continuous-round spheres stuffed firmly with polyester fiberfill. The hooves start in back loops only to give each stubby leg a clean, defined base. The branching antlers are constructed as simple chains with branched picot stems, allowing them to remain lightweight, properly proportioned, and naturally bendable without needing floral wire.
Skill Level
- Working in continuous spiral rounds
- Increasing and invisible decreasing
- Back loop only (BLO) single crochet
- Basic embroidery and joining amigurumi pieces
If you are new to assembling multi-piece amigurumi, don’t worry—detailed step-by-step placement instructions will guide you through every seam.
Finished Measurements
| Dimension | Measurement (Inches) | Measurement (CM) |
|---|---|---|
| Overall Height (base to antler tip) | 7.0 in | 18 cm |
| Seated Width (ear to ear) | 4.5 in | 11.5 cm |
| Body Depth (front to back) | 4.0 in | 10 cm |
Materials You Will Need
| Material | Color | Weight / Details | Quantity |
|---|---|---|---|
| Main Yarn (Head, Body, Ears, Legs) | Toffee | Worsted (Medium 4) | 75 m / 82 yds |
| Accent Yarn (Hooves, Antlers) | Dark Brown | Worsted (Medium 4) | 30 m / 33 yds |
| Nose Yarn | Red | Worsted (Medium 4) | 5 m / 6 yds |
| Safety Eyes | Black | 8 mm plastic safety eyes | 1 pair (2 eyes) |
| Crochet Hook | – | 3.5 mm (US E/4) | 1 hook |
| Notions | – | Polyester fiberfill stuffing | 40 grams |
| Notions | – | Tapestry needle | 1 needle |
| Notions | – | Stitch markers | 1 marker |
| Notions | – | Scissors | 1 pair |
Yarn Suggestions
| Yarn Line | Weight | Skein Yardage | Notes |
|---|---|---|---|
| Lion Brand Vanna’s Choice | Worsted (4) | 170 yds / 156 m (100g) | Great stitch definition and rich heather shades |
| Paintbox Yarns Simply Aran | Worsted (4) | 201 yds / 184 m (100g) | Soft acrylic available in perfect brown tones |
| Caron Simply Soft | Worsted (4) | 315 yds / 288 m (170g) | Silky sheen with crisp stitch visibility |
⚠️ Note: Avoid using textured, boucle, or overly fuzzy yarns for the main body. Fuzzy fibers hide your stitches and make counting continuous spiral rounds extremely difficult.
Gauge
| Stitch / Round | Measurement (Inches) | Measurement (CM) |
|---|---|---|
| 16 sc x 18 rounds | 4.0 in x 4.0 in | 10 cm x 10 cm |
| Rnds 1 to 6 of Head flat circle | 1.5 in diameter | 3.8 cm diameter |
Abbreviations (US Terms)
| Abbreviation | Full Term |
|---|---|
| ch | chain |
| sl st | slip stitch |
| sc | single crochet |
| inc | single crochet increase (2 sc in same st) |
| dec | invisible decrease (sc2tog using front loops) |
| BLO | back loop only |
| st(s) | stitch(es) |
| Rnd | round |
| FO | fasten off |
UK: sc = dc, hdc = htr, dc = tr.
Special Stitches Explained
- Magic Ring: Form a yarn loop around your fingers, pull up a loop with your hook, and work the specified number of single crochet stitches directly into the ring. Pull the yarn tail firmly to close the central hole completely.
- Invisible Decrease (dec): Insert hook into the front loop only of the first stitch, then immediately into the front loop only of the second stitch. Yarn over, pull through both front loops, yarn over, and pull through the remaining two loops on your hook. This creates a clean decrease without gaps or bumps.
Pattern Instructions
💡 Designer Tip: Work all 3D pieces in continuous spirals without joining with a slip stitch at the end of rounds. Place a stitch marker in the first stitch of each round and move it up as you go.
Section 1: Head (Toffee yarn, make 1)
Rnd 1: Work 6 sc in a magic ring. (6 sc)
Rnd 2: Work 2 sc in each st around. (12 sc)
Rnd 3: (1 sc, inc) x 6. (18 sc)
Rnd 4: (2 sc, inc) x 6. (24 sc)
Rnd 5: (3 sc, inc) x 6. (30 sc)
Rnd 6: (4 sc, inc) x 6. (36 sc)
Rnd 7: (5 sc, inc) x 6. (42 sc)
Rnd 8: Sc in each st around. (42 sc)
Rnd 9: Sc in each st around. (42 sc)
Rnd 10: Sc in each st around. (42 sc)
Rnd 11: Sc in each st around. (42 sc)
Rnd 12: Sc in each st around. (42 sc)
Rnd 13: Sc in each st around. (42 sc)
Rnd 14: Sc in each st around. (42 sc)
Rnd 15: (5 sc, dec) x 6. (36 sc)
Rnd 16: (4 sc, dec) x 6. (30 sc)
Rnd 17: (3 sc, dec) x 6. (24 sc)
💡 Safety Note: If using 8 mm plastic safety eyes, attach them now between Rnds 10 and 11, spaced 5 stitches apart on the front of the head. For toys intended for children under 3 years old, embroider the eyes using black yarn after finishing assembly.
Stuff the head firmly with polyester fiberfill.
Rnd 18: (2 sc, dec) x 6. (18 sc)
Rnd 19: (1 sc, dec) x 6. (12 sc)
Rnd 20: (dec) x 6. (6 sc)
Fasten off, leaving a 20 cm (8 in) tail. Thread the tail onto a tapestry needle, weave through the front loops of the remaining 6 stitches, pull tight to seal, and weave in the end.
Section 2: Body (Toffee yarn, make 1)
Rnd 1: Work 6 sc in a magic ring. (6 sc)
Rnd 2: Work 2 sc in each st around. (12 sc)
Rnd 3: (1 sc, inc) x 6. (18 sc)
Rnd 4: (2 sc, inc) x 6. (24 sc)
Rnd 5: (3 sc, inc) x 6. (30 sc)
Rnd 6: (4 sc, inc) x 6. (36 sc)
Rnd 7: (5 sc, inc) x 6. (42 sc)
Rnd 8: (6 sc, inc) x 6. (48 sc)
Rnd 9: Sc in each st around. (48 sc)
Rnd 10: Sc in each st around. (48 sc)
Rnd 11: Sc in each st around. (48 sc)
Rnd 12: Sc in each st around. (48 sc)
Rnd 13: Sc in each st around. (48 sc)
Rnd 14: Sc in each st around. (48 sc)
Rnd 15: Sc in each st around. (48 sc)
Rnd 16: Sc in each st around. (48 sc)
Rnd 17: (6 sc, dec) x 6. (42 sc)
Rnd 18: Sc in each st around. (42 sc)
Rnd 19: Sc in each st around. (42 sc)
Rnd 20: (5 sc, dec) x 6. (36 sc)
Rnd 21: (4 sc, dec) x 6. (30 sc)
Stuff the body firmly with fiberfill and continue stuffing until complete.
Rnd 22: (3 sc, dec) x 6. (24 sc)
Rnd 23: (2 sc, dec) x 6. (18 sc)
Fasten off, leaving a 30 cm (12 in) tail for sewing the head to the body.
✅ Checkpoint: You should now have one stuffed head sphere measuring approximately 6.5 cm (2.5 in) tall and one stuffed body shape measuring approximately 7.5 cm (3 in) tall with an open neck rim of 18 stitches.
Section 3: Legs (Make 4: Hoof in Dark Brown, Leg in Toffee)
Start with Dark Brown yarn.
Rnd 1: Work 6 sc in a magic ring. (6 sc)
Rnd 2: Work 2 sc in each st around. (12 sc)
Rnd 3: Sc in the BLO of each st around. (12 sc)
Rnd 4: Sc in each st around. (12 sc)
Change to Toffee yarn at the end of Rnd 4.
Rnd 5: Sc in each st around. (12 sc)
Rnd 6: Sc in each st around. (12 sc)
Rnd 7: Sc in each st around. (12 sc)
Rnd 8: Sc in each st around. (12 sc)
Fasten off, leaving a 20 cm (8 in) tail for sewing. Stuff each leg lightly at the hoof end, leaving the top half flat.
Section 4: Ears (Toffee yarn, make 2)
Rnd 1: Work 6 sc in a magic ring. (6 sc)
Rnd 2: (1 sc, inc) x 3. (9 sc)
Rnd 3: (2 sc, inc) x 3. (12 sc)
Rnd 4: (3 sc, inc) x 3. (15 sc)
Rnd 5: Sc in each st around. (15 sc)
Rnd 6: Sc in each st around. (15 sc)
Rnd 7: (3 sc, dec) x 3. (12 sc)
Rnd 8: Sc in each st around. (12 sc)
Fasten off, leaving a 15 cm (6 in) tail. Do not stuff. Pinch the base of each ear flat before sewing.
Section 5: Nose (Red yarn, make 1)
Rnd 1: Work 6 sc in a magic ring. (6 sc)
Rnd 2: Work 2 sc in each st around. (12 sc)
Rnd 3: Sc in each st around. (12 sc)
Rnd 4: (dec) x 6. (6 sc)
Fasten off, leaving a 15 cm (6 in) tail. Stuff lightly with a tiny scrap of fiberfill.
Section 6: Antlers (Dark Brown yarn, make 2)
Main Stem Foundation: Ch 12.
Row 1: Sl st in 2nd ch from hook and next ch.
First Side Branch: Ch 4, sl st in 2nd ch from hook and next 2 ch (3 sl st branch created).
Main Stem: Resume working along foundation chain: sl st in next 3 ch.
Second Side Branch: Ch 4, sl st in 2nd ch from hook and next 2 ch (3 sl st branch created).
Main Stem: Resume working along foundation chain: sl st in remaining 5 ch. (16 sl st total)
Fasten off, leaving a 20 cm (8 in) tail for assembly.
Assembly
- Head to Body: Center the open neck edge of the Body (Rnd 23) over the bottom of the Head (around Rnd 19-20). Using the 30 cm Toffee tail from the body, whipstitch each stitch of Rnd 23 securely to the head, pulling tight after each stitch to eliminate wobbling.
- Nose: Position the Red nose directly on the center front of the head between Rnds 11 and 14 (just below the eyes). Sew in place using the yarn tail.
- Ears: Sew the flattened bases of the two ears to the sides of the head between Rnds 5 and 7, angled slightly backward.
- Antlers: Place the base of each Dark Brown antler on the top of the head between Rnds 2 and 4, spaced about 3 stitches apart. Stitch securely around the base stem.
- Legs: Sew two legs to the front lower edge of the body around Rnds 4 to 8, spaced 2 stitches apart so the hooves point forward. Sew the remaining two legs to the bottom sides around Rnds 4 to 8 to create a wide, stable sitting perimeter.
Finishing
Weave in all remaining loose tails inside the body and head cavity using your tapestry needle. Gently pull on the antlers to shape their branches.
✅ Checkpoint: Place your completed reindeer on a flat table or shelf. It should sit square and stable on its bottom and four legs without falling backward.
Size Customization Tips
- Larger Reindeer: Use a 4.5 mm (US 7) hook with Bulky (Weight 5) yarn. Maintain the same pattern rounds; the finished reindeer will stand approximately 24 cm (9.5 in) tall.
- Miniature Ornament: Use a 2.25 mm (US B/1) hook with Sport / Fine (Weight 2) yarn. The finished ornament will measure around 11 cm (4.3 in) tall, perfect for hanging on a Christmas tree.
Care Instructions
Spot clean with cold water and mild soap. Do not submerge or machine wash, as agitation can distort the internal stuffing and soften the antler branches.
FAQ
Can I substitute plastic safety eyes with embroidery?
Yes! If making this toy for children under 3 years of age, skip plastic safety eyes and embroider two small vertical French knots or simple straight-stitch eyes using black embroidery thread or scrap black yarn.
How do I make the antlers stand upright without wire?
Working the sl st rows with firm tension into a tight chain gives the dark brown yarn plenty of structural rigidity. Sewing the base down over 2 complete rounds of the head provides a solid anchor that keeps them upright naturally.
Why does my reindeer wobble on the shelf?
Wobbling usually happens if the four legs are attached too high or unevenly. Ensure all four leg tops line up between Rnds 4 and 8 on the bottom curve of the body so they form a flat four-point plane with the body bottom.
Happy Crocheting!
Enjoy bringing this festive reindeer shelf sitter into your holiday home! Save this pattern to your holiday crochet board on Pinterest, and share your finished reindeer creation with family and friends!