Puffed Bobble Crochet Stitch Tutorial Free Crochet Pattern
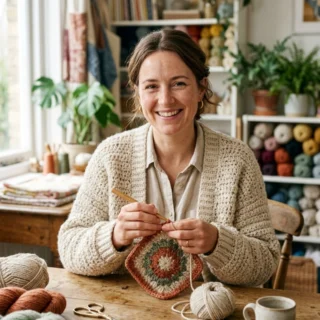
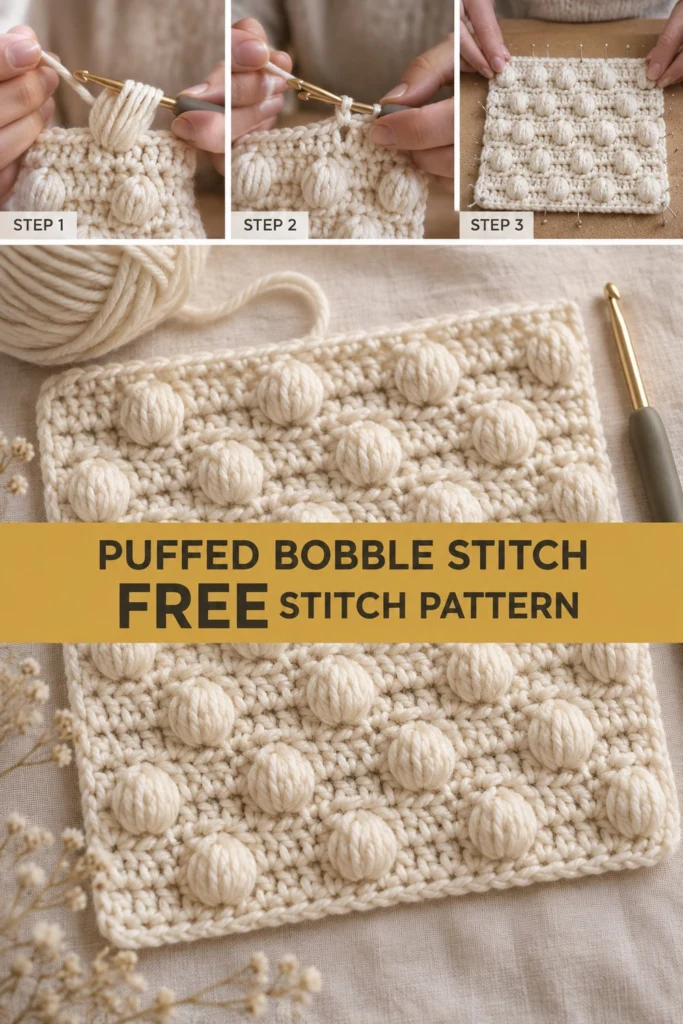
If you have ever tried crocheting a bobble or puff stitch only to end up with flat, squished bumps that sink into the back of your work, this tutorial is designed for you. The puffed bobble stitch creates thick, three-dimensional spheres that pop cleanly off a dense single crochet background, giving your blankets, pillows, and accessories an irresistible touchable texture. In this comprehensive stitch guide, I will walk you through crafting a perfectly square 20 cm (8 in) blocking-ready swatch using a lush cream aran yarn, explaining the exact mechanics to ensure every single bobble stands tall.
Puffed Bobble Crochet Stitch Tutorial Free Crochet Pattern
Quick Facts
- Skill level: Easy / Advanced Beginner
- Finished size: 8 in x 8 in (20 cm x 20 cm)
- Yarn: Natural Cream Aran / Worsted weight yarn (approx. 65 yards / 60 meters)
- Hook: 5.0 mm (US H-8) crochet hook
- Stitches used: Chain (ch), single crochet (sc), puffed bobble (pb)
- Time to make: 1.5 to 2 hours
Custom size adjustments and stitch multiples are included further down in this guide.
What Makes This Puffed Bobble Stitch Swatch Special
Unlike standard 3-double-crochet bobbles that can feel hollow, this stitch uses a full 5-yarn-over cluster worked directly into a single stitch. As shown in the step-by-step photos, drawing all 11 loops off your hook at once creates a dense, plush dome. By alternating 4-bobble and 5-bobble rows separated by plain single crochet rows, the clusters form an even, staggered diamond grid. The dense single crochet base locks the base of each puff in place, ensuring the texture remains raised even after repeated washing and heavy use.
Skill Level
This project is ideal for an Advanced Beginner. You should be comfortable with:
– Working flat rows and turning your work
– Maintaining consistent working yarn tension
– Yarn overs and pulling through multiple loops on the hook
– Working into row ends for a clean edging
💡 Designer Tip: If you can work a standard single crochet, you have all the foundational skills needed to master the puffed bobble stitch today!
Finished Measurements
| Dimension | Inches | Centimeters |
|---|---|---|
| Swatch Width | 8.0 in | 20.0 cm |
| Swatch Height | 8.0 in | 20.0 cm |
Materials You Will Need
| Material | Details | Quantity / Amount |
|---|---|---|
| Main Yarn | Natural Cream (Aran / Medium Weight #4) | 65 yds / 60 m (approx. 40 g) |
| Crochet Hook | 5.0 mm (US H-8) ergonomic inline hook | 1 hook |
| Tapestry Needle | Bent-tip yarn needle for weaving ends | 1 needle |
| Measuring Tape | Flexible vinyl tape measure | 1 tape |
| Blocking Supplies | Foam blocking mat & stainless steel T-pins | 1 set |
Yarn Suggestions
| Yarn Brand & Line | Fiber Content | Skein Weight / Yardage | Notes |
|---|---|---|---|
| Paintbox Yarns Simply Aran | 100% Premium Acrylic | 100 g / 201 yds (184 m) | Excellent stitch definition, smooth glide |
| Lion Brand Wool-Ease | 80% Acrylic, 20% Wool | 85 g / 197 yds (180 m) | Cozy wool feel with great rebound |
| Caron Simply Soft | 100% Acrylic | 170 g / 315 yds (288 m) | Silky shine; use a 4.5 mm hook to keep puffs firm |
⚠️ Note: Avoid heavily textured, fuzzy, or chenille/velvet yarns when learning this stitch. The thick pile obscures the individual loops, making it difficult to count loops on your hook or insert your tool into the base stitch cleanly.
Gauge
| Stitch Pattern | Gauge Count | Measurement |
|---|---|---|
| Single Crochet Background | 15.5 sts x 15 rows | 4 in x 4 in (10 cm x 10 cm) |
✅ Checkpoint: Measure your gauge swatch after Row 6. If your panel measures wider than 8 inches (20 cm), drop down to a 4.5 mm hook. If it measures narrower, switch up to a 5.5 mm hook.
Abbreviations
| Abbreviation | Meaning (US Terms) |
|---|---|
| ch | chain |
| st(s) | stitch(es) |
| sc | single crochet |
| pb | puffed bobble stitch (see Special Stitches) |
| RS | right side (front facing you) |
| WS | wrong side (back facing you) |
| rep | repeat |
| sl st | slip stitch |
| [ ] | repeat instructions within brackets specified number of times |
UK Conversion: sc = double crochet (dc).
Special Stitches Explained
Puffed Bobble Stitch (pb)
- Yarn over (yo), insert your hook into the designated stitch.
- Yo and pull up a loop to the height of a regular single crochet. (3 loops on hook)
- [Yo, insert hook in same st, yo and pull up a loop to same height] 4 more times. You will now have 11 loops resting evenly on your hook stem (Step 1 photo).
- Yo and carefully draw through all 11 loops on your hook in one smooth motion (Step 2 photo).
- Lock the puff: Secure the cluster by working the very next single crochet in the row firmly. Do not add a chain-1 after drawing through unless specified; pulling the next sc tight pops the puffed bobble out toward the RS.
Step 1: Pull up 5 loops (11 total loops on hook)
Step 2: Yarn over, pull through all 11 loops cleanly
Step 3: Lock with a single crochet on the next stitch
Pattern Instructions
Pattern Notes
- Turning chain 1 (ch 1) does not count as a stitch throughout the pattern.
- The puffed bobbles are worked on Right Side (RS) rows and naturally push forward away from you.
- Always keep yarn over loops relaxed and uniform in height during Step 1 so your hook slides smoothly through all 11 loops without snagging.
Swatch Panel (Natural Cream, make 1)
Chain 32.
Row 1 (RS): Sc in 2nd ch from hook and in each ch across (31 sc).
Row 2 (WS): Ch 1, turn, sc in each st across (31 sc).
Row 3 (RS – Bobble Row A): Ch 1, turn, sc in first 6 sts, *pb in next st, sc in next 5 sts; rep from * 2 more times, pb in next st, sc in last 6 sts *(31 sts: 4 pb, 27 sc)*.
✅ Checkpoint: You should have exactly 4 puffed bobbles evenly spaced with 5 single crochets between them and 6 single crochets on each outer border edge.
Row 4 (WS): Ch 1, turn, sc in each st across (be sure to work 1 sc into the top loop of each pb) (31 sc).
Row 5 (RS): Ch 1, turn, sc in each st across (31 sc).
Row 6 (WS): Ch 1, turn, sc in each st across (31 sc).
Row 7 (RS – Bobble Row B): Ch 1, turn, sc in first 3 sts, *pb in next st, sc in next 5 sts; rep from * 3 more times, pb in next st, sc in last 3 sts *(31 sts: 5 pb, 26 sc)*.
✅ Checkpoint: Row 7 creates 5 puffed bobbles staggered directly between the bobbles of Row 3.
Rows 8 to 10: Ch 1, turn, sc in each st across (31 sc).
Row 11 (RS): Rep Row 3 (31 sts: 4 pb, 27 sc).
Rows 12 to 14: Ch 1, turn, sc in each st across (31 sc).
Row 15 (RS): Rep Row 7 (31 sts: 5 pb, 26 sc).
Rows 16 to 18: Ch 1, turn, sc in each st across (31 sc).
Row 19 (RS): Rep Row 3 (31 sts: 4 pb, 27 sc).
Rows 20 to 22: Ch 1, turn, sc in each st across (31 sc).
Row 23 (RS): Rep Row 7 (31 sts: 5 pb, 26 sc).
Rows 24 to 26: Ch 1, turn, sc in each st across (31 sc).
Row 27 (RS): Rep Row 3 (31 sts: 4 pb, 27 sc).
Rows 28 to 30: Ch 1, turn, sc in each st across (31 sc).
Do not fasten off yarn. Proceed directly to the Border.
Border (Natural Cream)
Rotate work 90 degrees clockwise to work along the edges on RS.
Rnd 1:
– Top Edge: Work 31 sc evenly across Row 30.
– Corner 1: (1 sc, ch 1, 1 sc) in corner st.
– Right Side Edge: Work 30 sc evenly along the row ends (1 sc into each row-end).
– Corner 2: (1 sc, ch 1, 1 sc) in corner ch.
– Bottom Edge: Work 31 sc across the opposite side of the foundation chain.
– Corner 3: (1 sc, ch 1, 1 sc) in corner ch.
– Left Side Edge: Work 30 sc evenly along row ends.
– Corner 4: (1 sc, ch 1, 1 sc) in final corner st.
Join with a sl st to the first sc of the border. Fasten off yarn leaving a 6 in (15 cm) tail for weaving (126 sc, 4 ch-1 sps; 130 total elements).
Assembly & Blocking
- Thread your tapestry needle with the yarn tail and weave all ends securely into the back of the dense sc background.
- Dampen the completed swatch with cold water or spray thoroughly with a misting bottle.
- Lay the square face up on your foam blocking mat (Step 3 photo).
- Pin the square down along all four edges using stainless steel T-pins, stretching gently to achieve a perfect 20 cm x 20 cm (8 in x 8 in) square.
- Allow to air dry completely before removing pins.
       [Top Border: 31 sc]
    +-----------------------+
    | O   O   O   O   O     |
    |   O   O   O   O       |
 30 | O   O   O   O   O     | 30
 sc |   O   O   O   O       | sc
    | O   O   O   O   O     |
    |   O   O   O   O       |
    +-----------------------+
      [Bottom Border: 31 sc]
Two Mistakes Beginners Make (And How to Fix Them)
1. Drawing through loops with uneven tension
- The Mistake: Pulling the yarn over loops too tight as you accumulate them on your hook creates a narrow, strangled cluster. When you pull through all 11 loops, the puff gets flattened out against the fabric surface.
- The Fix: Lift your hook upward slightly after pulling up each loop so all 11 loops sit at the same height as a single crochet stitch before closing.
2. Skipping the tight locking single crochet
- The Mistake: Working the single crochet immediately following the bobble loosely, or adding an extra chain-1 that lets the puff collapse backward to the wrong side.
- The Fix: Skip the extra closing chain and work the very next sc firmly. Pull your working yarn snug on that locking stitch to anchor the base and pop the bobble forward permanently.
Three Great Projects for This Stitch
- Textured Accent Pillows: Combine multiple 20 cm squares or work one continuous panel to create high-end geometric throw pillows.
- Modern Tactile Baby Blankets: The staggered bobbles provide a sensory landscape for little hands while keeping the blanket warm and sturdy.
- Cushioned Tote Bags & Sleeves: The extra yarn mass of the 5-yo puff stitch adds built-in padding, making it an ideal choice for laptop sleeves and market bags.
Size Customization Tips
The stitch logic relies on a multiple of 6 + 2 chains (plus 1 for the foundation turning chain, total multiple of 6 + 3).
- To adjust width: Add or subtract in multiples of 6 chains. At our gauge, each 6-stitch repeat equals 1.5 inches (3.8 cm).
- To adjust height: Add or subtract in repeats of 4 rows (1 bobble row + 3 plain sc rows). Each 4-row repeat equals 1.0 inch (2.5 cm).
| Project Type | Foundation Chain | Finished Width | Estimated Yardage |
|---|---|---|---|
| Coaster / Washcloth | Ch 15 (2 repeats) | 4.0 in (10 cm) | 25 yds (23 m) |
| 8″ Swatch (Pattern) | Ch 32 (5 repeats) | 8.0 in (20 cm) | 65 yds (60 m) |
| Standard Pillow Panel | Ch 63 (10 repeats) | 16.0 in (40 cm) | 280 yds (256 m) |
| Baby Blanket | Ch 123 (20 repeats) | 32.0 in (81 cm) | 1,150 yds (1,050 m) |
Care Instructions
- Washing: Machine wash cold on a gentle or delicates cycle using a mild wool/synthetic detergent. Place inside a mesh laundry bag to prevent the bobbles from snagging on zippers or buttons.
- Drying: Lay flat on a clean towel to dry. Do not tumble dry, as high heat can flatten the puff texture or cause acrylic fiber to stretch out.
FAQ
Can I substitute a lighter or heavier yarn for this pattern?
Yes! You can use any yarn weight from DK up to Super Bulky. Choose a hook size recommended on the yarn ball band (or 0.5 mm smaller) to keep the background single crochet stitches dense so stuffing or backing fabric won’t show through.
How do I make the bobbles pop on both sides of the blanket?
The puffed bobble naturally pops away from the worker on Right Side rows. To make a double-sided texture, alternate working bobble rows on RS and WS rows throughout your project.
Is this stitch safe for baby blankets?
Yes. Because the 5-yo puffed bobble is worked into a single solid base stitch and locked tight by adjacent single crochets, there are no long open loops or gaps for tiny fingers to catch on.
Happy Crocheting!
You have now mastered the puffed bobble stitch! Save this article to your favorite Pinterest crochet tutorial boards so you can reference the stitch counts and troubleshooting steps whenever you start your next textured blanket or home decor project. Happy crafting!