Reader Favorites
Little River Otter Crochet Amigurumi Free Crochet Pattern

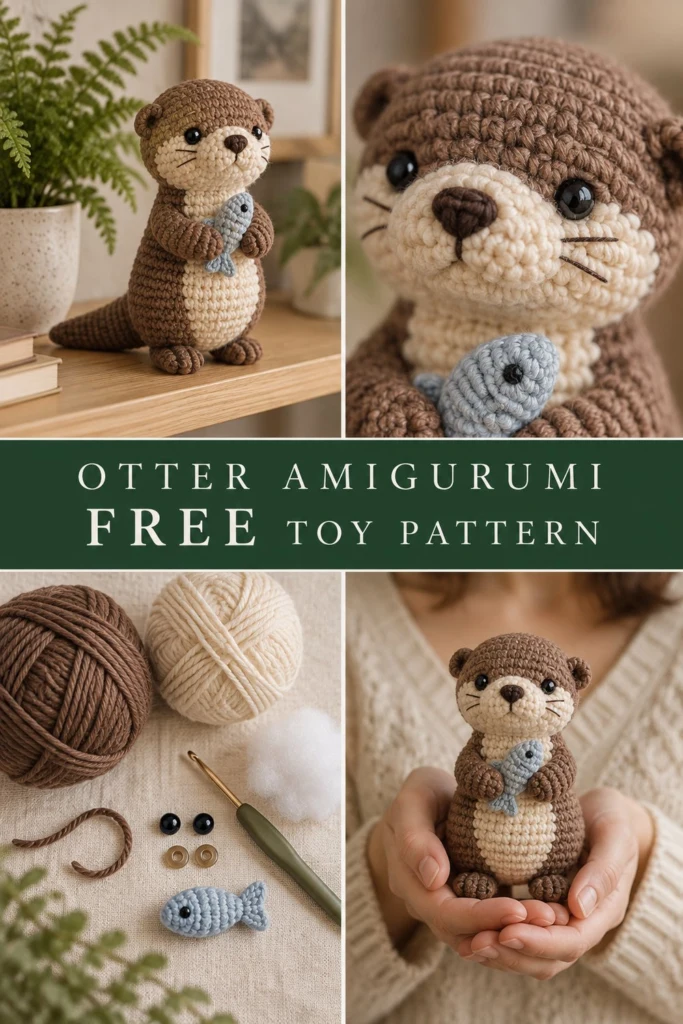
This charming little river otter sits up independently and clutches a tiny crochet fish, making it a delightful companion for both playtime and nursery display. Designed with smooth continuous single crochet rounds and a sweet embroidered face, it is completely safe for babies and toddlers.
Little River Otter Crochet Amigurumi Free Crochet Pattern
Quick Facts
- Skill level: Intermediate
- Finished size: Approximately 6 inches tall sitting down
- Yarn: Worsted weight yarn in Medium Brown, Cream, and Light Blue
- Hook: US C/2 (2.75 mm) crochet hook
- Stitches used: sc, inc, dec, sl st
- Time to make: 5 to 7 hours
Size customization tips are included further down.
What Makes This Crochet Otter Amigurumi Special
The sturdy egg-shaped body is worked in continuous rounds using single crochet stitches for a dense, gap-free fabric that holds its polyester stuffing securely. The cream-colored belly and face patch are seamlessly integrated into the shaping, while mirrored decreases create the tapered tail and stubby limbs. Embroidered facial features eliminate hard plastic components, ensuring it is entirely child-safe.
Skill Level
- Working in the round (spiral)
- Basic increases and invisible decreases
- Color changing across rounds
- Simple embroidery on amigurumi
Don’t worry if you are new to shaping amigurumi; the step-by-step instructions below walk you through every round.
Finished Measurements
| Dimension | Inches | Centimeters |
|---|---|---|
| Height (Sitting) | 6.0 in | 15.0 cm |
| Width (Body) | 3.5 in | 9.0 cm |
| Depth (Base to Tail) | 5.0 in | 13.0 cm |
Materials You Will Need
| Item | Color / Details | Amount |
|---|---|---|
| Worsted Weight Yarn (Color A) | Medium Brown | 90 yards (82 meters) |
| Worsted Weight Yarn (Color B) | Cream | 35 yards (32 meters) |
| Worsted Weight Yarn (Color C) | Light Blue | 10 yards (9 meters) |
| Embroidery Floss | Dark Brown & Black | Small amounts for eyes and whiskers |
| Crochet Hook | US C/2 (2.75 mm) | 1 hook |
| Notions | Polyester fiberfill stuffing | 1 handful |
| Notions | Stitch marker, tapestry needle, scissors | As needed |
Yarn Suggestions
| Yarn Line | Weight | Skein Yardage | Notes |
|---|---|---|---|
| Lion Brand Vanna’s Choice | Worsted (4) | 170 yards | Excellent stitch definition for toys |
| Caron Simply Soft | Worsted (4) | 315 yards | Gives a soft, slightly sheen finish |
| Red Heart Super Saver | Worsted (4) | 364 yards | Durable and holds shape well |
⚠️ Note: Avoid novelty, eyelash, or super fluffy yarns for this project, as they obscure the stitch count and make working continuous amigurumi rounds difficult.
Gauge
- 22 sts x 24 rounds = 4 in / 10 cm in single crochet using a 2.75 mm hook.
- Rnds 1 to 6 of the head/body flat circle measure approximately 2.0 in (5 cm) across.
Abbreviations
| Abbreviation | Meaning |
|---|---|
| ch | chain |
| sc | single crochet |
| inc | increase (work 2 sc in the same st) |
| dec | invisible decrease (insert hook into front loops of next 2 sts, yo, pull through both, yo, pull through remaining 2 loops) |
| sl st | slip stitch |
| st(s) | stitch(es) |
| Rnd(s) | round(s) |
| fo | fasten off |
UK conversion: sc = dc.
Special Stitches Explained
- Magic Ring: Wrap yarn around your index finger twice to form a ring, insert hook through center, yarn over and pull up a loop, chain 1, and work the required number of sc into the ring. Pull the tail to close tightly.
- Invisible Decrease (dec): Insert hook through the front loop only of the next stitch, then immediately insert hook through the front loop only of the following stitch. Yarn over and pull through both front loops, yarn over and pull through final two loops on hook.
Pattern Instructions
Pattern Notes
- Work in continuous spiral rounds without joining unless specified. Place a stitch marker in the first stitch of each round and move it up as you go.
- Stuff the pieces firmly as you work, unless instructed otherwise.
Section 1: Head and Body (Worked as one piece)
Head (Color A)
– Rnd 1: Start 6 sc in a magic ring (6 sc)
– Rnd 2: (inc) x 6 (12 sc)
– Rnd 3: (1 sc, inc) x 6 (18 sc)
– Rnd 4: (2 sc, inc) x 6 (24 sc)
– Rnd 5: (3 sc, inc) x 6 (30 sc)
– Rnd 6: (4 sc, inc) x 6 (36 sc)
– Rnds 7 to 11: sc in each st around (36 sc)
– Rnd 12: 12 sc, switch to Color B for face patch: 12 sc, switch to Color A: 12 sc (36 sc)
– Rnd 13: 11 sc in Color A, switch to Color B: 14 sc, switch to Color A: 11 sc (36 sc)
– Rnd 14: 11 sc in Color A, switch to Color B: 14 sc, switch to Color A: 11 sc (36 sc)
– Rnd 15: (4 sc, dec) x 2 in Color A, 2 sc in Color A, switch to Color B: (1 sc, dec) x 4, switch to Color A: 2 sc, (4 sc, dec) x 2 (30 sc)
– Rnd 16: (3 sc, dec) x 6 (Transitioning entirely back to Color A) (24 sc)
Begin stuffing the head firmly.
- Rnd 17: (2 sc, dec) x 6 (18 sc)
Transition to Body (Color A and Color B)
– Rnd 18: (2 sc, inc) x 6, incorporating Color B across stitches 7 to 12 for the belly patch (24 sc)
– Rnd 19: (3 sc, inc) x 6, with 8 sc in Color B centered on the belly (30 sc)
– Rnd 20: (4 sc, inc) x 6, with 10 sc in Color B (36 sc)
– Rnd 21: (5 sc, inc) x 6, with 12 sc in Color B (42 sc)
– Rnds 22 to 30: sc in each st around, maintaining 14 sc in Color B on the front belly and the rest in Color A (42 sc)
– Rnd 31: (5 sc, dec) x 6, keeping belly color centered (36 sc)
– Rnd 32: (4 sc, dec) x 6, keeping belly color centered (30 sc)
Stuff the body firmly with fiberfill.
- Rnd 33: (3 sc, dec) x 6 (24 sc)
- Rnd 34: (2 sc, dec) x 6 (18 sc)
- Rnd 35: (1 sc, dec) x 6 (12 sc)
- Rnd 36: (dec) x 6 (6 sc)
- Fo, leaving a tail. Thread through front loops of remaining 6 sts and pull tight to close.
✅ Checkpoint: You should now have a solid egg-shaped torso with an integrated cream belly and a rounded head.
Section 2: Muzzle (Color B, make 1)
- Rnd 1: Start 6 sc in a magic ring (6 sc)
- Rnd 2: (inc) x 6 (12 sc)
- Rnds 3 to 4: sc in each st around (12 sc)
- Fo, leaving a long tail for sewing. Lightly stuff and sew to the lower center of the face over rounds 12 to 15.
Section 3: Ears (Color A, make 2)
- Rnd 1: Start 5 sc in a magic ring (5 sc)
- Rnd 2: (inc) x 5 (10 sc)
- Rnds 3 to 4: sc in each st around (10 sc)
- Fo, flattening the open end. Do not stuff. Sew to the top sides of the head around Rnds 6 to 9.
Section 4: Arms (Color A, make 2)
- Rnd 1: Start 6 sc in a magic ring (6 sc)
- Rnd 2: (1 sc, inc) x 3 (9 sc)
- Rnds 3 to 7: sc in each st around (9 sc)
- Fo, leaving a tail for sewing. Lightly stuff the tips. Sew to the upper chest so they angle inward toward the center.
Section 5: Legs (Color A, make 2)
- Rnd 1: Start 6 sc in a magic ring (6 sc)
- Rnd 2: (1 sc, inc) x 3 (9 sc)
- Rnds 3 to 4: sc in each st around (9 sc)
- Fo, leaving a tail. Lightly stuff and attach to the lower base of the body so the otter can sit upright.
Section 6: Tail (Color A, make 1)
- Rnd 1: Start 4 sc in a magic ring (4 sc)
- Rnd 2: (1 sc, inc) x 2 (6 sc)
- Rnd 3: (2 sc, inc) x 2 (8 sc)
- Rnd 4: sc in each st around (8 sc)
- Rnd 5: (3 sc, inc) x 2 (10 sc)
- Rnd 6: (4 sc, inc) x 2 (12 sc)
- Rnds 7 to 12: sc in each st around (12 sc)
- Rnd 13: (4 sc, dec) x 2 (10 sc)
- Rnds 14 to 15: sc in each st around (10 sc)
- Fo, leaving a long tail. Lightly stuff. Sew firmly to the lower back so it acts as a kickstand for sitting.
Section 7: Tiny Fish (Color C, make 1)
- Ch 9
- Row 1: Working in back bumps of chain: sc in 2nd ch from hook, hdc in next 2 ch, dc in next 2 ch, hdc in next 2 ch, 3 sc in last ch. Working along opposite side of foundation chain: hdc in next 2 ch, dc in next 2 ch, hdc in next 2 ch, 2 sc in last ch. Sl st to first st to join. (20 sts)
- Fo, weave in ends. Shape the tail gently with your fingers. Place between the otter’s hands and tack down with a few stitches.
Assembly & Finishing
- Embroider the nose on the muzzle using dark brown embroidery floss in a small triangle shape.
- Embroider eyes on rounds 11 to 12, about 5 stitches apart, using French knots or straight stitches in black floss. Add three small horizontal whiskers on each cheek.
- Secure all yarn tails inside the body and trim cleanly.
Size Customization Tips
To make a larger otter, switch to a bulky weight yarn (Weight 5) and a US H/8 (5.0 mm) hook; each extra increase round adds roughly 1.5 inches to the final height. For a miniature pocket version, use fingering weight yarn (Weight 1) and a 1.75 mm hook.
Care Instructions
Hand wash gently in cool water with mild wool detergent. Do not bleach. Lay flat in the shade to dry completely. Do not tumble dry or iron.
Frequently Asked Questions
Can I use safety eyes instead of embroidery?
Yes, you can use 6mm black safety plastic eyes inserted between rounds 11 and 12. However, embroidered eyes are strongly recommended if making this toy for children under 3 years old.
How do I keep the color changes clean on the belly?
When changing colors between Color A and Color B, always drop the working color to the back and pick up the new color on the last yarn-over of the previous stitch to prevent jagged color stairs.
Why won’t my otter sit up straight?
Ensure you have stuffed the lower body firmly and positioned the tail slightly lower on the back so it acts as a third balance point alongside the legs.
Happy Crocheting!
I hope you love bringing this little river otter to life. Be sure to save this pattern on Pinterest for later, and leave a comment below to share what color combination you chose for your otter and its fish!
📄 Your free PDF pattern
⏳ Preparing your free PDF… 30s
Like this one? Save it for later.