Reader Favorites
Structured Mini Crochet Shoulder Bag Free Crochet Pattern

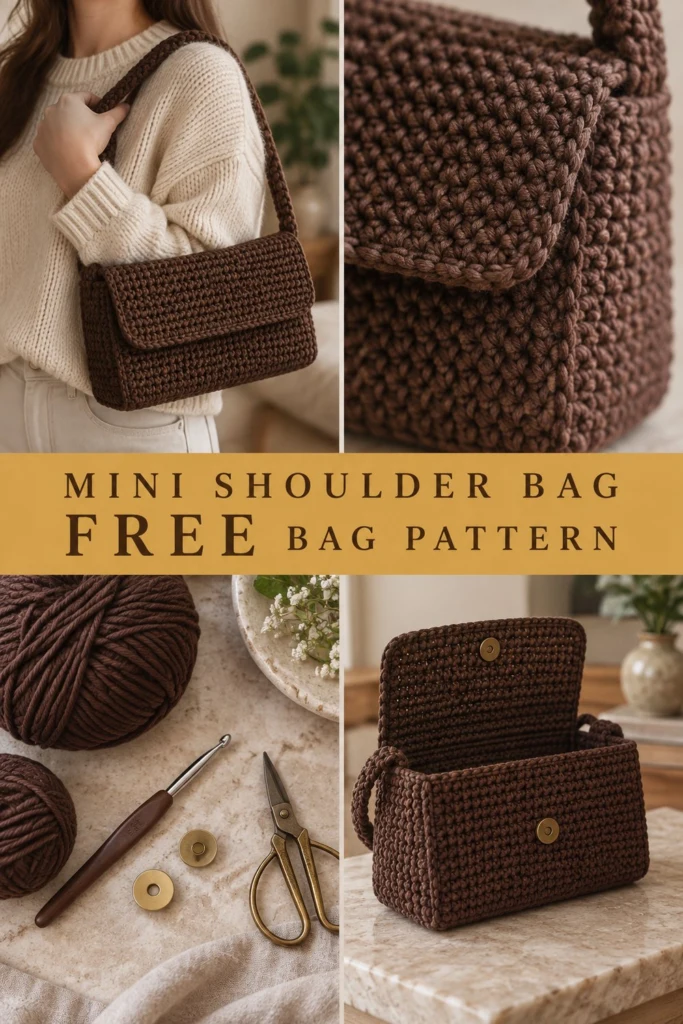
Floppy crochet bags are out, and this little one stands up completely on its own thanks to a clever stitch choice and sturdy yarn. If you want a modern everyday accessory that holds its shape without a plastic or fabric lining, this piece is a wonderful project to add to your handmade wardrobe.
Structured Mini Crochet Shoulder Bag Free Crochet Pattern
Quick Facts
- Skill level: Intermediate
- Finished size: 9 inches wide, 5.5 inches high, 3.5 inches deep (strap length: 22 inches)
- Yarn: Chunky / bulky weight cotton blend in Rich Brown
- Hook: 5.0 mm (US H/8) crochet hook
- Stitches used: Ch, sl st, sc, blo, wassat (waistcoat stitch)
- Time to make: 4 to 6 hours
💡 Designer Tip: Size customization tips are included further down if you prefer a slightly larger or wider bag.
What Makes This Structured Mini Crochet Shoulder Bag Special
The secret weapon of this bag is the waistcoat stitch (also known as the knit stitch). By working single crochet stitches directly through the “V” of the stitch post below rather than under the top loops, you lock the yarn tightly in place. This creates a dense, sturdy fabric that naturally stands upright, mimicking a leather or canvas handbag. A crisp single back-loop-only (BLO) round creates a sharp 90-degree corner at the base, while a fold-over flap secured with a bronze magnetic snap completes the professional finish.
Skill Level
- Working in joined and spiral rounds
- Mastering the waistcoat stitch (detailed below)
- Basic sewing and magnetic snap installation
- Reassurance: Don’t worry if the waistcoat stitch feels snug at first; maintaining a loose tension will make it easy to insert your hook.
Finished Measurements
| Dimension | Inches | Centimeters |
|---|---|---|
| Width | 9.0 in | 22.9 cm |
| Height | 5.5 in | 14.0 cm |
| Depth | 3.5 in | 9.0 cm |
| Strap Length | 22.0 in | 56.0 cm |
Materials You Will Need
| Material | Description | Quantity / Amount |
|---|---|---|
| Yarn (Rich Brown) | Rich Brown Chunky Cotton/Acrylic Blend (Bulky / Weight 5) | 350 yards / 320 meters |
| Crochet Hook | 5.0 mm (US H/8) | 1 hook |
| Notions | Bronze Magnetic Snap Set (18mm) | 1 set |
| Notions | Tapestry Needle | 1 needle |
| Notions | Stitch Markers | 2 markers |
| Notions | Sharp Scissors | 1 pair |
Yarn Suggestions
| Yarn Line | Skein Yardage | Notes |
|---|---|---|
| Lion Brand Wool-Ease Thick & Quick | 106 yds / 97 m per skein | Great stitch definition, holds shape exceptionally well |
| Bernat Maker Home Dec | 317 yds / 290 m per ball | Tubular yarn that gives a crisp, modern look |
| Lily Sugar’n Cream Super Size (held double) | 200 yds / 184 m per ball | 100% cotton structure |
⚠️ Note: Avoid super-soft, slippery acrylic yarns or lightweight lace yarns, as they will cause the bag to slouch and lose its structured shape.
Gauge
- 14 sts x 16 rows = 4 inches in waistcoat stitch using a 5.0 mm hook.
- Base check: The starting chain foundation measures approximately 8 inches long.
Abbreviations
- beg – beginning
- blo – back loop only
- ch – chain
- dec – decrease (sc2tog)
- inc – increase (2 sc in same st)
- rep – repeat
- rnd(s) – round(s)
- row(s) – row(s)
- sc – single crochet
- sl st – slip stitch
- st(s) – stitch(es)
- wassat – waistcoat stitch (center single crochet)
UK Terms Translation: UK sc = US sc, UK hdc = US hdc, UK dc = US dc.
Special Stitches Explained
- Waistcoat Stitch (wassat): Insert your hook directly between the two legs of the “V” formed by the stitch in the previous round (piercing straight through the center of the post from front to back), yarn over, pull up a long loop, yarn over, and pull through both loops on the hook. Keep your tension loose to ensure smooth hook insertion.
- Invisible Decrease (dec): Insert hook in front loop only of next st, then front loop only of following st, yarn over, pull through both front loops, yarn over, and pull through remaining two loops.
Pattern Instructions
Pattern Notes
- Working rounds are joined with a slip stitch unless otherwise noted.
- Do not pull your turning or joining slip stitches too tight, as you need to work into them in the next round.
- Use a stitch marker to keep track of the start of each round.
Section 1: Bag Base
Using Rich Brown:
* Ch 27.
* Row 1: Working in the back bumps of the chain, sc in 2nd ch from hook, sc in each ch across to last ch, 3 sc in last ch. Working along the opposite side of the foundation chain, sc in each ch across to the final ch, 2 sc in final ch. Join with sl st to first sc. (54 sc)
* Rnd 2: Ch 1, inc in first st, 24 sc, inc in each of the next 3 sts, 24 sc, inc in each of the last 2 sts. Join with sl st. (60 sc)
* Rnd 3: Ch 1, sc in first st, inc in next st, 24 sc, (sc in next st, inc in next st) x 3, 24 sc, (sc in next st, inc in next st) x 2. Join with sl st. (66 sc)
* Rnd 4: Ch 1, sc in each st around. Join with sl st. (66 sc)
✅ Checkpoint: Your flat base oval should measure approximately 8 inches by 3.5 inches and lie completely flat.
Section 2: Bag Body
- Rnd 5 (BLO Turn): Ch 1, working in blo only, sc in each st around. Join with sl st. (66 sc)
- Rnd 6: Ch 1, working in wassat, work 1 wassat in each st around, working in the spiral without joining (place marker at start of round). (66 wassat)
- Rnds 7 to 20: Continue working 1 wassat in each st around in a spiral. (66 wassat per rnd)
- Rnd 21: Sl st into the next st to smooth the transition, ch 1, sc in each st around. Join with sl st. (66 sc)
- Fasten off, leaving a 6-inch tail to weave in.
Section 3: Bag Flap
The flap is worked in turned rows directly from the back top edge of the bag body.
* Row 1: With the bag facing you, locate the center 22 stitches along the back edge. Attach Rich Brown with a sl st in the first of these 22 sts, ch 1, sc in the same st, sc in next 21 sts. Turn. (22 sc)
* Row 2: Ch 1, inc in first st, sc in next 20 sts, inc in last st. Turn. (24 sc)
* Row 3: Ch 1, sc in each st across. Turn. (24 sc)
* Rows 4 to 12: Rep Row 3 (9 more rows). Turn at the end of Row 12. (24 sc)
* Row 13: Ch 1, dec, sc in next 20 sts, dec. Turn. (22 sc)
* Row 14: Ch 1, dec, sc in next 18 sts, dec. Turn. (20 sc)
* Fasten off, weaving in all ends.
Section 4: Shoulder Strap
- Ch 75.
- Row 1: Sc in 2nd ch from hook, sc in each ch across. Turn. (74 sc)
- Row 2: Ch 1, sc in each st across. Turn. (74 sc)
- Row 3: Ch 1, sc in each st across. Fasten off, leaving a 12-inch tail for sewing. (74 sc)
- Fold the strap lengthwise if desired for a more rounded profile, or leave flat as shown in photos. Sew ends securely to the left and right upper side gussets of the bag body, approximately 1 inch below the top rim.
Assembly
- Magnetic Snap Installation:
- Install the male half of the bronze magnetic snap centrally on the inside face of the bag flap (around Row 8 of the flap), securing the prongs through the fabric over a small square of scrap yarn or felt for reinforcement.
- Fold the flap down over the front of the bag to mark the exact mating position, then install the female half of the magnetic snap onto the front wall of the bag body (centered approximately 3 rows down from the top rim).
- Strap Attachment: Securely whipstitch the two ends of the shoulder strap to the left and right exterior sides of the bag body, centering the attachment points just below Rnd 20.
Finishing
- Weave in all remaining yarn tails securely using your tapestry needle.
- Gently steam-block the bag body and flap if needed to crisp up the edges and ensure the waistcoat stitches align evenly.
Size Customization Tips
- Making it wider: Add stitches to your starting foundation chain in multiples of 2.
- Making it taller: Add additional rounds in Section 2 (each extra round adds about 0.35 inches of height).
Care Instructions
Spot clean with a damp cloth and mild soap. Do not submerge completely in water if using unwashed cotton blends, or lay flat to dry in the shade if hand-washed.
FAQ
Can I use a different yarn weight?
You can use any bulky weight yarn, but keep in mind that acrylic stretches more than cotton, so your bag may require a lightweight lining if you plan to carry heavy items.
Do I need to sew in a fabric lining?
No! The waistcoat stitch creates a dense, sturdy wall that stands up entirely on its own without any extra lining.
How do I keep the waistcoat stitches from curling?
Maintain a loose, even tension when pulling up the yarn loop through the center of the stitch post, and work on a flat surface to check your shape every few rounds.
Happy Crocheting!
I hope you love making your structured mini shoulder bag as much as I loved designing it for you. Be sure to save this pin on Pinterest to your favorite crochet boards, and leave a comment below letting me know what color you decided to make yours in!
📄 Your free PDF pattern
⏳ Preparing your free PDF… 30s
Like this one? Save it for later.