Patchwork Granny Square Crochet Cardigan Free Crochet Pattern
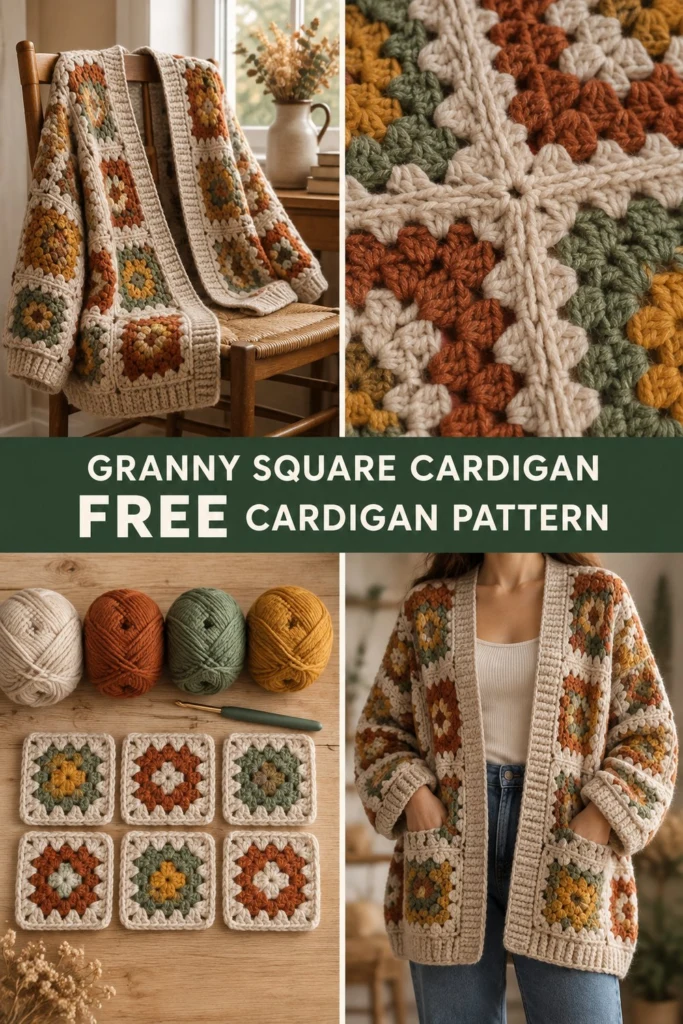
Nothing makes a house feel like home quite like wrapping yourself in a handcrafted cardigan that brings together timeless techniques and modern garment design. This patchwork cardigan pairs classic crochet granny squares in cozy oatmeal, rich rust, sage green, and warm mustard with clean, ribbed finishing for an approachable garment project.
Patchwork Granny Square Crochet Cardigan Free Crochet Pattern
Quick Facts
- Skill level: Intermediate
- Finished size: XS, S, M, L, XL, 2XL (Garment has generous ease built into the design)
- Yarn: Worsted weight (Category 4) in Oatmeal, Rust, Sage, and Mustard
- Hook: 5.0 mm (US H/8) crochet hook
- Stitches used: Ch, sl st, sc, dc, cluster (3-dc group), join-as-you-go method
- Time to make: Approximately 25 to 35 hours depending on size
Size-specific square counts and stitch totals are included in the instructions below.
What Makes This Granny Square Cardigan Special
Traditional granny squares often feel like blankets until you arrange them with purpose. Here, a specific palette of four yarn colors keeps each motif balanced and harmonious. Instead of sewing dozens of squares together at the end, you use a seamless join-as-you-go method on the final round of each square. A wide ribbed front band worked in straightforward post stitches frames the open front, and simple patch pockets complete the lived-in, cozy feel.
Skill Level
- Required skills: Working in the round, traditional granny square construction, join-as-you-go joining techniques, basic garment assembly, working simple post stitches for ribbing.
- If you can make a standard granny square and join motifs, you are fully ready for this project!
Finished Measurements
| Size | Chest / Bust (in / cm) | Cardigan Length (in / cm) | Sleeve Length (in / cm) |
|---|---|---|---|
| XS | 34 (86.5) | 26 (66) | 18 (45.5) |
| S | 38 (96.5) | 26.5 (67.5) | 18 (45.5) |
| M | 42 (106.5) | 27 (68.5) | 18.5 (47) |
| L | 46 (117) | 27.5 (70) | 18.5 (47) |
| XL | 50 (127) | 28 (71) | 19 (48.5) |
| 2XL | 54 (137) | 28.5 (72.5) | 19 (48.5) |
Materials You Will Need
| Color Name | Yarn Weight | Yards (Approx.) | Meters (Approx.) |
|---|---|---|---|
| Oatmeal (Main Color) | Worsted (Cat 4) | 1,200 (1,300, 1,400, 1,500, 1,600, 1,700) | 1,095 (1,185, 1,280, 1,370, 1,460, 1,555) |
| Rust | Worsted (Cat 4) | 300 (330, 360, 390, 420, 450) | 275 (300, 330, 355, 385, 410) |
| Sage | Worsted (Cat 4) | 300 (330, 360, 390, 420, 450) | 275 (300, 330, 355, 385, 410) |
| Mustard | Worsted (Cat 4) | 250 (280, 310, 340, 370, 400) | 230 (255, 285, 310, 340, 365) |
- Hook: 5.0 mm (US H/8) crochet hook
- Notions: Yarn needle for weaving ends, locking stitch markers, measuring tape
Yarn Suggestions
- Lion Brand Vanna’s Choice: 100% Acrylic, 170 yds (156 m) per 3.5 oz (100g) skein. Excellent stitch definition and holds its shape well in garments.
- Caron Simply Soft: 100% Acrylic, 315 yds (288 m) per 6 oz (170g) skein. Wonderful drape, though you will need fewer total skeins due to yardage.
- Knit Picks Brava Worsted: 100% Premium Acrylic, 218 yds (200 m) per 100g skein. Highly durable, machine washable, and budget-friendly.
⚠️ Note: Avoid novelty, eyelash, or super-fuzzy yarns for this project. They obscure the classic stitches of the granny squares and make the join-as-you-go method difficult to manage.
Gauge
- Granny Square: One completed square measures exactly 5.75 in x 5.75 in (14.5 cm x 14.5 cm) using a 5.0 mm hook.
- Ribbing Band: 16 sts x 12 rows = 4 in (10 cm) in half double crochet worked in the third loop.
Abbreviations
- ch: chain
- sl st: slip stitch
- sc: single crochet
- hdc: half double crochet
- dc: double crochet
- cluster: 3-dc group worked in the same space
- sp: space
- sk: skip
- st(s): stitch(es)
- BLO: back loop only
- FPdc: front post double crochet
- BPdc: back post double crochet
- RS: right side
- WS: wrong side
- rep: repeat
- rnd(s): round(s)
- beg: beginning
UK terms equivalent: sc = dc, hdc = htr, dc = tr, sl st = sl st.
Special Stitches Explained
- Cluster (3-dc group): Work 3 dc into the specified space or stitch.
- Join-As-You-Go (JAYG): On the final round of a square, substitute working a ch-1 space with a slip stitch into the corresponding ch-1 space of an adjacent completed square.
- Third Loop (HDC): Working hdc in the horizontal bar located on the back of the stitch (just below the front and back loops) to create a knitted-look ribbing texture.
Pattern Instructions
Pattern Notes
- Read through all instructions before beginning.
- Turning chains do not count as stitches unless specifically noted.
- Always check your gauge on the first completed square to ensure your garment will meet the finished measurement specifications.
Section 1: The Granny Squares
Make a total number of squares based on your chosen size. Color order for each square is specified below.
- Size XS: Make 44 squares total.
- Size S: Make 48 squares total.
- Size M: Make 52 squares total.
- Size L: Make 56 squares total.
- Size XL: Make 60 squares total.
- Size 2XL: Make 64 squares total.
Color Distribution: Divide your total squares evenly across the four colorway variations shown in the flat-lay photo (e.g., varying centers of Mustard, Rust, Sage, and Oatmeal).
Square Construction (Make N as required above)
- Rnd 1 (Center): With Color A (e.g., Mustard), make a magic ring, ch 3 (counts as first dc), work 2 dc in ring, ch 2, (3 dc in ring, ch 2) 3 times; join with sl st to top of beg ch-3. Fasten off Color A. (4 clusters, 4 ch-2 spaces)
- Rnd 2: Join Color B (e.g., Sage) in any ch-2 corner sp, ch 3, (2 dc, ch 2, 3 dc) in same corner sp, *ch 1, (3 dc, ch 2, 3 dc) in next corner sp; rep from * twice more, ch 1; join with sl st to top of beg ch-3. Fasten off Color B. *(8 clusters, 4 ch-1 spaces, 4 ch-2 corners)*
- Rnd 3: Join Color C (e.g., Rust) in any ch-2 corner sp, ch 3, (2 dc, ch 2, 3 dc) in same corner sp, *ch 1, 3 dc in next ch-1 sp, ch 1, (3 dc, ch 2, 3 dc) in next corner sp; rep from * twice more, ch 1, 3 dc in next ch-1 sp, ch 1; join with sl st to top of beg ch-3. Fasten off Color C. *(12 clusters, 8 ch-1 spaces, 4 ch-2 corners)*
- Rnd 4 (Oatmeal Edge & Join-As-You-Go): Join Oatmeal in any ch-2 corner sp, ch 3, (2 dc, ch 2, 3 dc) in same corner sp, *(ch 1, 3 dc in next ch-1 sp) twice, ch 1, (3 dc, ch 2, 3 dc) in next corner sp*; rep from * twice more, (ch 1, 3 dc in next ch-1 sp) twice, ch 1; join with sl st to top of beg ch-3. Fasten off Oatmeal. *(16 clusters, 12 ch-1 spaces, 4 ch-2 corners)*
Note: When joining subsequent squares to panels, replace the ch-1 spaces and ch-2 corner spaces on connecting sides with a slip stitch into the corresponding space of the neighboring square.
Section 2: Cardigan Assembly & Panel Layout
Arrange your squares flat according to your size diagram before joining them permanently.
- Back Panel:
- XS: 3 columns x 4 rows = 12 squares
- S: 3 columns x 4 rows = 12 squares
- M: 4 columns x 4 rows = 16 squares
- L: 4 columns x 4 rows = 16 squares
- XL: 4 columns x 5 rows = 20 squares
- 2XL: 4 columns x 5 rows = 20 squares
- Left Front Panel:
- XS/S: 1 column x 4 rows = 4 squares
- M/L: 1 column x 4 rows = 4 squares
- XL/2XL: 1 column x 5 rows = 5 squares
- Right Front Panel: Mirror image of the Left Front Panel.
- Sleeves (Make 2):
- XS/S: 2 columns x 3 rows = 6 squares
- M/L: 2 columns x 3 rows = 6 squares
- XL/2XL: 2 columns x 4 rows = 8 squares
Seaming
Join the shoulder seams by working a flat slip stitch seam through the back loops of the top edge of the front and back panels. Sew the top curve of the sleeves to the armhole openings, then seam the underarms and side seams from cuff to lower hem.
✅ Checkpoint: All panels should now be joined into a cohesive cardigan shape with open front panels and attached sleeves.
Section 3: Front Ribbed Band & Collar
Working along the right front edge, around the back neck, down the left front edge.
- Row 1: With Oatmeal, join yarn at the bottom right front hem, ch 1, work sc evenly up the right front edge, around the back neck curve, and down the left front edge. Turn. (Stitch count varies by size, approx. 180 to 230 sc)
- Row 2: Ch 2 (does not count as st here and throughout), work hdc in each st across. Turn. (180 hdc)
- Row 3: Ch 2, *work FPdc around first st, BPdc around next st*; rep from * to * across to last st, hdc in last st. Turn. *(180 sts)*
- Rows 4 to 8: Rep Row 3 five more times to build a sturdy, wide ribbed collar and front opening band. Fasten off. (180 sts)
Section 4: Patch Pockets (Make 2)
- Foundation: With Oatmeal, ch 25.
- Row 1: Work dc in 4th ch from hook (skipped chs count as first dc), dc in each ch across, turn. (23 dc)
- Rows 2 to 6: Ch 3, dc in each dc across, turn. (23 dc)
- Row 7: Ch 1, work sc in each st across. Fasten off, leaving a 12 in (30 cm) tail for sewing.
- Placement: Position pockets symmetrically on the lower front panels, approximately 3 inches above the bottom ribbing band, and sew securely on three sides.
Section 5: Finishing
- Weave in all remaining loose yarn ends securely using your yarn needle.
- Block the finished cardigan lightly with steam or a damp towel layout to set the seams and relax the acrylic fibers.
Size Customization Tips
- Each additional square added to the length or width adjusts the cardigan by approximately 5.75 inches (14.5 cm).
- If you prefer an oversized fit, add one complete column of squares to the back and front panels and recalculate your sleeve width accordingly.
Care Instructions
- Machine wash gentle in cold water with mild detergent.
- Tumble dry on low heat or lay flat in shade to dry completely.
- Do not bleach or iron directly on acrylic yarn.
FAQ
Can I use cotton yarn instead of acrylic?
Yes, cotton yarn works wonderfully for granny squares and provides great stitch definition. Keep in mind that cotton is heavier than acrylic, so your finished cardigan will have more drape and weight.
How do I adjust the cardigan for a plus-size fit?
You can easily scale this pattern up to 3XL or 4XL by adding another column of squares to the back panel and front panels, ensuring you adjust the ribbed band stitch counts accordingly.
Can I join the squares as I go instead of sewing them at the end?
Absolutely! The pattern instructions are specifically designed for the join-as-you-go method on Round 4 of every square, which saves you hours of assembly time at the end.
Happy Crocheting!
I hope you enjoy creating your very own patchwork granny square cardigan. Save this pin to your Pinterest boards to keep your project handy, and leave a comment below to share what color combinations you decided to use!