Velvet Ribbed Crochet Christmas Stocking Free Christmas Pattern
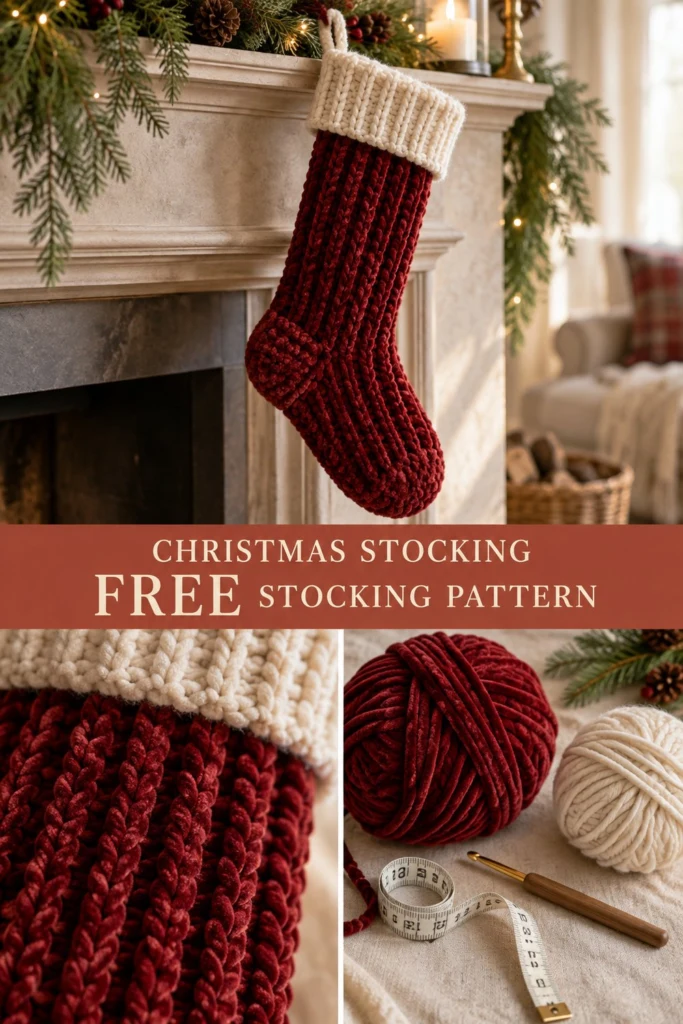
Nothing brings warmth to a cozy holiday mantel like a classic, tactile Christmas stocking. This plush velvet ribbed crochet Christmas stocking features deep, touchable vertical ridges worked in rich burgundy velvet yarn, paired with a chunky folded cream cuff that gives it a luxurious, heirloom feel.
Designed to hold its shape whether empty or stuffed with holiday treats, this stocking uses clever post-stitch ribbing and a short-row heel turn to ensure a sturdy, beautiful fit year after year.
Velvet Ribbed Crochet Christmas Stocking Free Christmas Pattern
Quick Facts
- Skill level: Intermediate
- Finished size: Approx. 18 in (45 cm) long from top cuff to toe, 6.75 in (17 cm) wide across leg
- Yarn: Bulky / Super Bulky Velvet Yarn (Color A) and Bulky Acrylic/Wool Blend Yarn (Color B)
- Hook: 7.0 mm (US K-10.5 / L)
- Stitches used: ch, sc, hdc, FPdc, BLO, sl st
- Time to make: 3 to 4 hours
Note: Customization tips to alter stocking length or foot width are provided later in this pattern.
What Makes This Stocking Special
- Front Post Ribbing: Alternating front post double crochet stitches create clean, raised columns down the foot and leg, providing structural elasticity and prevent sagging when filled.
- Flat Oval Sole & BLO Ridge: Worked in continuous rounds from a foundation chain, a single back-loop-only (BLO) round neatly transitions the bottom sole up into the stocking walls.
- Short Row Heel Turn: A seamless, row-by-row heel turn keeps the heel proportional and prevents awkward bunching around the ankle.
- Perpendicular Folded Cuff: The chunky cream cuff is worked directly onto the top opening in vertical back-loop hdc rows, folding over smoothly for that timeless holiday mantle presentation.
Skill Level
This project is ideal for an Intermediate crocheter (or an adventurous beginner comfortable with post stitches). You will need to know:
* Working around a foundation chain to form an oval
* Post stitches (Front Post Double Crochet – FPdc)
* Back Loop Only (BLO) stitches
* Short row shaping (turning mid-row and working back)
If you have never worked a short-row heel turn before, don’t worry! Detailed step-by-step instructions guide you through every row.
Finished Measurements
| Dimension | Inches | Centimeters |
|---|---|---|
| Total Length (Cuff to Heel) | 18.0 in | 45.0 cm |
| Foot Length (Heel to Toe) | 10.0 in | 25.5 cm |
| Leg Opening Width (Flat) | 6.75 in | 17.0 cm |
| Cuff Depth (Folded) | 3.5 in | 9.0 cm |
Materials You Will Need
| Material | Details | Quantity |
|---|---|---|
| Main Yarn (Color A) | Burgundy Velvet / Chenille Yarn (Bulky Weight #5 or Super Bulky #6) | 180 yds / 165 m (1 ball) |
| Cuff Yarn (Color B) | Cream / Off-White Chunky Yarn (Bulky Weight #5) | 65 yds / 60 m (1 ball) |
| Crochet Hook | 7.0 mm (US K-10.5 / L) or size needed to obtain gauge | 1 hook |
| Tapestry Needle | Large eye yarn needle for weaving ends | 1 needle |
| Stitch Markers | Locking stitch markers for heel placement | 2 markers |
| Measuring Tape | Flexible soft tape measure | 1 tape |
Yarn Suggestions
| Brand & Yarn Line | Weight | Skein Size | Notes |
|---|---|---|---|
| Bernat Velvet | Bulky (#5) | 315 yds / 300 g | Luxurious plush texture; excellent stitch definition for post ribbing. |
| Premier Yarns Velvet | Bulky (#5) | 315 yds / 300 g | Very soft velvet finish with vibrant sheen. |
| Bernat Blanket (for Cuff) | Super Bulky (#6) | 220 yds / 300 g | Soft chenille texture ideal for the folded cream cuff. |
⚠️ Note: Avoid lightweight standard worsted yarns without adjusting hook size, as they will yield a much smaller stocking. Ensure your velvet yarn has good structural integrity so stitches remain crisp and uniform.
Gauge
- Main Ribbed Pattern (Color A): 11 sts x 8 rnds = 4 in x 4 in (10 cm x 10 cm) worked in FPdc/hdc ribbing.
- Cuff Pattern (Color B): 10 hdc x 7 rows = 4 in x 4 in (10 cm x 10 cm) worked in hdc BLO.
Abbreviations
| Abbreviation | Full Term (US Crochet Standards) |
|---|---|
| ch | chain |
| sl st | slip stitch |
| sc | single crochet |
| hdc | half double crochet |
| FPdc | front post double crochet |
| inc | increase (work 2 sc in same stitch) |
| BLO | back loop only |
| st(s) | stitch(es) |
| rnd(s) | round(s) |
| rem | remaining |
UK Conversion: sc = dc (double crochet); hdc = htr (half treble crochet); FPdc = FPtr (front post treble crochet).
Special Stitches Explained
- Front Post Double Crochet (FPdc): Yarn over, insert hook from front to back to front around the post of the indicated stitch from the previous round, yarn over and pull up a loop (3 loops on hook), [yarn over, draw through 2 loops] twice.
- Back Loop Only (BLO): Insert hook only under the back strand of the V at the top of the stitch, leaving the front strand unworked.
Pattern Instructions
Notes
- The stocking is worked seamlessly from the toe up to the heel, shaping the heel with turned short rows in single crochet, then continuing the ribbed leg upward before joining the cream folded cuff.
- Ch 1 at beginning of sc rows/rnds does not count as a stitch.
- Ch 2 at beginning of ribbed rnds does not count as a stitch. Always make your first FPdc into the first indicated stitch.
- Join each round with a slip stitch to the top of the first stitch (not the turning chain).
Section 1: Oval Sole (Color A – Burgundy Velvet)
Foundation Chain: Ch 11 in Color A.
Rnd 1: Sc in 2nd ch from hook, sc in next 8 ch, 3 sc in last ch. Working along opposite side of foundation chain into unworked loops: sc in next 8 ch, 2 sc in last ch (same ch as start). Sl st to first sc to join (22 sc).
Rnd 2: Ch 1, inc in first st, sc in next 8 sts, inc in next 3 sts, sc in next 8 sts, inc in last 2 sts. Sl st to first sc (28 sc).
Rnd 3: Ch 1, sc in next st, inc in next st, sc in next 8 sts, (sc in next st, inc in next st) 3 times, sc in next 8 sts, (sc in next st, inc in next st) 2 times. Sl st to first sc (34 sc).
✅ Checkpoint: The sole should lie completely flat and measure approx. 8.5 in (21.5 cm) long by 3.5 in (9 cm) wide.
Section 2: Foot & Turning Ridge (Color A)
Rnd 4 (Turning Round): Ch 1, sc in BLO of each st around. Sl st to first sc (34 BLO sc).
Rnd 5: Ch 2 (does not count as st here and throughout), *FPdc in next st, hdc in next st*, repeat from * around. Sl st to first FPdc *(34 sts: 17 FPdc, 17 hdc)*.
Rnds 6 to 9: Repeat Rnd 5 (34 sts: 17 FPdc, 17 hdc).
✅ Checkpoint: The foot section forms a neat cylinder rising upward from the flat sole base.
Section 3: Heel Turn (Color A)
The short-row heel is worked back and forth over the first 17 stitches only. Leave the remaining 17 instep stitches unworked for now.
Row 1 (WS): Ch 1, sc in first 17 sts, turn (17 sc). (Leaves 17 instep sts unworked).
Row 2 (RS): Ch 1, sc in first 16 sts, leave last st unworked, turn (16 sc).
Row 3: Ch 1, sc in first 15 sts, leave last st unworked, turn (15 sc).
Row 4: Ch 1, sc in first 14 sts, leave last st unworked, turn (14 sc).
Row 5: Ch 1, sc in first 13 sts, leave last st unworked, turn (13 sc).
Row 6: Ch 1, sc in first 12 sts, leave last st unworked, turn (12 sc).
Row 7: Ch 1, sc in first 11 sts, leave last st unworked, turn (11 sc).
Row 8: Ch 1, sc in first 10 sts, leave last st unworked, turn (10 sc).
Widening the heel cup (working back into the unworked heel stitches):
Row 9: Ch 1, sc in 10 sts, sc in next unworked st from Row 8, turn (11 sc).
Row 10: Ch 1, sc in 11 sts, sc in next unworked st from Row 7, turn (12 sc).
Row 11: Ch 1, sc in 12 sts, sc in next unworked st from Row 6, turn (13 sc).
Row 12: Ch 1, sc in 13 sts, sc in next unworked st from Row 5, turn (14 sc).
Row 13: Ch 1, sc in 14 sts, sc in next unworked st from Row 4, turn (15 sc).
Row 14: Ch 1, sc in 15 sts, sc in next unworked st from Row 3, turn (16 sc).
Row 15: Ch 1, sc in 16 sts, sc in next unworked st from Row 2, turn (17 sc).
Section 4: Leg (Color A)
Rejoin all stitches back into rounds to build the leg upward.
Rnd 10: Ch 2, working across all 17 heel sts and 17 unworked instep sts, *FPdc in next st, hdc in next st*, repeat from * around. Sl st to first FPdc *(34 sts: 17 FPdc, 17 hdc)*.
Rnds 11 to 24: Repeat Rnd 10 (34 sts: 17 FPdc, 17 hdc).
Fasten off Color A. Weave in end securely on inside.
✅ Checkpoint: The leg should measure approx. 11.5 in (29 cm) tall from the top of the heel turn to the top opening rim.
Section 5: Folded Ribbed Cuff (Color B – Cream)
The cuff is worked perpendicular to the leg opening in back-loop half double crochet rows, attaching to the leg edge as you go.
Join Color B with a sl st at the back center edge of the leg opening.
Foundation Chain: Ch 13 in Color B.
Row 1: Hdc in 2nd ch from hook and in each ch across, sl st into next 2 sts of leg opening rim, turn (12 hdc).
Row 2: Sk 2 sl sts, hdc in BLO of next 12 hdc, turn (12 hdc).
Row 3: Ch 1, hdc in BLO of next 12 hdc, sl st into next 2 sts of leg opening rim, turn (12 hdc).
Rows 4 to 34: Repeat Rows 2 and 3 around the entire leg rim, finishing at the back edge (12 hdc per row, 34 rows total).
Fasten off, leaving an 18 in (45 cm) tail for seaming. Using yarn needle, seam the final row of the cuff to the foundation chain along the inner side. Fold cuff down 3.5 in (9 cm) over the top red velvet leg opening.
Section 6: Hanging Loop (Color B – Cream)
Foundation Chain: Ch 21 in Color B.
Row 1: Sc in 2nd ch from hook and in each ch across (20 sc).
Fasten off, leaving a 12 in (30 cm) tail.
Assembly
- Fold the hanging loop strip in half to form a 4 in (10 cm) secure hanging loop.
- Position the base of the loop inside the top rear corner of the stocking (aligned with the heel seam).
- Using the long tail and tapestry needle, stitch both ends of the loop firmly through the inner layer of the stocking leg and cuff fold so it easily supports weight on a mantel hook.
Finishing
- Check all seams along the heel transition and cuff join.
- Weave in any remaining yarn ends neatly into the wrong side of the work.
- Lightly hand-shape the foot and heel cup. (Do not iron or apply high heat directly to velvet/polyester yarn).
Size Customization Tips
- Longer Leg: To make a longer stocking, add additional rounds to Section 4 (Leg) before attaching the cream cuff. Every 2 additional rounds add approx. 1 in (2.5 cm) in overall height.
- Wider Foot: Add 2 chains to the initial foundation chain (Ch 13 instead of Ch 11). Increase Rnds 1–3 accordingly to reach 38 sts total. Ensure your final round count remains an even number to keep the 2-stitch post ribbing repeat aligned!
Care Instructions
- Washing: Hand wash gently in cool water with mild liquid detergent.
- Drying: Do not wring or twist velvet yarn. Press flat between clean dry towels to absorb excess moisture, then lay flat to dry completely.
- Storage: Store flat in a breathable storage bin during off-seasons.
FAQ
Can I use standard worsted weight yarn for this pattern?
Yes! However, using worsted weight yarn with a smaller hook (e.g., 4.5 mm or 5.0 mm) will result in a smaller decorative mini stocking (approx. 10–12 in long). To achieve the full 18-inch finished size, stick to bulky or super bulky category 5/6 yarns.
How do I prevent velvet yarn from “looping” or snagging?
Velvet chenille yarn can occasionally “worm” or pull if stitch tension is too loose. Keep your tension firm and consistent, and use a hook size slightly smaller if you notice loose loops appearing along post stitches.
Can I make the entire stocking in a single solid color?
Absolutely! Simply omit the color change at Section 5 and continue working the cuff in your main burgundy velvet yarn for a sleek, monochromatic velvet stocking look.
Happy Crocheting!
Enjoy stitching this cozy velvet ribbed crochet Christmas stocking for your holiday mantle decor or as a cherished handmade gift! Save this post to your Pinterest crochet boards and leave a comment sharing your favorite holiday color combinations!