Plump Turkey Gnome Crochet Shelf Sitter Free Thanksgiving Pattern

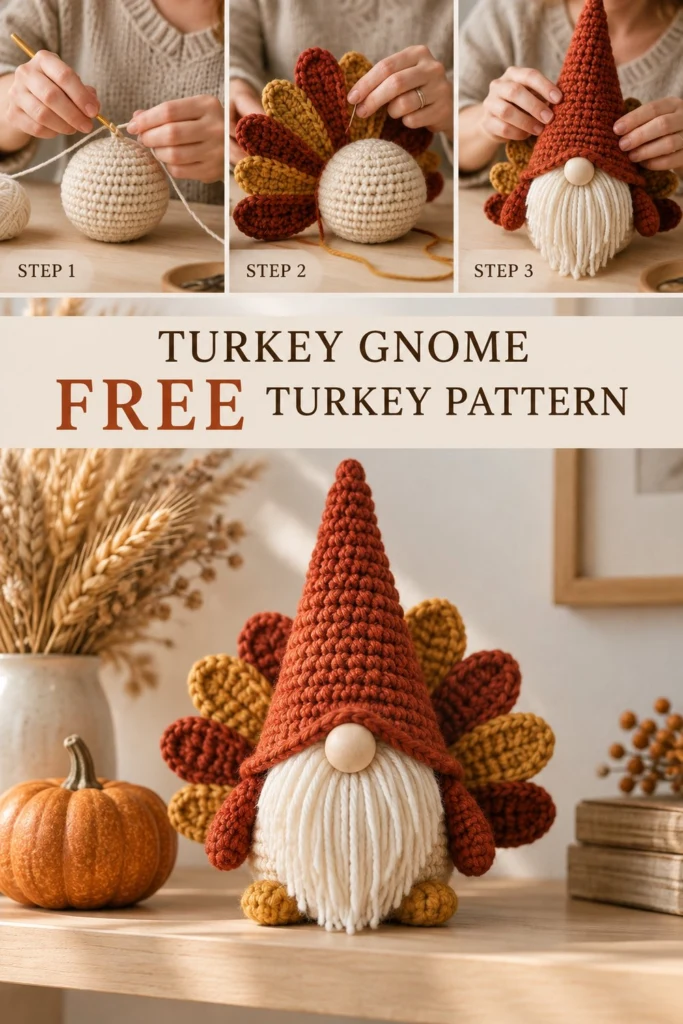
Bring cozy autumn magic into your home with this adorable plump turkey gnome shelf sitter. Combining the whimsical charm of a Scandinavian gnome with a vibrant fan of autumnal turkey feathers, this project makes an eye-catching centerpiece for Thanksgiving tables, mantels, and tier trays. Worked in continuous single crochet rounds with a weighted bottom base, your gnome stands sturdy and upright wherever you place him.
Plump Turkey Gnome Crochet Shelf Sitter Free Thanksgiving Pattern
Quick Facts
- Skill level: Easy / Intermediate
- Finished size: Approximately 6.3 in / 16 cm tall and 6.5 in / 16.5 cm wide across the feather fan
- Yarn: Worsted weight (#4 medium) acrylic yarn in Light Beige, Rust Red, and Deep Gold
- Hook: 3.5 mm (US E-4) crochet hook
- Stitches used: Magic ring, chain, single crochet, half double crochet, double crochet, single crochet increase, invisible decrease, slip stitch, back loop only (BLO)
- Time to make: 3 to 4 hours
Note: Detailed tips on customizing the size of your gnome are provided near the bottom of this pattern.
What Makes This Plump Turkey Gnome Special
This festive design blends plush amigurumi techniques with simple surface assembly to create a character-filled holiday accent:
- Weighted Base for Shelf Sitting: The body begins with a flat back-loop-only base round, paired with weighted poly-pellets inside the body so your gnome sits perfectly upright on bookshelves, window sills, or mantels without tipping over.
- Layered Feather Tail Fan: Five textured leaf-shaped feathers in rich autumn rust and deep gold tones fan out behind the gnome, perfectly mimicking a turkey’s tail plumage.
- Classic Gnome Details: A plush cream yarn fringe beard and an unpainted wooden bead nose tuck under a tall, pointed terracotta-red cone hat for a cozy handcrafted look.
Skill Level
This project is rated Easy / Intermediate. You will need to know how to:
- Work in continuous spirals (spiral amigurumi rounds)
- Execute basic increases and invisible single crochet decreases
- Work stitches around both sides of a foundation chain (for the feet and feathers)
- Attach fringe yarn and assemble crocheted elements cleanly
If you are comfortable making basic plushies or amigurumi balls, this gnome will be a fun and satisfying afternoon project!
Finished Measurements
| Measurement | Inches | Centimeters |
|---|---|---|
| Total Height (Base to Hat Tip) | 6.3 in | 16 cm |
| Body Diameter (Widest Point) | 3.5 in | 9 cm |
| Feather Fan Total Width | 6.5 in | 16.5 cm |
Materials You Will Need
| Material / Item | Details & Quantity |
|---|---|
| Light Beige Yarn | Worsted weight (#4), ~65 yds / 60 m |
| Rust Red Yarn | Worsted weight (#4), ~75 yds / 70 m |
| Deep Gold Yarn | Worsted weight (#4), ~35 yds / 32 m |
| Crochet Hook | 3.5 mm (US E-4) or size needed to obtain tight gauge |
| Wooden Bead | 1 natural unpainted wood bead (18 mm / 0.7 in) |
| Stuffing | Polyester fiberfill stuffing |
| Weighting Base | ~50 g / 1.7 oz plastic poly-pellets inside a small pouch/nylon |
| Notions | Yarn needle, stitch marker, scissors, straight pins |
Yarn Suggestions
| Brand & Yarn Name | Weight & Fiber | Yardage per Skein | Notes |
|---|---|---|---|
| Lion Brand Vanna’s Choice | Worsted (#4), 100% Acrylic | 170 yds / 156 m (3.5 oz / 100 g) | Great stitch definition and beautiful fall color palette |
| Red Heart Super Saver | Worsted (#4), 100% Acrylic | 364 yds / 333 m (7 oz / 198 g) | Sturdy fiber that keeps the hat and feathers crisp |
| Bernat Premium | Worsted (#4), 100% Acrylic | 360 yds / 329 m (7 oz / 198 g) | Soft finish with excellent stitch popping structure |
⚠️ Note: Avoid using super-soft velvet or loose single-ply roving yarns for this pattern. The hat and tail feathers require a sturdy worsted acrylic or cotton blend yarn to maintain their crisp, upright shape without sagging.
Gauge
| Stitch Pattern | Gauge (4 x 4 in / 10 x 10 cm) | Hook Size |
|---|---|---|
| Single Crochet in the Round | 20 sts x 22 rnds | 3.5 mm (US E-4) |
- Circle Gauge Check: Rounds 1 to 6 of the flat Body circle measure 2.25 in / 5.7 cm across.
Abbreviations
| Abbreviation | Definition |
|---|---|
| BLO | Back Loop Only |
| ch | Chain |
| dec | Invisible Single Crochet Decrease (sc2tog) |
| dc | Double Crochet |
| FLO | Front Loop Only |
| hdc | Half Double Crochet |
| inc | Single Crochet Increase (2 sc in same st) |
| MR | Magic Ring |
| rnd(s) | Round(s) |
| sc | Single Crochet |
| sl st | Slip Stitch |
| st(s) | Stitch(es) |
UK equivalents: sc = dc, hdc = htr, dc = tr, sl st = ss.
Special Stitches Explained
- Magic Ring (MR): Form a loop around your fingers, insert hook, yarn over and pull up a loop. Chain 1, then work the specified number of single crochet stitches into the ring. Pull the yarn tail firmly to close the central ring tightly.
- Invisible Decrease (dec): Insert hook into the front loop only of the first stitch, then immediately insert hook into the front loop only of the second stitch (2 front loops on hook). Yarn over, pull through both front loops, yarn over, and pull through remaining 2 loops on hook.
- Working Around Both Sides of Foundation Chain: Work specified stitches down one side of the chain loops. In the final end chain, work the turning stitches, then rotate the piece 180 degrees to work along the remaining unworked bottom loops of the foundation chain back to the start.
Pattern Instructions
Pattern Notes
- The Body, Hat, Arms, and Feet are worked in seamless continuous spiral rounds. Do not join at the end of rounds unless instructed; move your stitch marker up to the first stitch of each new round.
- Keep your crochet tension firm so that the polyester stuffing and weighting pellets stay securely inside without showing through gaps.
Section 1: Body (Light Beige, make 1)
Worked from the bottom flat base upward in continuous rounds.
- Rnd 1: 6 sc in MR (6 sc)
- Rnd 2: inc in each st around (12 sc)
- Rnd 3: (1 sc, inc) x 6 (18 sc)
- Rnd 4: (2 sc, inc) x 6 (24 sc)
- Rnd 5: (3 sc, inc) x 6 (30 sc)
- Rnd 6: (4 sc, inc) x 6 (36 sc)
- Rnd 7: (5 sc, inc) x 6 (42 sc)
- Rnd 8: BLO sc in each st around (42 sc)
- Rnds 9 to 16 (8 rnds): sc in each st around (42 sc)
- Rnd 17: (5 sc, dec) x 6 (36 sc)
- Rnd 18: (4 sc, dec) x 6 (30 sc)
- Rnd 19: (3 sc, dec) x 6 (24 sc)
✅ Checkpoint: Insert your pouch of weighted poly-pellets (~50 g) down into the flat bottom of the body. Add polyester fiberfill firmly around and above the pouch to form a plump, smooth sphere.
- Rnd 20: (2 sc, dec) x 6 (18 sc)
- Rnd 21: (1 sc, dec) x 6 (12 sc)
- Rnd 22: dec x 6 (6 sc)
Fasten off, leaving a 6 in / 15 cm tail. Thread tail onto a tapestry needle, weave through FLO of remaining 6 stitches, pull tight to seal the sphere, and weave in end.
Section 2: Pointy Cone Hat (Rust Red, make 1)
Worked from top tip down in continuous rounds.
- Rnd 1: 4 sc in MR (4 sc)
- Rnd 2: (1 sc, inc) x 2 (6 sc)
- Rnd 3: sc in each st around (6 sc)
- Rnd 4: (2 sc, inc) x 2 (8 sc)
- Rnd 5: sc in each st around (8 sc)
- Rnd 6: (3 sc, inc) x 2 (10 sc)
- Rnd 7: sc in each st around (10 sc)
- Rnd 8: (4 sc, inc) x 2 (12 sc)
- Rnd 9: (3 sc, inc) x 3 (15 sc)
- Rnd 10: sc in each st around (15 sc)
- Rnd 11: (4 sc, inc) x 3 (18 sc)
- Rnd 12: sc in each st around (18 sc)
- Rnd 13: (2 sc, inc) x 6 (24 sc)
- Rnd 14: sc in each st around (24 sc)
- Rnd 15: (3 sc, inc) x 6 (30 sc)
- Rnd 16: sc in each st around (30 sc)
- Rnd 17: (4 sc, inc) x 6 (36 sc)
- Rnd 18: sc in each st around (36 sc)
- Rnd 19: (5 sc, inc) x 6 (42 sc)
- Rnds 20 to 22 (3 rnds): sc in each st around (42 sc)
Fasten off, leaving a 16 in / 40 cm tail for assembly. Do not stuff the hat tightly; lightly stuff only the top tip to keep it perky.
Section 3: Arms (Rust Red, make 2)
Worked in continuous rounds.
- Rnd 1: 8 sc in MR (8 sc)
- Rnds 2 to 7 (6 rnds): sc in each st around (8 sc)
Lightly stuff the bottom tip of each arm. Flatten top opening and work 4 sc across both layers to seal the opening shut (4 sc). Fasten off, leaving a 10 in / 25 cm tail for sewing.
Section 4: Feet (Deep Gold, make 2)
Worked in oval rounds around a foundation chain.
- Foundation: Ch 5.
- Rnd 1: sc in 2nd ch from hook, sc in next 2 ch, 3 sc in last ch; rotate to work down opposite side of foundation chain: sc in next 2 ch, inc in last ch (10 sc)
- Rnd 2: inc in 1st st, sc in next 2 sts, inc in next 3 sts, sc in next 2 sts, inc in last 2 sts (16 sc)
- Rnd 3: sc in each st around (16 sc)
Fasten off, leaving a 10 in / 25 cm tail for sewing. Lightly stuff feet.
Section 5: Tail Feathers (Make 3 in Rust Red, 2 in Deep Gold = 5 total)
Worked in leaf-shaped oval rounds around a center foundation chain.
- Foundation: Ch 9.
- Rnd 1: sc in 2nd ch from hook, hdc in next ch, dc in next 4 ch, hdc in next ch, 3 sc in last ch; rotate to work down opposite side of foundation chain: hdc in next ch, dc in next 4 ch, hdc in next ch, sc in last ch (17 sts)
- Rnd 2: sc in next 8 sts, 3 sc in next st (tip st), sc in next 8 sts, sl st to first st (19 sts)
Fasten off, leaving a 12 in / 30 cm tail for sewing.
✅ Checkpoint: Lay all 5 finished feathers flat. You should have 3 Rust Red and 2 Deep Gold feathers measuring approximately 3 in / 7.5 cm in height each.
Assembly
Follow these steps in order to build your turkey gnome shelf sitter:
- Attach the Beard: Cut 20 strands of Light Beige yarn, each 8 in / 20 cm long. Fold 2 strands together in half. Using your crochet hook, loop fringe-style into 5 contiguous front loops across Rnd 13 on the front center of the Body. Once all strands are knotted, brush through strands with your fingers and trim with scissors into a neat, pointed V-shape beard (~2.25 in / 6 cm total length).
- Attach the Nose: Take your 18 mm wooden bead. Thread a 10 in / 25 cm piece of Light Beige yarn through the bead center hole. Securely sew the wooden bead right above the top of the beard between Rnds 14 and 15 of the Body so it rests snug against the top fringe loops.
- Attach the Hat: Fit the pointy Rust Red hat down over the top of the body. Align the hat brim so it rests angled slightly down just touching the top edge of the wooden bead nose, covering Body Rnds 16 to 22. Pin in place and stitch the bottom edge of the hat to the body using the long Rust Red yarn tail.
- Attach the Feet: Pin the two Deep Gold feet side-by-side onto the bottom edge of the body at Rnds 7 to 9, pointing directly forward under the beard fringe. Sew flat to the body using yarn tails.
- Attach the Arms: Pin the flattened edges of the Rust Red arms to the left and right sides of the body at Rnds 13 to 15, angled slightly forward. Sew in place using yarn tails.
- Assemble and Attach the Tail Feather Fan:
- Arrange the 5 feathers in a fan formation: Rust Red (outer left), Deep Gold (inner left), Rust Red (center), Deep Gold (inner right), Rust Red (outer right). Overlap the bottom sides of the feathers slightly so they form a continuous semi-circular fan.
- Stitch the lower overlapping sides of the feathers together first with a tapestry needle.
- Position the bottom lower third of the feather array against the back of the Body between Rnds 8 and 16. Pin securely and stitch firmly onto the back of the gnome body.
Finishing
- Check all stitched seams and whipstitch any loose gaps between the feather fan base and body.
- Trim any stray yarn ends on the beard so the point is crisp and symmetrical.
- Weave in all remaining yarn ends securely inside the plush body.
- Gently press down on the base of your gnome so the weighted pellets flatten out, ensuring he sits straight on your shelf.
Size Customization Tips
If you’d like to adjust the finished dimensions of your turkey gnome shelf sitter, use these calculations based on yarn weight and gauge:
- Making a Mini Gnome (approx. 4.5 in / 11.5 cm tall): Use Sport or Fine (#2/#3) yarn with a 2.5 mm hook. Expect a gauge of ~26 sts per 4 in / 10 cm. The body diameter will measure approximately 2.5 in / 6.3 cm across. Use a 12 mm wooden bead for the nose.
- Making a Giant Plush Gnome (approx. 10 in / 25 cm tall): Use Super Bulky (#6) plush chenille yarn with a 6.0 mm hook (gauge ~10 sts per 4 in / 10 cm). Keep stitch counts identical! Use a 30 mm wooden bead for the nose and add ~150 g of weight inside the base.
Care Instructions
- Cleaning: Spot clean gently using cold water and mild detergent. Do not submerge completely in water, as moisture can damage the natural wooden bead nose and rust any internal pellet bags.
- Drying: Air dry flat in a well-ventilated area away from direct sunlight.
- Grooming: Use a clean, dry, soft-bristle toothbrush or comb to fluff up the beard fringe after storage or handling.
FAQ
Can I use safety eyes or safety noses instead of a wooden bead?
Yes! If you prefer a full yarn or amigurumi face, you can replace the wooden bead with a crocheted nose oval (6 sc in MR, inc around to 12 sc, sc 1 rnd, dec around to 6) stuffed lightly, or use a 15 mm oval safety nose attached prior to closing the head.
How do I prevent the tail feather fan from flopping backward?
Two key details keep the feathers upright: first, stitch the bottom 1/3 of the feathers directly against the curved back of the body sphere (Rnds 8 to 16) rather than just at the bottom seam. Second, overlap and stitch adjacent feather edges together before sewing the entire fan onto the body.
Is this pattern safe for toddlers and small babies?
If making this project for children under age 3, replace the wooden bead nose with a soft crocheted nose, eliminate poly-pellet plastic beads (use heavy clean cotton fabric scraps inside a stitched pouch instead), and trim beard fringe loops short to prevent choking hazards.
Happy Crocheting!
You now have a delightful plump turkey gnome shelf sitter ready to warm up your harvest decor! Save this pattern to your autumn crochet board on Pinterest, and share your finished color combinations with your fellow makers. Happy Thanksgiving making!