Gingerbread House Crochet Ornament Free Christmas Pattern
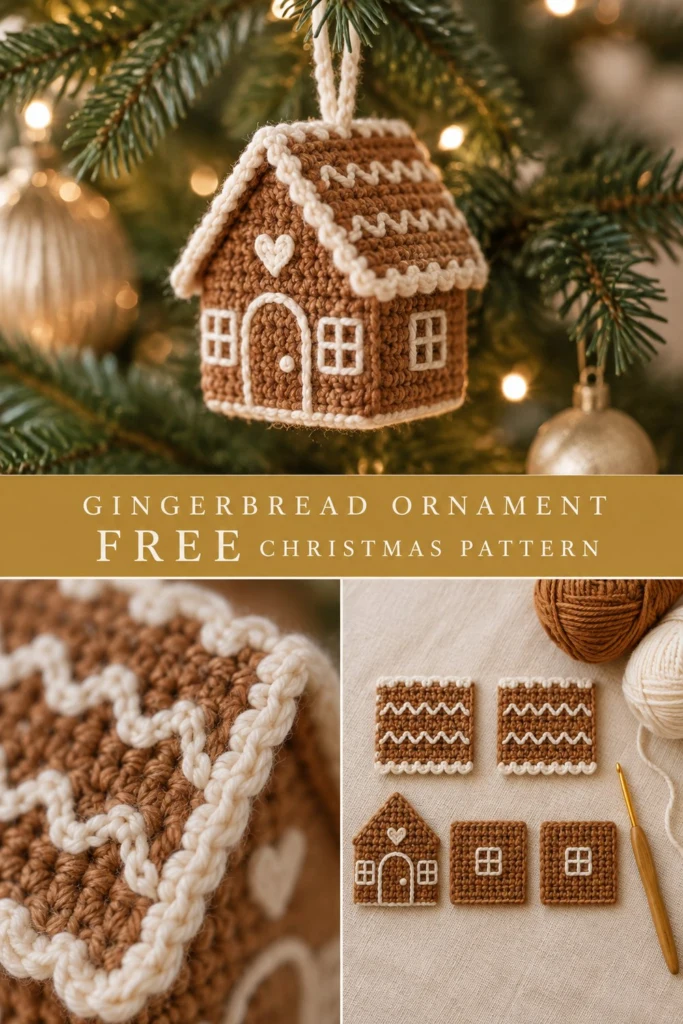
Bring cozy, handmade rustic charm to your Christmas tree with this adorable gingerbread house ornament. Crafted from sturdy single crochet panels in warm ginger brown and trimmed with cream icing details, this sweet little house holds its crisp rectangular shape beautifully with just a touch of fiberfill stuffing. It is a delightful weekend project that adds nostalgia and warmth to your holiday decorating or holiday gifting.
Gingerbread House Crochet Ornament Free Christmas Pattern
Quick Facts
- Skill level: Easy / Intermediate
- Finished size: Approximately 2.5 in (6.4 cm) wide, 2.5 in (6.4 cm) deep, and 3.25 in (8.2 cm) tall
- Yarn: DK weight (Category 3) cotton or acrylic blend yarn in Ginger Brown and Cream
- Hook: 3.0 mm (US C-2 or D-3) crochet hook
- Stitches used: Single crochet (sc), surface slip stitch (sl st), single crochet decrease (sc2tog), single crochet 3 together (sc3tog), chain (ch), half double crochet (hdc)
- Time to make: 2 to 3 hours
Note: Sizing details and scaling options are provided in the Size Customization Tips section below.
What Makes This Gingerbread House Ornament Special
- Dimensional Flat-Panel Construction: Six flat single crochet panels (front wall, back wall, two side walls, base, and two roof pieces) are crocheted separately and stitched together. This creates clean, sharp architectural edges that prevent rounding or warping.
- Surface Slip Stitch Icing: The decorative white icing lines on the roof and wall trim are created using surface slip stitching and embroidery directly onto the flat panels before assembly, ensuring perfect placement and crisp line work.
- Child & Pet Friendly: All embellishments—including the front door, windows, and gable heart—are embroidered using soft cream yarn rather than tiny plastic beads or buttons, making it durable and safe for busy holiday households.
Skill Level
This pattern is suitable for adventurous beginners and intermediate crocheters familiar with:
– Working flat single crochet in turned rows
– Basic decreases (sc2tog and sc3tog)
– Surface embroidery and surface slip stitching onto crochet fabrics
– Seaming flat crochet panels together with a tapestry needle
Even if you have never tried surface slip stitching before, detailed step-by-step instructions are provided in the Special Stitches section.
Finished Measurements
| Dimension | Inches | Centimeters |
|---|---|---|
| Width (Side to Side) | 2.5 in | 6.4 cm |
| Depth (Front to Back) | 2.5 in | 6.4 cm |
| Wall Height (Base to Eaves) | 2.15 in | 5.5 cm |
| Total Height (Base to Roof Peak) | 3.25 in | 8.2 cm |
| Roof Overhang Width | 2.75 in | 7.0 cm |
Materials You Will Need
| Material | Specification | Quantity / Measurement |
|---|---|---|
| Ginger Brown Yarn | DK Weight (Category 3), 100% Cotton or Cotton/Acrylic Blend | 65 yds / 60 m |
| Cream Yarn | DK Weight (Category 3), 100% Cotton or Cotton/Acrylic Blend | 35 yds / 32 m |
| Crochet Hook | 3.0 mm (US C-2 / D-3) | 1 hook |
| Tapestry Needle | Yarn needle with a blunt tip | 1 needle |
| Polyester Fiberfill | Lightweight synthetic stuffing | Small handful (~15 g) |
| Stitch Markers | Locking stitch markers | 2 to 4 markers |
| Scissors | Standard yarn scissors | 1 pair |
Yarn Suggestions
| Yarn Brand & Line | Fiber Content | Skein Weight / Yardage | Notes |
|---|---|---|---|
| Paintbox Yarns Cotton DK | 100% Cotton | 50 g / 137 yds (125 m) | Excellent stitch definition; matte finish mimics gingerbread. |
| Rico Baby Cotton Soft DK | 50% Cotton, 50% Acrylic | 50 g / 137 yds (125 m) | Soft texture with great structural stability for flat panels. |
| Scheepjes Catona | 100% Mercerized Cotton | 50 g / 138 yds (125 m) | Crisp V-stitches make surface embroidery easy to align. |
⚠️ Note: Avoid using fuzzy or boucle yarns for this project. Sharp stitch definition is essential for counting rows and keeping surface embroidery straight.
Gauge
22 stitches and 24 rows = 4 in (10 cm) worked in single crochet in turned rows using a 3.0 mm hook.
- Flat Panel Gauge Check: The 13 sc x 13 row square wall panel should measure exactly 2.35 in x 2.15 in (6.0 cm x 5.5 cm) before edging.
Abbreviations
| Abbreviation | US Crochet Term |
|---|---|
| ch | chain |
| st(s) | stitch(es) |
| sc | single crochet |
| hdc | half double crochet |
| sl st | slip stitch |
| sc2tog | single crochet 2 together (decrease across 2 sts) |
| sc3tog | single crochet 3 together (decrease across 3 sts) |
| BLO | back loop only |
| FLO | front loop only |
| RS | right side |
| WS | wrong side |
UK Conversion: sc = double crochet (dc), hdc = half treble crochet (htr), sl st = slip stitch (ss).
Special Stitches Explained
1. Single Crochet 2 Together (sc2tog)
Insert hook into next stitch, yarn over and draw up a loop (2 loops on hook). Insert hook into following stitch, yarn over and draw up a loop (3 loops on hook). Yarn over and pull through all 3 loops on hook. (1 st decreased)
2. Single Crochet 3 Together (sc3tog)
Insert hook into next stitch, yarn over and draw up a loop. Insert hook into next stitch, yarn over and draw up a loop. Insert hook into third stitch, yarn over and draw up a loop (4 loops on hook). Yarn over and pull through all 4 loops on hook. (2 sts decreased)
3. Surface Slip Stitch
Hold Cream yarn on the back (WS) of your fabric. Insert hook from the front (RS) to the back through a stitch hole. Yarn over on the back side, pull a loop up to the front (1 loop on hook). Insert hook into the next designated stitch hole, yarn over on the back side, pull a loop up through the fabric and through the loop on your hook. Keep working tension loose so the fabric does not pucker.
Pattern Instructions
Pattern Notes
- Turning chains do not count as a stitch throughout the pattern.
- All panels are worked flat in turned rows using single crochet.
- Keep wall tension tight and consistent to ensure the structure holds its square shape when lightly stuffed.
Section 1: Front Wall Panel (Ginger Brown, make 1)
With Ginger Brown yarn and 3.0 mm hook, ch 14.
- Row 1 (RS): Sc in 2nd ch from hook and in each ch across, turn (13 sc).
- Rows 2–13: Ch 1, turn, sc in each st across (13 sc).
Gable Peak Formation:
– Row 14: Ch 1, turn, sc2tog, sc in next 9 sts, sc2tog, turn (11 sc).
– Row 15: Ch 1, turn, sc2tog, sc in next 7 sts, sc2tog, turn (9 sc).
– Row 16: Ch 1, turn, sc2tog, sc in next 5 sts, sc2tog, turn (7 sc).
– Row 17: Ch 1, turn, sc2tog, sc in next 3 sts, sc2tog, turn (5 sc).
– Row 18: Ch 1, turn, sc2tog, sc in next 1 st, sc2tog, turn (3 sc).
– Row 19: Ch 1, turn, sc3tog (1 sc).
Fasten off, leaving a 12 in (30 cm) tail for seaming.
✅ Checkpoint: Front Wall panel should feature a 13-stitch square base topped by a symmetric 6-row triangular gable. Total height is 19 rows.
Section 2: Back Wall Panel (Ginger Brown, make 1)
With Ginger Brown yarn and 3.0 mm hook, ch 14.
- Row 1 (RS): Sc in 2nd ch from hook and in each ch across, turn (13 sc).
- Rows 2–13: Ch 1, turn, sc in each st across (13 sc).
- Row 14: Ch 1, turn, sc2tog, sc in next 9 sts, sc2tog, turn (11 sc).
- Row 15: Ch 1, turn, sc2tog, sc in next 7 sts, sc2tog, turn (9 sc).
- Row 16: Ch 1, turn, sc2tog, sc in next 5 sts, sc2tog, turn (7 sc).
- Row 17: Ch 1, turn, sc2tog, sc in next 3 sts, sc2tog, turn (5 sc).
- Row 18: Ch 1, turn, sc2tog, sc in next 1 st, sc2tog, turn (3 sc).
- Row 19: Ch 1, turn, sc3tog (1 sc).
Fasten off, leaving an 8 in (20 cm) tail for seaming.
Section 3: Side Wall Panels (Ginger Brown, make 2)
With Ginger Brown yarn and 3.0 mm hook, ch 14.
- Row 1 (RS): Sc in 2nd ch from hook and in each ch across, turn (13 sc).
- Rows 2–13: Ch 1, turn, sc in each st across (13 sc).
Fasten off, leaving an 8 in (20 cm) tail on each panel.
Section 4: Base Panel (Ginger Brown, make 1)
With Ginger Brown yarn and 3.0 mm hook, ch 14.
- Row 1 (RS): Sc in 2nd ch from hook and in each ch across, turn (13 sc).
- Rows 2–13: Ch 1, turn, sc in each st across (13 sc).
Fasten off and weave in ends.
Section 5: Roof Panels (Ginger Brown, make 2)
With Ginger Brown yarn and 3.0 mm hook, ch 16.
- Row 1 (RS): Sc in 2nd ch from hook and in each ch across, turn (15 sc).
- Rows 2–14: Ch 1, turn, sc in each st across (15 sc).
Do not fasten off. Proceed directly to decorative scalloped eaves border:
- Roof Lower Border (RS): Rotate piece to work across the bottom edge (Row 1 foundation chain). Join Cream yarn:
* (sc, hdc, sc) in next st, sl st in next st *repeat 7 times across the bottom edge, ending with (sc, hdc, sc) in the last st (15 sts along lower edge: 8 scalloped points).
Fasten off, leaving a 12 in (30 cm) tail of Cream yarn for detailing. Repeat for second Roof Panel.
Section 6: Embroidery & Surface Icing (Before Assembly)
Decorate the flat panels prior to seaming to achieve neat, professional lines.
1. Front Wall Details (Cream Yarn)
- Arch Door: Using Cream yarn and tapestry needle, stitch an arched door centered on the lower edge across sts 5 to 9, extending up from Row 1 to Row 8. Work a small French knot or embroidered dot on st 8 of Row 4 for the doorknob.
- Windows: Stitch two 3×3 square windows with cross-panes on either side of the door (Window 1: sts 2–4, Rows 4–7; Window 2: sts 10–12, Rows 4–7).
- Gable Heart: Embroider a small white heart on the center peak of the gable across Rows 15 to 17.
2. Side Wall Details (Cream Yarn)
- On each side panel, embroider a centered 4-pane square window across sts 5 to 9 and Rows 5 to 9 using Cream yarn backstitches.
3. Roof Decorative Icing (Cream Yarn)
- Using Cream yarn, work two horizontal rows of surface slip stitch zigzags across each roof panel along Row 5 and Row 10 to create the iconic icing design.
Section 7: Hanging Loop (Cream, make 1)
With Cream yarn, ch 31.
– Row 1: Sl st in 2nd ch from hook and in each ch across (30 sl st).
Fasten off, leaving a 6 in (15 cm) tail. Fold loop in half and secure ends to the top peak of one roof panel.
Assembly
- Seam Wall Box Structure: Place Front Wall, Side Wall 1, Back Wall, and Side Wall 2 side by side. Using tapestry needle and Ginger Brown yarn tails, seam the vertical edges (Rows 1–13) using whipstitch. Join Side Wall 2 back to Front Wall to form a 4-sided cube.
- Attach Base Panel: Align the 4 edges of the Base Panel with the bottom edges (Row 1) of the 4 walls. Whipstitch around all four sides using Ginger Brown yarn.
- Stuffing: Insert polyester fiberfill lightly into the box structure. Ensure the corners are filled evenly so the house maintains its clean square shape without bulging outward.
- Attach Roof Panels:
- Position the two Roof Panels over the top of the house so the scalloped eaves overhang the side walls evenly.
- Using Ginger Brown yarn, seam the upper edges (Row 14 of both roof panels) together along the center roof ridge.
- Whipstitch the sloping roof side edges directly to the angled gable top edges of the Front and Back walls.
- Frame Base & Edging: Using Cream yarn, work surface slip stitches along the bottom perimeter joint of the house where the base meets the walls to create a clean white foundation trim.
Finishing
- Pull the Cream hanging loop through the top center of the roof ridge seam so it hangs straight and balanced.
- Carefully weave in all remaining loose yarn tails inside the structure.
- Gently shape the roof eaves and corners with your fingers to ensure clean right angles.
Size Customization Tips
- Thicker / Bulky Yarn Option: To create a larger ornament (approx. 4.5 in / 11.5 cm tall), use Worsted / Aran weight yarn with a 3.75 mm or 4.0 mm hook. Follow the row and stitch counts exactly as written.
- Miniature Ornament Option: Use Fingering / 4-ply cotton yarn with a 2.0 mm hook for a tiny mini gingerbread house (approx. 2.0 in / 5 cm tall), ideal for miniature trees or gift tags.
Care Instructions
- Spot Clean Only: Blot gently with a damp cloth and mild liquid soap if needed. Do not soak or submerge in water to preserve the internal stuffing shape.
- Storage: Store flat in a dry, cool box wrapped in tissue paper during off-season months to prevent creasing or flattening of the roof eaves.
FAQ
Can I substitute acrylic yarn for cotton?
Yes! Acrylic yarn works very well for this project. Keep in mind that cotton provides slightly stiffer stitch definition, which helps the flat walls stay rigid, but acrylic gives a soft, light finish.
How do I stop my box shape from bulging after stuffing?
The key is to stuff lightly. Fill the four base corners first, then fill the upper gable apex. Do not overpack the center; otherwise, the single crochet side walls will bow outward.
Can I embroider the details after seaming the house?
It is strongly recommended to complete all surface embroidery and icing lines while the panels are completely flat. Embroidering after assembly is significantly harder and can distort the shape.
Happy Crocheting!
You now have a delightful handmade gingerbread ornament ready to adorn your tree! Be sure to save this pattern to your holiday Pinterest boards and share your finished creation in your favorite yarn colors!