Reader Favorites
Bunny Lovey Crochet Baby Security Blanket Free Crochet Pattern
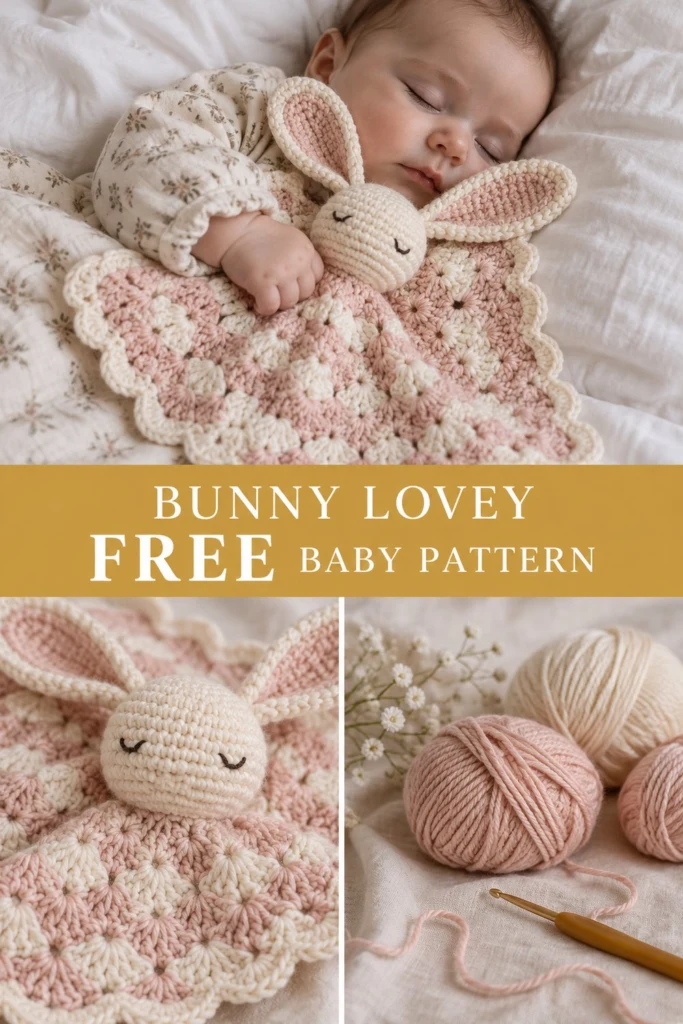
Meet the softest sleeping companion for your little one, designed to soothe and comfort during naps and travels. This charming security blanket pairs a delicate, textured shell stitch blanket with a huggable, stuffed bunny head featuring sweet embroidered eyes.
Bunny Lovey Crochet Baby Security Blanket Free Crochet Pattern
Quick Facts
- Skill level: Intermediate
- Finished size: Blanket is approximately 12 in x 12 in (30 cm x 30 cm) square; Bunny head is 3 in (7.5 cm) wide
- Yarn: Sport or light DK weight 100% cotton yarn in Cream and Blush Pink
- Hook: 3.5 mm (US E/4) crochet hook
- Stitches used: ch, sl st, sc, hdc, dc, shell stitch
- Time to make: 2 to 3 evenings
Size customization tips are included further down in the article.
What Makes This Bunny Lovey Special
Every detail of this lovey is designed with safety and texture in mind. The gentle shell stitch creates a tactile, quilted surface that little fingers love to grasp. The bunny ears are constructed to be sturdy yet floppy, perfect for pulling and comforting. The facial features are entirely embroidered with yarn using secure stitches, meaning there are no plastic safety eyes or small parts that could detach—making it completely safe for babies under three.
Skill Level
- Working in continuous single crochet rounds (amigurumi technique)
- Making magic rings and invisible decreases
- Working shell stitches in rows or rounds
- Basic yarn embroidery on crochet fabric
Don’t worry if you haven’t made an amigurumi-style toy before; I will walk you through every step below!
Finished Measurements
| Part | Width | Length / Height |
|---|---|---|
| Blanket Base | 12 in (30 cm) | 12 in (30 cm) |
| Bunny Head (Stuffed) | 3 in (7.5 cm) | 3 in (7.5 cm) |
| Bunny Ears (Each) | 1 in (2.5 cm) | 2.5 in (6.5 cm) |
Materials You Will Need
| Color Name | Yarn Weight / Fiber | Yards | Meters |
|---|---|---|---|
| Cream | Sport / 100% Cotton | 120 yds | 110 m |
| Blush Pink | Sport / 100% Cotton | 90 yds | 82 m |
| Dark Brown (scrap) | Sport / 100% Cotton | 3 yds | 3 m |
- Hook: 3.5 mm (US E/4) crochet hook
- Notions: Tapestry needle for weaving ends and embroidery, stitch markers, polyester toy stuffing (fiberfill), scissors.
Yarn Suggestions
| Yarn Name | Weight | Skein Yardage | Notes |
|---|---|---|---|
| Schachenmayr Catania | Sport | 137 yds (125 m) / 50g | Wonderful stitch definition, 100% mercerized cotton |
| Hobbii Rainbow Cotton 8/4 | Fingering/Sport | 185 yds (170 m) / 50g | Extremely soft, wide palette of baby-safe pastels |
| Drops Safran | Sport | 175 yds (160 m) / 50g | Durable, smooth, machine washable |
⚠️ Note: Avoid novelty yarns with long hairs, fuzzy mohair, or glitter threads for baby loveys, as loose fibers can pose a hazard. Stick to smooth mercerized or combed cottons that are gentle on baby skin and easy to wash.
Gauge
- Blanket stitch gauge: 2 shell repeats x 8 rows = 4 in (10 cm) square using a 3.5 mm hook.
- Bunny head gauge: Rnds 1 to 6 of the amigurumi head = 2 in (5 cm) across.
Abbreviations
- ch: chain
- sl st: slip stitch
- sc: single crochet
- hdc: half double crochet
- dc: double crochet
- shell: 5 dc in the same stitch or space indicated
- inc: increase (work 2 sc in the same stitch)
- dec: invisible decrease (insert hook in front loops of next 2 sts, yarn over, pull through both loops, yarn over and pull through 2 remaining loops)
- st(s): stitch(es)
- rep: repeat
- rnd(s): round(s)
- row(s): row(s)
- FO: fasten off
UK terms equivalent: sc = dc, hdc = htr, dc = tr.
Special Stitches Explained
- Magic Ring: Wrap yarn around your left index finger twice to form a ring. Insert hook under both strands, yarn over and pull up a loop, ch 1 to secure, then work your starting stitches into the ring. Pull the tail to close.
- Invisible Decrease (dec): Insert hook only into the front loop of the first stitch, then into the front loop of the second stitch. Yarn over, pull through both front loops, yarn over and pull through remaining two loops on hook.
- Shell Stitch: Work 5 double crochet stitches into the exact same designated stitch or chain space.
Pattern Instructions
Section 1: Blanket Base
The blanket is worked in a traditional textured shell stitch pattern, alternating between Cream and Blush Pink.
- Row 1 (Cream): Ch 71, work 1 sc in the 2nd ch from hook, *sk 2 ch, 5 dc in next ch, sk 2 ch, 1 sc in next ch* rep from * to * across. Turn. *(12 shells, 13 sc)*
- Row 2 (Blush Pink): Ch 3 (counts as first dc here and throughout), 2 dc in the first sc, *1 sc in the 3rd (center) dc of the next shell, 5 dc in the next sc* rep from * across ending with 3 dc in the final sc. Turn. *(11 full shells, 2 half-shells)*
- Row 3 (Cream): Ch 1, 1 sc in the first dc, *5 dc in the next sc, 1 sc in the center dc of the next shell* rep from * across, ending with 1 sc in the top of the turning chain. Turn. *(12 shells, 13 sc)*
- Rows 4 to 20: Alternate Cream and Blush Pink every 2 rows, repeating Rows 2 and 3. At the end of Row 20, do not FO; continue directly to the border.
- Border Rnd 1 (Cream): Working around the entire outer edge of the blanket square, work 1 sc in each stitch and row-end across the sides, working (1 sc, ch 2, 1 sc) in each of the 4 corner stitches to maintain a flat edge. Join with a sl st to the first sc. FO and weave in all ends. (296 sc, 4 ch-2 spaces)
✅ Checkpoint: Your blanket base should measure a neat 12 in x 12 in square with soft scalloped edges on all four sides.
Section 2: Bunny Head (Cream, Make 1)
Worked in continuous spiral rounds without joining. Use a stitch marker to track the first stitch of each round.
- Rnd 1: Start 6 sc in a magic ring. (6 sc)
- Rnd 2: Inc in each st around. (12 sc)
- Rnd 3: (1 sc, inc) x 6 around. (18 sc)
- Rnd 4: (2 sc, inc) x 6 around. (24 sc)
- Rnd 5: (3 sc, inc) x 6 around. (30 sc)
- Rnd 6: (4 sc, inc) x 6 around. (36 sc)
- Rnds 7 to 13: Sc in each st around. (36 sc)
- Rnd 14: (4 sc, dec) x 6 around. (30 sc)
- Rnd 15: (3 sc, dec) x 6 around. (24 sc)
- Rnd 16: (2 sc, dec) x 6 around. (18 sc)
Stuff the head firmly with polyester fiberfill now. - Rnd 17: (1 sc, dec) x 6 around. (12 sc)
- Rnd 18: Dec x 6 around. (6 sc)
- FO, leaving a 12 in (30 cm) tail. Use a tapestry needle to weave the tail through the front loops of the remaining 6 stitches and pull tight to close the hole securely.
Section 3: Bunny Ears (Cream and Blush Pink, Make 2)
Make the inner ear in Blush Pink and the outer ear in Cream.
Inner Ear (Blush Pink, Make 2)
- Row 1: Ch 8, work 1 sc in 2nd ch from hook, 1 sc in next 5 ch, 3 sc in last ch. Working along the opposite side of the foundation chain, work 1 sc in next 6 sts. Turn. (15 sc)
- FO Blush Pink, leaving an 8 in (20 cm) tail for sewing.
Outer Ear (Cream, Make 2)
- Row 1: Ch 8, work 1 sc in 2nd ch from hook, 1 sc in next 5 ch, 3 sc in last ch. Working along the opposite side of the foundation chain, work 1 sc in next 6 sts. Turn. (15 sc)
- Do not FO. Place the Blush Pink inner ear on top of the Cream outer ear, wrong sides facing. Working through both thicknesses simultaneously, sc evenly around the entire outer edge of the ear. FO, leaving a 10 in (25 cm) tail for attaching to the head.
Assembly
- Embroider the Face: Using Dark Brown yarn and a tapestry needle, embroider sleeping curved eyes with tiny eyelashes between Rnds 9 and 11 of the bunny head, spaced about 5 stitches apart. Add a tiny small inverted ‘v’ shaped nose just below the eyes.
- Attach Ears: Sew the bottom flat edge of each completed ear securely to the top of the bunny head between Rnds 3 and 5, positioning them about 4 stitches apart.
- Attach Head to Blanket: Locate the exact center of the blanket base. Using the remaining long yarn tail from the bunny head, sew the base of the head firmly to the center of the blanket using tight, secure whip stitches all around the neck base so it cannot be pulled off by a baby.
Finishing
- Weave in all loose yarn ends securely on the wrong side of the work.
- Gently block the blanket square with steam or a damp towel if needed to square up the edges.
Size Customization Tips
To make a larger security blanket, simply increase your starting foundation chain by a multiple of 6 stitches plus 2 (e.g., ch 83 or ch 95) and add extra rows of shell stitches in alternating colors until your desired blanket size is reached. Each additional 6-stitch repeat adds approximately 1 in (2.5 cm) of width.
Care Instructions
Machine wash gentle cycle in cold water using a mild baby detergent. Lay flat to dry in the shade. Do not bleach or tumble dry on high heat to preserve the softness of the cotton yarn.
FAQ
Can I use acrylic yarn instead of cotton?
Yes, you can substitute a soft acrylic sport or DK weight yarn, but 100% cotton is recommended for baby items because it holds its shape better, is less prone to pilling, and becomes softer with every wash.
How do I make the bunny head firmer?
Ensure you pack the fiberfill firmly into the head before closing Rnd 17. You can also use a hook that is one size smaller than recommended for your yarn to keep the single crochet stitches tight so stuffing doesn’t show through.
Is this lovey safe for newborns?
Yes! Because all facial features are embroidered with yarn instead of using plastic safety eyes or buttons, and the head is double-secured to the blanket center, there are no choking hazards for babies under three years old.
Happy Crocheting!
I hope you love making this sweet bunny security blanket as much as I loved designing it for you. Be sure to save the pin on Pinterest to your baby crochet board, and leave a comment below sharing what color combination you chose for your little one!
📄 Your free PDF pattern
⏳ Preparing your free PDF… 30s
Like this one? Save it for later.