Reader Favorites
Granny Square Crochet Christmas Tree Skirt Free Christmas Pattern
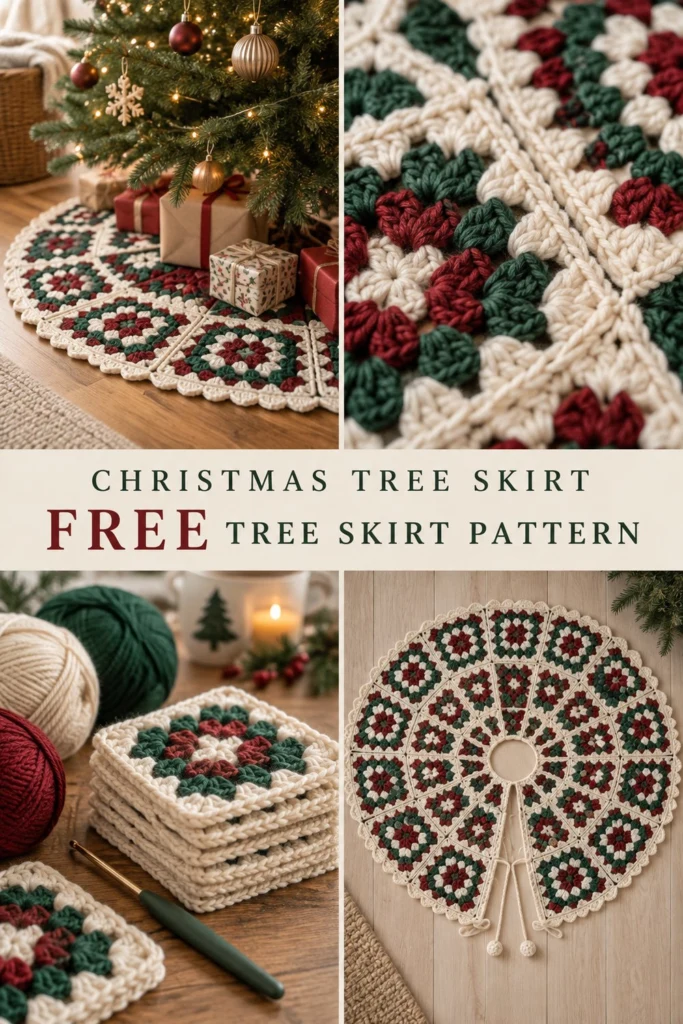
Transform your holiday decor with a stunning handmade heirloom using this free crochet pattern designed to bring traditional charm right to the base of your tree. Crafted from classic granny squares in creamy white, pine green, and cranberry, this project features a central opening and a back slit so it wraps easily around any tree stand, finished with a lovely scalloped border and two matching ties.
Granny Square Crochet Christmas Tree Skirt Free Christmas Pattern
Quick Facts
- Skill level: Intermediate
- Finished size: Approximately 100 cm (39 inches) in diameter
- Yarn: Worsted weight yarn in Cream, Pine Green, and Cranberry
- Hook: 5.0 mm (US H/8) crochet hook
- Stitches used: Ch, sl st, sc, dc, granny cluster (3-dc group)
- Time to make: Approximately 2 to 3 weeks working an evening a few squares at a time
Size adjustment tips and customization guidelines are included further down in this guide.
What Makes This Granny Square Tree Skirt Special
Working with individual motifs means you can easily take your project on the go, making a few squares each evening until you are ready to assemble them. The join-as-you-go method unites the squares seamlessly into a dramatic circle without sewing dozens of separate panels at the end. The classic color palette of cream, pine green, and cranberry evokes vintage holiday memories, while the scalloped border and twisted cord ties add a polished, professional finish that makes the skirt look boutique-made.
Skill Level
- Comfortable working in rounds and starting with a magic ring or chain loop
- Familiarity with the classic granny square technique
- Ability to join motifs using a join-as-you-go or slip stitch method
- Confidence following a repeated stitch sequence and working a lace border
Don’t worry if you haven’t assembled a motif-based project before—the step-by-step instructions below walk you through every single phase from your very first square to the final tie!
Finished Measurements
| Dimension | Inches | Centimeters |
|---|---|---|
| Diameter | 39 in | 100 cm |
| Center Hole Diameter | 4 in | 10 cm |
Materials You Will Need
| Color Name | Yarn Type / Weight | Yards | Meters |
|---|---|---|---|
| Cream | Worsted weight (4-ply) acrylic or wool blend | 700 yds | 640 m |
| Pine Green | Worsted weight (4-ply) acrylic or wool blend | 450 yds | 410 m |
| Cranberry | Worsted weight (4-ply) acrylic or wool blend | 350 yds | 320 m |
- Crochet Hook: 5.0 mm (US H/8)
- Notions: Yarn needle for weaving in ends, locking stitch markers, measuring tape
Yarn Suggestions
| Brand | Line | Skein Yardage | Notes |
|---|---|---|---|
| Lion Brand | Vanna’s Choice | 170 yds / 156 m per ball | Excellent stitch definition and holds its shape well |
| Caron | Simply Soft | 315 yds / 288 m per ball | Soft sheen, wide color availability |
| Paintbox Yarns | Simply Aran | 201 yds / 184 m per ball | Incredible range of precise holiday shades |
⚠️ Note: Avoid novelty yarns with fuzz or high stretch for the granny squares, as they obscure the geometric cluster structure and make joining difficult. Stick to smooth acrylic, wool, or cotton blends in the specified weight.
Gauge
- One finished square measures approximately 4.7 inches (12 cm) square using a 5.0 mm hook.
- Exact gauge is forgiving for granny squares, but maintaining consistent tension ensures flat, even joining.
Abbreviations
- ch: chain
- sl st: slip stitch
- sc: single crochet
- dc: double crochet
- cluster (cl): 3 dc worked in the same space
- sp: space
- st(s): stitch(es)
- rnd: round
- rep: repeat
- RS: right side
UK terms equivalent note: UK: sc = dc, hdc = htr, dc = tr.
Special Stitches Explained
- Granny Cluster (cl): Work 3 double crochet stitches into the designated space or chain-space.
- Corner Space: (3 dc, ch 2, 3 dc) worked into the same chain-2 space.
Pattern Instructions
Section 1: Granny Squares (Make 60 Total)
Color sequence per square:
– Rnd 1 (Center): With Cranberry, make a magic ring, ch 3 (counts as first dc), 2 dc in ring, ch 2, (3 dc in ring, ch 2) 3 times; join with sl st to top of beg ch-3. Fasten off Cranberry. (4 clusters, 4 ch-2 sps)
– Rnd 2: Join Pine Green in any ch-2 corner sp, ch 3, (2 dc, ch 2, 3 dc) in same sp, *ch 1, skip 3 dc, (3 dc, ch 2, 3 dc) in next ch-2 corner sp*; rep from * around, ch 1, join with sl st to top of beg ch-3. Fasten off Pine Green. *(8 clusters, 4 ch-1 sps, 4 ch-2 sps)*
– Rnd 3: Join Cream in any ch-2 corner sp, ch 3, (2 dc, ch 2, 3 dc) in same sp, *ch 1, work cl in ch-1 sp, ch 1, (3 dc, ch 2, 3 dc) in next ch-2 corner sp*; rep from * around, ch 1, work cl in ch-1 sp, ch 1, join with sl st to top of beg ch-3. Fasten off Cream, leaving a 6-inch tail for joining. *(12 clusters, 8 ch-1 sps, 4 ch-2 sps)*
Section 2: Assembly and Join-As-You-Go
The tree skirt is assembled in concentric tiers radiating outward from the center opening to the outer edge, leaving one radial slit open for wrapping around the tree base.
– Arrange your 60 squares into the layout shown in the photos: a ring of 10 squares for the inner tier, 20 squares for the middle tier, and 30 squares for the outer tier.
– Join the squares along their edges using a slip stitch seam through the back loops only with Cream yarn, working from the inside collar down to the outer border, leaving the straight back opening unjoined.
Section 3: Scalloped Outer Border
- Rnd 1: Join Cream yarn at the top-right corner of the back slit. Work 1 sc in each stitch and 2 sc in each ch-2 corner space all around the outer perimeter of the tree skirt, including the inner circle and both edges of the back slit. Join with sl st to first sc. (420 sc)
- Rnd 2: Ch 1, *skip 1 st, 5 dc in next st, skip 1 st, sc in next st*; rep from * around the outer scalloped edge of the skirt, ending with a sl st to the first st. Fasten off. *(105 shells)*
Section 4: Ties
- Make two braided or twisted cords using 3 strands of Cream yarn, each approximately 12 inches (30 cm) long.
- Securely attach one tie to each side of the upper back slit opening, about 2 inches down from the collar, so they can be tied in a bow once wrapped around the tree.
✅ Checkpoint: Verify that your center hole measures approximately 4 inches across and the back slit lies flat before weaving in all remaining yarn tails.
Size Customization Tips
- To fit a wider tree base, add another tier of squares or increase the inner ring count by increments of 5 squares, adjusting the border stitch count accordingly.
- For a smaller tabletop tree skirt, reduce the pattern to two tiers of squares instead of three.
Care Instructions
Hand wash gently in cool water with mild wool detergent. Lay flat on a clean towel to block into a perfect circle, reshaping the outer scallops and allowing to dry completely before placing under the tree.
FAQ
Can I use different yarn colors for a non-traditional Christmas theme?
Yes! You can easily swap the cranberry and pine green for ice blues and silvers, or pastels, while keeping the cream background for contrast.
How do I prevent the center circle from stretching out over time?
Work a round of single crochet tightly around the inner collar during the border phase to stabilize the neckline against the weight of the tree stand.
Is this pattern suitable for confident beginners?
Definitely. If you know how to make a basic granny square, you can make this tree skirt by simply joining the squares in concentric rows and adding the border.
Happy Crocheting!
I hope you love creating this heirloom tree skirt for your holiday celebrations. Save this pin on Pinterest to keep the pattern handy, and leave a comment below sharing what color combination you plan to use!
📄 Your free PDF pattern
⏳ Preparing your free PDF… 30s
Like this one? Save it for later.