Reader Favorites
Cozy Scarf Penguin Crochet Amigurumi Free Christmas Pattern
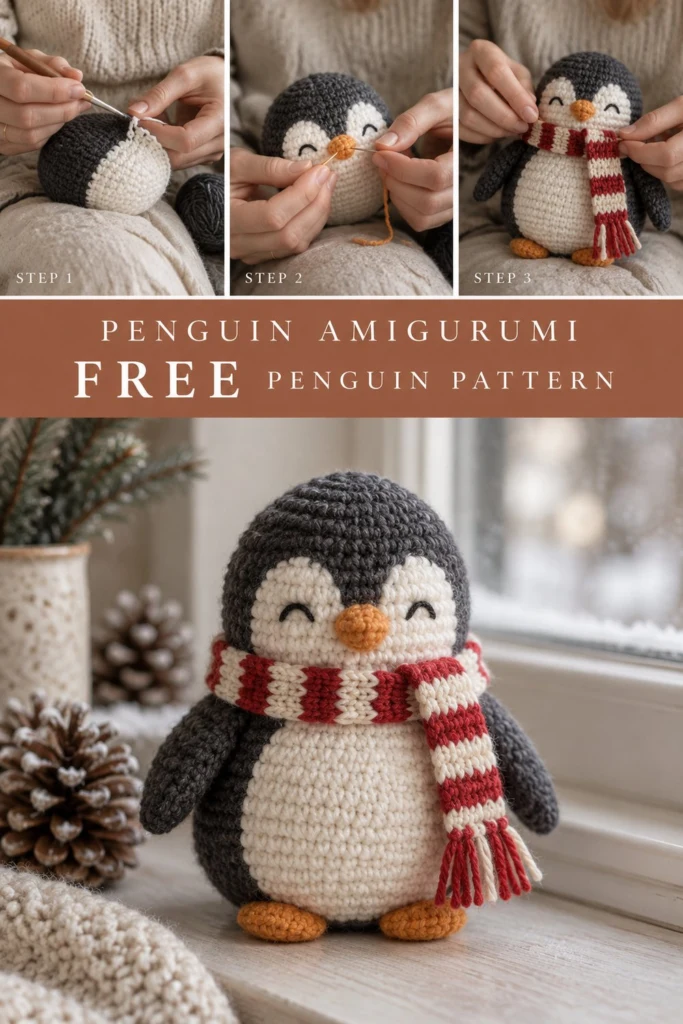
Create an irresistible holiday keepsake with this charming, egg-shaped penguin amigurumi complete with a classic red and white striped scarf. Working in continuous single crochet rounds with a built-in tummy color change means zero annoying sewn-on patches, while flat flippers, a textured orange beak, and embroidered sleeping eyes create a baby-safe finished toy that looks straight out of a winter wonderland.
Cozy Scarf Penguin Crochet Amigurumi Free Christmas Pattern
Quick Facts
- Skill level: Intermediate
- Finished size: 6 inches tall and 4.5 inches wide
- Yarn: Worsted weight (Medium 4) acrylic yarn in Dark Charcoal, Cream, Orange, and Red
- Hook: 3.5 mm (US E/4) crochet hook
- Stitches used: Magic ring, chain, single crochet, slip stitch, increase, invisible decrease
- Time to make: 4 to 6 hours
Size customization tips are included further down the page to help you adapt your yarn weight if needed.
What Makes This Penguin Amigurumi Special
This little holiday companion combines clean amigurumi shaping with clever construction. The white belly is worked directly into the body rounds using a clean color-change technique, eliminating clumsy sewn patches. The wings are worked flat and joined seamlessly, and the embroidered sleeping eyes give the toy a sweet, peaceful expression while keeping it entirely baby-safe without plastic components.
Skill Level
- Working in the round (spiral)
- Basic color changes in single crochet
- Making invisible decreases
- Basic surface embroidery
You’ll master these techniques in no time with our step-by-step instructions.
Finished Measurements
| Dimension | Inches | Centimeters |
|---|---|---|
| Height | 6.0 in | 15.2 cm |
| Width | 4.5 in | 11.4 cm |
| Depth | 4.5 in | 11.4 cm |
Materials You Will Need
| Material | Color | Details | Amount |
|---|---|---|---|
| Worsted Weight Yarn | Dark Charcoal | Main body and flippers | 80 yards (73 meters) |
| Worsted Weight Yarn | Cream | Tummy and face patches | 40 yards (37 meters) |
| Worsted Weight Yarn | Orange | Beak and feet | 20 yards (18 meters) |
| Worsted Weight Yarn | Red | Scarf stripes | 25 yards (23 meters) |
| Crochet Hook | N/A | 3.5 mm (US E/4) | 1 hook |
| Notions | N/A | Polyester fiberfill stuffing | 1 oz (30 g) |
| Notions | N/A | Stitch markers | 2 markers |
| Notions | N/A | Yarn needle and embroidery floss (Black) | For eyes and mouth |
Yarn Suggestions
| Yarn Line | Weight | Skein Yardage | Notes |
|---|---|---|---|
| Lion Brand Vanna’s Choice | Worsted (4) | 170 yds / 156 m | Great stitch definition for amigurumi |
| Red Heart Super Saver | Worsted (4) | 364 yds / 333 m | Firm structure, holds stuffing shape well |
| Caron Simply Soft | Worsted (4) | 315 yds / 288 m | Soft drape, slight sheen |
⚠️ Note: Avoid novelty, fuzzy, or eyelash yarns for the main body rounds, as they obscure your stitch definition and make counting rounds difficult when working in continuous spirals.
Gauge
- Amigurumi gauge: Rnds 1 to 6 of the flat circle = 2.0 inches (5 cm) across using a 3.5 mm hook.
- Exact gauge is not critical for amigurumi, but maintain a tight, even tension so the polyester stuffing does not peek through your stitches.
Abbreviations
| Abbreviation | Meaning |
|---|---|
| ch | Chain |
| sc | Single crochet |
| inc | Single crochet increase (2 sc in the same st) |
| dec | Invisible decrease (insert hook in front loops of next 2 sts, yo, pull through both, yo, pull through 2 loops) |
| sl st | Slip stitch |
| st(s) | Stitch(es) |
| r(nd)s | Round(s) |
| rep | Repeat |
| yo | Yarn over |
UK: sc = dc, hdc = htr, dc = tr.
Special Stitches Explained
- Magic Ring: Wrap yarn around your left index finger twice, insert hook under both strands, pull up a loop, ch 1, and work the first round of stitches into the ring. Pull the tail to close.
- Invisible Decrease: Insert hook into the front loop only of the next stitch, then insert hook into the front loop only of the following stitch. Yarn over and pull through both front loops, yarn over and pull through remaining 2 loops on hook.
Pattern Instructions
Pattern Notes:
– The body is worked in continuous spiral rounds without joining. Use a stitch marker to track the first stitch of each round.
– Color changes for the tummy are worked horizontally by switching yarn colors mid-round as indicated. Carry the unused yarn loosely across the back of the work when spanning short distances, or drop and pick up to prevent puckering.
Section 1: Body (Dark Charcoal and Cream, make 1)
Starting at the bottom base with Dark Charcoal:
– Rnd 1: With Dark Charcoal, 6 sc in a magic ring (6 sc)
– Rnd 2: (inc) x 6 (12 sc)
– Rnd 3: (1 sc, inc) x 6 (18 sc)
– Rnd 4: (2 sc, inc) x 6 (24 sc)
– Rnd 5: (3 sc, inc) x 6 (30 sc)
– Rnd 6: (4 sc, inc) x 6 (36 sc)
– Rnd 7: (5 sc, inc) x 6 (42 sc)
– Rnd 8: Work BLO: (6 sc, inc) x 6 (48 sc)
– Rnds 9 to 13: sc in each st around (48 sc)
– Rnd 14: 18 sc in Dark Charcoal, switch to Cream and work 12 sc in Cream, switch to Dark Charcoal and work 18 sc in Dark Charcoal (48 sc)
– Rnd 15: 17 sc in Dark Charcoal, switch to Cream and work 14 sc in Cream, switch to Dark Charcoal and work 17 sc in Dark Charcoal (48 sc)
– Rnd 16: 16 sc in Dark Charcoal, switch to Cream and work 16 sc in Cream, switch to Dark Charcoal and work 16 sc in Dark Charcoal (48 sc)
– Rnds 17 to 24: 15 sc in Dark Charcoal, switch to Cream and work 18 sc in Cream, switch to Dark Charcoal and work 15 sc in Dark Charcoal (48 sc)
– Rnd 25: 16 sc in Dark Charcoal, switch to Cream and work 16 sc in Cream, switch to Dark Charcoal and work 16 sc in Dark Charcoal (48 sc)
– Rnd 26: 17 sc in Dark Charcoal, switch to Cream and work 14 sc in Cream, switch to Dark Charcoal and work 17 sc in Dark Charcoal (48 sc)
– Rnd 27: 18 sc in Dark Charcoal, switch to Cream and work 12 sc in Cream, switch to Dark Charcoal and work 18 sc in Dark Charcoal (48 sc)
– Rnd 28: Cut Cream yarn leaving a short tail to weave in. With Dark Charcoal only: (6 sc, dec) x 6 (42 sc)
– Rnd 29: (5 sc, dec) x 6 (36 sc)
– Rnd 30: (4 sc, dec) x 6 (30 sc)
✅ Checkpoint: Stuff the body firmly with polyester fiberfill at this point, shaping it into an egg-like upright cylinder.
- Rnd 31: (3 sc, dec) x 6 (24 sc)
- Rnd 32: (2 sc, dec) x 6 (18 sc)
- Rnd 33: (1 sc, dec) x 6 (12 sc)
- Rnd 34: (dec) x 6 (6 sc)
Fasten off, leaving a 6-inch tail. Thread through the front loops of the remaining 6 stitches and pull tight to close the top of the head.
Section 2: Face Patches (Cream, make 2)
- Rnd 1: With Cream, 6 sc in a magic ring (6 sc)
- Rnd 2: (inc) x 6 (12 sc)
- Rnd 3: (1 sc, inc) x 6 (18 sc)
- Rnd 4: sc in each st around (18 sc)
Fasten off, leaving a 10-inch tail for sewing.
Section 3: Flippers (Dark Charcoal, make 2)
Working in rows, ch 2 and turn after each row:
– Row 1: 6 sc in a magic ring, pull closed, do not join in round, turn (6 sc)
– Row 2: (1 sc, inc) x 3 (9 sc)
– Rows 3 to 7: sc in each st across (9 sc)
– Row 8: (1 sc, dec) x 3 (6 sc)
– Rows 9 to 11: sc in each st across (6 sc)
Fasten off, leaving a 10-inch tail for sewing. Do not stuff the flippers. Flatten them before attaching.
Section 4: Beak (Orange, make 1)
- Rnd 1: With Orange, 4 sc in a magic ring (4 sc)
- Rnd 2: (1 sc, inc) x 2 (6 sc)
- Rnd 3: (2 sc, inc) x 2 (8 sc)
- Rnd 4: (3 sc, inc) x 2 (10 sc)
Fasten off, leaving a 10-inch tail. Lightly stuff.
Section 5: Feet (Orange, make 2)
- Rnd 1: With Orange, 6 sc in a magic ring (6 sc)
- Rnd 2: (inc) x 6 (12 sc)
- Rnds 3 to 4: sc in each st around (12 sc)
- Rnd 5: (2 sc, dec) x 3 (9 sc)
Fasten off, leaving a 10-inch tail. Lightly stuff.
Section 6: Scarf (Red and Cream, make 1)
Working in rows, starting with Red:
– Row 1: With Red, ch 52, sc in 2nd ch from hook and in each ch across, turn (51 sc)
– Row 2: With Red, ch 1, sc across (51 sc)
– Row 3: Switch to Cream, ch 1, sc across (51 sc)
– Row 4: With Cream, ch 1, sc across (51 sc)
– Row 5: Switch to Red, ch 1, sc across (51 sc)
– Row 6: With Red, ch 1, sc across (51 sc)
Fasten off, weave in ends. Attach 2-inch fringe strands using Red and Cream yarn remnants to both short ends of the scarf.
Assembly
- Face Patches: Sew the two Cream face patches onto the upper front of the body, centered over the tummy color change between Rnds 12 and 22, leaving a small V-shape of dark charcoal between them at the crown.
- Beak: Position the stuffed orange beak centrally overlapping the lower inner edges of the two face patches, spanning Rnds 16 to 19, and sew securely.
- Eyes: Using black embroidery floss and a yarn needle, stitch sleeping curved eyes with upward eyelashes onto the cream face patches just above the upper corners of the beak.
- Fippers: Flatten the flippers and sew them to the left and right sides of the body spanning Rnds 14 to 22.
- Feet: Flatten the stuffed feet and sew them to the bottom base of the body on Rnds 2 to 5 so the penguin sits upright.
- Scarf: Wrap the striped scarf snugly around the penguin’s neck just below the beak, overlapping the ends on the right side. Secure with a few discreet stitches so it stays in place.
Finishing
Weave in all remaining yarn ends securely inside the body. Check that all sewn components are firmly attached.
Size Customization Tips
- To make a larger penguin, use Bulky weight yarn (Weight 5) with a 5.0 mm crochet hook; each extra increase round in the base adds approximately 1.2 inches to the finished width.
- To make a miniature ornament version, use Sport weight yarn (Weight 2) with a 2.5 mm crochet hook.
Care Instructions
Spot clean gently with a damp cloth and mild soap. Do not submerge completely in water or machine wash to protect the polyester fiberfill shape and embroidered features.
FAQ
Can I use safety eyes instead of embroidery?
Yes, you can use 8 mm plastic safety eyes inserted into the face patches before stuffing the body. However, embroidered eyes are strongly recommended if making this toy for infants or toddlers under 3 years old.
How do I keep my color changes clean on the tummy?
When switching colors on the tummy rounds, drop the working yarn to the back and pick up the new color by pulling up a loop through the final pull-through of the previous stitch. This prevents jagged color jogs.
Can I adjust the length of the scarf?
Definitely! Simply chain more or fewer stitches in Row 1 of the scarf section (maintaining an odd total number) to make it longer or shorter to your preference.
Happy Crocheting!
I hope you love creating your cozy scarf penguin amigurumi this holiday season. Be sure to save this pin to your Christmas crochet boards on Pinterest, and leave a comment below to share what colors you used for your winter friend!
📄 Your free PDF pattern
⏳ Preparing your free PDF… 30s
Like this one? Save it for later.