Reader Favorites
Cheerful Snowman Crochet Amigurumi Free Christmas Pattern
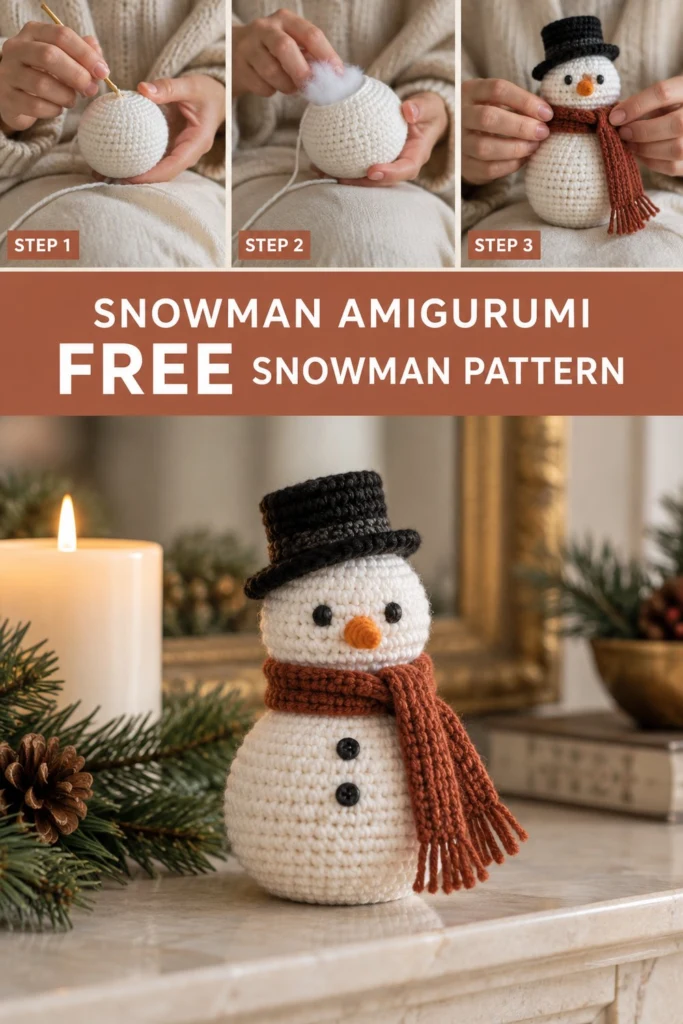
Bring cozy holiday charm to your mantelpiece with this cheerful amigurumi snowman! Crafted from simple continuous single crochet rounds, this festive classic features a structured lower body, a neatly shaped head, a tiny brimmed top hat, a soft carrot nose, and a cozy ribbed scarf with fringed edges.
Cheerful Snowman Crochet Amigurumi Free Christmas Pattern
Quick Facts
- Skill level: Easy / Advanced Beginner
- Finished size: Approximately 6 inches (15 cm) tall from base to top of hat
- Yarn: Light Worsted / DK weight yarn in Cream, Rust, Black, and Bright Orange
- Hook: 3.0 mm (US C/2 or D/3) crochet hook
- Stitches used: Magic Ring, single crochet (sc), half double crochet (hdc), increase (inc), decrease (dec), back loop only (BLO), front loop only (FLO)
- Time to make: 2 to 3 hours
Note: Custom size tips are provided near the bottom of this article if you wish to adjust the height of your snowman.
What Makes This Snowman Amigurumi Special
- Sturdy Standing Base: The spherical lower body is stuffed firmly with optional weighted poly-pellets in the bottom to ensure your snowman sits perfectly upright on shelves or mantels.
- Textured Ribbed Scarf: Worked in back-loop-only half double crochet rows, the vibrant rust scarf mimics a tiny hand-knitted winter accessory complete with tassel fringe.
- Classic Sculpted Top Hat: The black top hat features a clean fold line created by working into the back loops, giving the crown a crisp shape before flaring into a flat outer brim.
- Simple Seamless Stitching: Worked in continuous sc spirals, there are no unsightly joining seams down the back of the body or head.
Skill Level
- Required Skills:
- Working in continuous spirals (amigurumi method)
- Basic increases and invisible decreases
- Working in specific loops (BLO and FLO)
- Simple assembly, stuffing, and button sewing
If you have mastered the magic ring and basic single crochet stitches, this pattern is a smooth and quick project for holiday gift-giving or holiday decor!
Finished Measurements
| Component | Width / Diameter | Height |
|---|---|---|
| Lower Body Sphere | 3.25 in (8.5 cm) | 3.0 in (7.5 cm) |
| Head Sphere | 2.5 in (6.5 cm) | 2.25 in (6.0 cm) |
| Top Hat | 2.25 in (6.0 cm) brim diameter | 1.25 in (3.0 cm) |
| Total Snowman | 3.5 in (9.0 cm) width across body | 6.0 in (15.0 cm) height |
Materials You Will Need
| Material / Yarn | Specific Color | Quantity / Yardage |
|---|---|---|
| Yarn A (DK / Light Worsted) | Cream | 65 yd (60 m) / 25 g |
| Yarn B (DK / Light Worsted) | Rust | 20 yd (18 m) / 8 g |
| Yarn C (DK / Light Worsted) | Black | 18 yd (16 m) / 7 g |
| Yarn D (DK / Light Worsted) | Bright Orange | 4 yd (4 m) / 2 g |
| Crochet Hook | — | 3.0 mm (US C/2 or D/3) |
| Safety Eyes | Black | 2 x 6 mm plastic safety eyes |
| Buttons | Black | 2 x 9 mm 2-hole black buttons |
| Stuffing | White | Premium polyester fiberfill (approx. 25 g) |
| Notions | — | Tapestry needle, stitch marker, scissors, black sewing thread |
Yarn Suggestions
| Brand & Line | Fiber Content | Skein Yardage / Weight | Notes |
|---|---|---|---|
| Paintbox Yarns Simply DK | 100% Premium Acrylic | 302 yd (276 m) / 100 g | Durable matte finish, extensive color palette. |
| Ricorumi DK Cotton | 100% Cotton | 63 yd (57.5 m) / 25 g | Excellent stitch definition and crisp shape. |
| Scheepjes Catona | 100% Mercerized Cotton | 137 yd (125 m) / 50 g | Smooth yarn with a slight sheen; tight stitches. |
⚠️ Note: Avoid using fuzzy, chenille, or novelty yarns for this pattern if you are a beginner. Thick plush yarns obscure stitch loops and make counting rounds accurately very difficult.
Gauge
- Amigurumi Gauge: 6 sc x 6 rnds = 1 in (2.5 cm) using a 3.0 mm hook.
- Gauge Check: Rnds 1 to 6 of the flat continuous circle (Body) = 2.0 in (5.0 cm) across.
Abbreviations
| Abbreviation | Definition (US Terms) |
|---|---|
| ch | Chain |
| sc | Single crochet |
| hdc | Half double crochet |
| inc | Increase (2 sc in same st) |
| dec | Invisible decrease (sc2tog through front loops) |
| BLO | Back loop only |
| FLO | Front loop only |
| st(s) | Stitch(es) |
| rnd(s) | Round(s) |
| row(s) | Row(s) |
| sl st | Slip stitch |
| MR | Magic Ring |
UK Conversion: sc = dc (double crochet), hdc = htr (half treble crochet).
Special Stitches Explained
- Magic Ring (MR): Loop yarn around your fingers, insert hook into loop, yarn over and draw up a loop. Chain 1, then work the specified number of single crochets into the adjustable loop. Pull the tail end firmly to close the central hole tightly.
- Invisible Decrease (dec): Insert hook into the front loop only of the first stitch, then immediately insert hook into the front loop only of the next stitch (2 loops on hook). Yarn over, pull through both front loops, yarn over, and pull through remaining 2 loops on hook.
Pattern Instructions
Pattern Notes
- All body and head pieces are worked in continuous spirals. Do not join with a slip stitch or turn at the end of rounds unless specified. Place a stitch marker in the first stitch of each round to keep count.
- The scarf is worked in turned rows.
Section 1: Lower Body (Cream, make 1)
With Cream yarn, form a Magic Ring.
- Rnd 1: 6 sc in MR (6 sc)
- Rnd 2: inc in each st around (12 sc)
- Rnd 3: (1 sc, inc) x 6 (18 sc)
- Rnd 4: (2 sc, inc) x 6 (24 sc)
- Rnd 5: (3 sc, inc) x 6 (30 sc)
- Rnd 6: (4 sc, inc) x 6 (36 sc)
- Rnd 7: (5 sc, inc) x 6 (42 sc)
- Rnds 8 to 14: sc in each st around (42 sc)
- Rnd 15: (5 sc, dec) x 6 (36 sc)
- Rnd 16: (4 sc, dec) x 6 (30 sc)
- Rnd 17: (3 sc, dec) x 6 (24 sc)
💡 Designer Tip: Stuff the body base firmly now. If you want a weighted base, insert a small pouch of plastic poly-pellets at the bottom center, then surround it with polyester fiberfill.
- Rnd 18: (2 sc, dec) x 6 (18 sc)
- Rnd 19: (1 sc, dec) x 6 (12 sc)
- Rnd 20: dec x 6 (6 sc)
Fasten off, leaving a 10 in (25 cm) yarn tail. Thread the tail through a tapestry needle, weave through the front loops of the final 6 stitches, pull tightly to close the opening, and weave in the end.
✅ Checkpoint: The lower body sphere should measure approximately 3.25 inches (8.5 cm) wide and sit upright firmly when placed on a flat table.
Section 2: Head (Cream, make 1)
With Cream yarn, form a Magic Ring.
- Rnd 1: 6 sc in MR (6 sc)
- Rnd 2: inc in each st around (12 sc)
- Rnd 3: (1 sc, inc) x 6 (18 sc)
- Rnd 4: (2 sc, inc) x 6 (24 sc)
- Rnd 5: (3 sc, inc) x 6 (30 sc)
- Rnds 6 to 11: sc in each st around (30 sc)
⚠️ Note: Insert the 6 mm safety eyes between Rnds 8 and 9, spaced approximately 5 stitches apart. Secure safety backings inside.
- Rnd 12: (3 sc, dec) x 6 (24 sc)
- Rnd 13: (2 sc, dec) x 6 (18 sc)
Stuff the head firmly with polyester fiberfill, taking care to maintain a neat spherical shape.
- Rnd 14: (1 sc, dec) x 6 (12 sc)
- Rnd 15: dec x 6 (6 sc)
Fasten off, leaving a 14 in (35 cm) yarn tail for sewing the head to the body. Thread needle through the remaining front loops, pull to close, and keep the remaining tail attached.
Section 3: Carrot Nose (Bright Orange, make 1)
With Bright Orange yarn, form a Magic Ring.
- Rnd 1: 4 sc in MR (4 sc)
- Rnd 2: (1 sc, inc) x 2 (6 sc)
- Rnd 3: (2 sc, inc) x 2 (8 sc)
- Rnd 4: sc in each st around (8 sc)
Fasten off, leaving an 8 in (20 cm) yarn tail. Do not stuff.
Section 4: Top Hat (Black, make 1)
With Black yarn, form a Magic Ring.
- Rnd 1: 6 sc in MR (6 sc)
- Rnd 2: inc in each st around (12 sc)
- Rnd 3: (1 sc, inc) x 6 (18 sc)
- Rnd 4: (2 sc, inc) x 6 (24 sc)
- Rnd 5: BLO sc in each st around (24 sc)
- Rnds 6 to 9: sc in each st around (24 sc)
- Rnd 10: FLO (1 sc, inc) x 12 (36 sc)
- Rnd 11: (2 sc, inc) x 12 (48 sc)
Fasten off with a slip stitch into the next stitch. Leave a 12 in (30 cm) tail for attaching to the head. Lightly stuff the inner crown of the hat with fiberfill.
Section 5: Ribbed Scarf (Rust, make 1)
With Rust yarn, ch 51.
- Row 1: hdc in 2nd ch from hook and in each ch across, turn (50 hdc)
- Row 2: ch 1 (does not count as st here and throughout), BLO hdc in each st across, turn (50 hdc)
- Row 3: ch 1, BLO hdc in each st across (50 hdc)
Fasten off and weave in loose ends.
Fringe Details:
Cut 8 strands of Rust yarn, each 4 in (10 cm) long. Group into pairs of 2 strands. Fold each pair in half, pull the center loop through an edge stitch at the end of the scarf, and pull the thread ends through the loop to form a knot. Repeat to attach 2 fringe knots to each end of the scarf. Trim fringe evenly to 0.75 in (2 cm).
Assembly
-
Attaching Head to Body:
Position the head centered directly over the closed top of the lower body sphere (over Rnds 18–20 of the body). Using the long Cream tail from the head, whipstitch around the joining seam, securing the head to the body. Pull stitches snug so the head stays rigid. -
Attaching the Nose:
Center the orange carrot nose between the safety eyes over Rnds 8 and 9 of the head. Sew the open base of the cone securely to the head using the orange yarn tail. -
Attaching the Top Hat:
Position the top hat on top of the head angled slightly to one side for character. Use the long black yarn tail to sew through the leftover inner loops of Rnd 10 around the top of the head. -
Attaching Buttons:
Using black sewing thread and a sewing needle, sew the two small 9 mm black buttons onto the front center of the lower body ball. Place the upper button at Rnd 11 and the lower button at Rnd 8. -
Draping the Scarf:
Wrap the ribbed rust scarf twice around the neck seam between the head and body. Tie a gentle knot on the right side and allow the fringed ends to fall downward across the lower body.
Finishing
- Thread any remaining tails into the body cavity and snip flush with the fabric.
- Gently roll the snowman between your palms to adjust fiberfill alignment.
Size Customization Tips
- Larger Mantel Snowman: Work with Worsted weight (Category 4) yarn and a 3.75 mm (US F/5) hook. Using the same pattern steps will result in a finished snowman approximately 8.5 inches (21.5 cm) tall.
- Miniature Ornament Snowman: Use Fingering weight yarn and a 2.0 mm hook with 4 mm safety eyes. This will reduce the size to roughly 3.5 inches (9.0 cm) tall, perfect for hanging on a Christmas tree.
Care Instructions
- Cleaning: Spot clean gently using cold water and mild detergent. Do not submerge completely if weighted with metal or wooden beads.
- Drying: Air dry horizontally on a dry towel away from direct heat or sunlight.
- Storage: Store in a breathable cotton bag during off-season months to prevent dust accumulation.
FAQ
Can I embroider the eyes instead of using safety eyes?
Yes! If you are making this snowman for a child under 3 years old, omit the plastic safety eyes and sew french knots or small vertical satin stitches using black embroidery floss between Rnds 8 and 9.
Why does my top hat brim curl upward excessively?
If the brim curls, your tension on Rnd 11 may be too tight. Try using a hook one size larger (3.5 mm) for the two brim rounds (Rnds 10 and 11), or flatten the brim gently with a steam iron held 2 inches away from the acrylic yarn.
How do I stop the body from leaning over?
Ensure the body sphere is stuffed firmly, particularly around the neck area where the head meets the body. Inserting weighted poly-pellets into a small stocking pouch at the bottom of Rnd 1 ensures a low center of gravity.
Happy Crocheting!
You are all done! Save this pin to your favorite Christmas Crochet board on Pinterest so you can easily find it every holiday season. Pick your yarn colors and start stitching your own festive snowman today!
📄 Your free PDF pattern
⏳ Preparing your free PDF… 30s
Like this one? Save it for later.