Reader Favorites
Poinsettia Crochet Plant Pot Cover Free Christmas Pattern

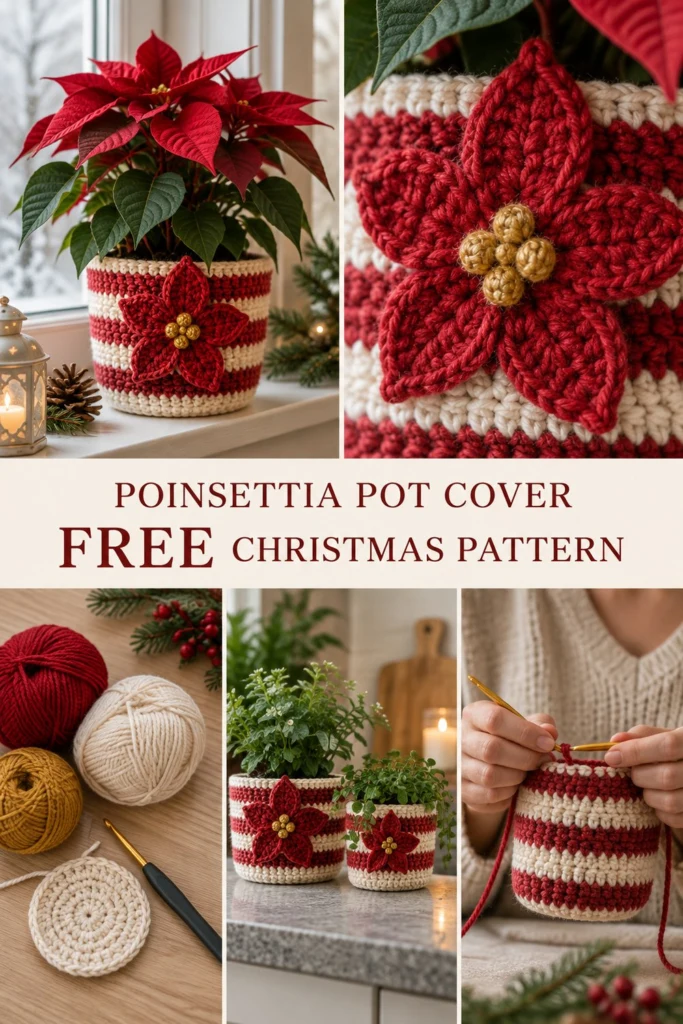
Brighten up your holiday windowsill with a cozy, hand-crocheted sleeve for your seasonal greenery. Standard plastic nursery pots and shiny foil wrappers from the supermarket never quite match festive home decor, but this textured cover transforms a standard 14 cm plant pot into a handcrafted centerpiece. Featuring crisp red-and-cream stripes, a sturdy flat base, and a striking appliquéd poinsettia flower with golden bobble centers, it is a quick weekend project that you can wash and reuse year after year.
Poinsettia Crochet Plant Pot Cover Free Christmas Pattern
Quick Facts
- Skill level: Easy / Advanced Beginner
- Finished size: Fits a standard 14 cm (5.5 in) base plant pot; 12 cm (4.75 in) height
- Yarn: Worsted weight (#4 Medium) acrylic or cotton yarn in Cream, Deep Red, and Gold
- Hook: 4.5 mm (US 7) crochet hook
- Stitches used: Single crochet (sc), Half double crochet (hdc), Double crochet (dc), Slip stitch (sl st), Back loop only (BLO), 3-dc Bobble
- Time to make: 2 to 3 hours
Custom size adjustments for larger or smaller plant pots are detailed in the Size Customization Tips section below.
What Makes This Pot Cover Special
- Seamless Base-to-Wall Transition: A dedicated back-loop-only (BLO) round creates a crisp 90-degree ridge around the bottom edge, helping the cover sit perfectly flat against windowsills or countertops without rolling.
- Sturdier Dense Fabric: Worked using single crochet in continuous rounds, the fabric creates a dense, non-stretch wall that easily supports plastic plant pots and keeps excess moisture away from surfaces.
- Dimensional Appliqué: The 5-petal poinsettia is crocheted separately with structured chain-based leaves and topped with a clustered 4-bobble gold center, adding rich holiday texture.
- Classic Festive Stripe Sequence: Bold 3-round color blocks in deep crimson red and warm cream deliver a timeless Christmas aesthetic.
Skill Level
This project is suitable for an easy / advanced beginner crocheter who knows basic stitches and working in rounds.
- Working in a magic ring (magic circle)
- Increasing single crochet rounds (+6 stitches per round)
- Working in the Back Loop Only (BLO)
- Basic color changes at the end of a round
- Working down both sides of a foundation chain (for petals)
- Basic assembly and hand sewing with a yarn needle
If you have basic crochet experience, you will find this pattern straightforward and quick to complete!
Finished Measurements
| Measurement | Inches | Centimeters |
|---|---|---|
| Base Diameter | 5.5 in | 14.0 cm |
| Height | 4.75 in | 12.0 cm |
| Top Opening Diameter | 5.75 in | 14.5 cm |
| Poinsettia Flower Diameter | 4.0 in | 10.0 cm |
Materials You Will Need
| Item | Detail | Quantity / Amount |
|---|---|---|
| Cream Yarn | Worsted Weight (#4), Medium | 65 yds (59 m) / ~35 g |
| Deep Red Yarn | Worsted Weight (#4), Medium | 50 yds (46 m) / ~28 g |
| Gold Yarn | Worsted Weight (#4), Medium | 10 yds (9 m) / ~5 g |
| Crochet Hook | 4.5 mm (US 7) | 1 hook |
| Stitch Marker | Locking stitch marker | 1 marker |
| Yarn Needle | Tapestry / blunt needle | 1 needle |
| Scissors | Standard craft scissors | 1 pair |
Yarn Suggestions
| Yarn Name | Fiber Content | Skein Details | Notes |
|---|---|---|---|
| Paintbox Yarns Simply Aran | 100% Premium Acrylic | 201 yds (184 m) / 100 g | Excellent stitch definition, durable, wide Christmas palette. |
| Lion Brand 24/7 Cotton | 100% Mercerized Cotton | 186 yds (170 m) / 100 g | Sturdy cotton structure, holds pot shape firmly without sagging. |
| Rico Design Creative Cotton Aran | 100% Cotton | 93 yds (85 m) / 50 g | Soft matte finish, brilliant color hold for seasonal decor. |
⚠️ Note: Avoid using floppy single-ply roving yarns or slippery silk/rayon blends. This cover requires a structured yarn (such as aran/worsted acrylic or mercerized cotton) so the walls remain upright and snug against the pot.
Gauge
- Main Body Gauge: 16 sc x 18 rnds = 4 x 4 in (10 x 10 cm) worked in single crochet with a 4.5 mm hook.
- Base Circle Gauge: Rnds 1 to 6 of the flat base circle = 3.5 in (8.9 cm) in diameter.
Abbreviations
| Abbreviation | Full Term (US Terminology) |
|---|---|
| ch | Chain |
| sc | Single crochet |
| hdc | Half double crochet |
| dc | Double crochet |
| sl st | Slip stitch |
| inc | Increase (2 single crochet in the same stitch) |
| BLO | Back loop only |
| st(s) | Stitch(es) |
| rnd(s) | Round(s) |
| MR | Magic Ring / Magic Circle |
| [ ] / ( ) | Repeat instructions within brackets/parentheses the specified number of times |
UK Conversion Note: UK single crochet (sc) = US single crochet; UK half treble (htr) = US half double crochet (hdc); UK treble (tr) = US double crochet (dc).
Special Stitches Explained
1. Magic Ring (MR)
Create a loop with your yarn, leaving a 4-inch tail. Insert your hook into the loop, yarn over, pull up a loop, ch 1 to secure. Work your initial round of stitches directly into the adjustable loop, then pull the yarn tail tightly to close the central hole complete.
2. Back Loop Only (BLO)
Instead of inserting your hook under both top loops of a stitch, insert your hook under only the back loop (the loop furthest away from you). This leaves a horizontal front-loop ridge on the right side of your work, creating a flat bottom edge bend.
3. 3-Double Crochet Bobble (3-dc Bobble)
- Yarn over, insert hook into the indicated stitch or ring, yarn over and pull up a loop (3 loops on hook).
- Yarn over and pull through 2 loops (2 loops remain on hook).
- Repeat steps 1–2 twice more in the same stitch or ring (4 loops remain on hook).
- Yarn over and pull through all 4 loops on the hook.
- Ch 1 to lock the bobble stitch closed.
Pattern Instructions
Pattern Notes
- The pot cover is worked from the bottom up in continuous spiral rounds. Do not join rounds with a slip stitch unless explicitly directed. Place a locking stitch marker in the first stitch of every round to track your position.
- Color changes are performed in the final yarn-over of the last stitch of the previous round before switching colors.
- The poinsettia flower and gold berry center are crocheted separately and sewn to the striped side of the pot cover during assembly.
Section 1: Main Pot Cover (Cream & Deep Red)
Start with Cream yarn and 4.5 mm hook.
Rnd 1: 6 sc in MR (6 sc).
Rnd 2: Inc in each st around (12 sc).
Rnd 3: (1 sc, inc) x 6 (18 sc).
Rnd 4: (2 sc, inc) x 6 (24 sc).
Rnd 5: (3 sc, inc) x 6 (30 sc).
Rnd 6: (4 sc, inc) x 6 (36 sc).
Rnd 7: (5 sc, inc) x 6 (42 sc).
Rnd 8: (6 sc, inc) x 6 (48 sc).
Rnd 9: (7 sc, inc) x 6 (54 sc).
Rnd 10: (8 sc, inc) x 6 (60 sc).
✅ Checkpoint: Lay your circle flat. It should measure 5.5 in (14 cm) across. If your plant pot base is wider, see the Size Customization Tips section before continuing.
Now transition from the flat base to the vertical walls:
Rnd 11: Working in BLO, sc in each st around (60 BLO sc).
Rnds 12–13: Working through both loops, sc in each st around (60 sc). On the last st of Rnd 13, switch to Deep Red yarn.
Rnds 14–16: With Deep Red, sc in each st around (60 sc). On the last st of Rnd 16, switch to Cream yarn.
Rnds 17–19: With Cream, sc in each st around (60 sc). On the last st of Rnd 19, switch to Deep Red yarn.
Rnds 20–22: With Deep Red, sc in each st around (60 sc). On the last st of Rnd 22, switch to Cream yarn.
Rnds 23–25: With Cream, sc in each st around (60 sc). On the last st of Rnd 25, switch to Deep Red yarn.
Rnds 26–28: With Deep Red, sc in each st around (60 sc). On the last st of Rnd 28, switch to Cream yarn.
Rnds 29–30: With Cream, sc in each st around (60 sc).
At the end of Rnd 30, sl st in the next st to smooth the top edge. Fasten off and leave an 8 in (20 cm) tail for weaving.
Section 2: Poinsettia Petal Motif (Deep Red, Make 1)
With Deep Red yarn and 4.5 mm hook.
Rnd 1: 5 sc in MR, sl st in first sc to join ring (5 sc).
Work the 5 pointed petals into the 5 base stitches of the center ring:
Petals 1 to 5: Sl st into each of the 5 base sc around the central ring. For each base sc, work: ch 8; starting in 2nd ch from hook, sl st in 2nd ch, sc in next ch, hdc in next ch, dc in next 2 ch, hdc in next ch, sc in next ch; ch 1 (tip); working up opposite side of foundation chain, sc in next ch, hdc in next ch, dc in next 2 ch, hdc in next ch, sc in next ch, sl st in next ch; sl st back into same base sc (14 sts per petal, 70 sts total).
After completing all 5 petals, sl st to the initial ring join. Fasten off, leaving a 14 in (35 cm) tail for sewing to the cover.
Section 3: Gold Berry Center Cluster (Gold, Make 1)
With Gold yarn and 4.5 mm hook.
Rnd 1: In MR, work [ch 2, 3-dc Bobble, ch 2, sl st in MR] 4 times. Pull yarn tail tightly to cluster the 4 golden bobbles tightly together in a circle (4 bobbles). Fasten off, leaving a 10 in (25 cm) tail for sewing.
Assembly
- Attach Berry Center to Flower: Position the Gold Berry Center Cluster over the central hole of the Poinsettia Petal Motif. Using a yarn needle and the gold tail, stitch through the flower center to anchor all 4 bobbles flat. Secure on the back of the flower and tie a simple knot.
- Position Flower on Pot Cover: Place the assembled poinsettia on the front of the pot cover, centering it visually across the middle red and cream stripes (spanning across Rnds 16–24).
- Sew Flower to Cover: Thread the long red tail left from the poinsettia flower onto a tapestry needle. Using small whipstitches along the back center ridge of each petal and around the central ring, secure the flower to the cover. Keep stitches invisible from the front.
Finishing
- Turn the cover inside out. Weave in all loose yarn ends from color transitions securely using your tapestry needle.
- Trim excess yarn tails.
- Slide your 14 cm plastic plant pot directly into the cover.
Size Customization Tips
If your plant pot has non-standard dimensions, use this exact calculation guide to adjust the pattern size:
- Wider Base Circle: Add standard increase rounds to Section 1 before working the BLO transition round. Each extra increase round adds 6 single crochets and increases the base diameter by approximately 0.38 in (0.95 cm).
- Example for a 16 cm (6.3 in) base pot: Work up to Rnd 11: (9 sc, inc) x 6 (66 sc), then proceed to the BLO round with 66 stitches.
- Taller Pot Height: To increase cover height, simply add 3-round stripe repeats (3 rnds Red, 3 rnds Cream) until the cozy reaches 0.5 in (1.2 cm) below the top lip of your pot. Every 3-round stripe adds approximately 0.66 in (1.7 cm) of height.
Care Instructions
- Fiber Care: Machine wash on a gentle cold cycle inside a mesh laundry bag, or hand wash in cold water with mild detergent.
- Drying: Reshape while damp and lay flat to dry on a towel. Do not tumble dry.
- Planting Tip: Always remove the inner nursery pot from the crochet cover before watering your plant. Allow excess water to drain fully before slipping the pot back inside to avoid water staining.
FAQ
Can I use cotton yarn instead of acrylic yarn?
Yes! 100% worsted weight mercerized cotton yarn (such as Lion Brand 24/7 Cotton) is an outstanding choice for a crochet pot cover or crochet plant pot cozy. Cotton provides even firmer wall structure and superior washability for holiday windowsills.
How do I avoid clean color change jogs on the stripes?
When making the final single crochet stitch of a color block, insert your hook into the stitch, yarn over with the current color, and pull up a loop. Then yarn over with your new color and pull through both loops on your hook to complete the stitch seamlessly.
How do I stop the pot cover from sliding down on smooth pots?
Single crochet fabric is naturally textured and grips plastic well. However, if your pot is tapered or slippery, work 1 round of slip stitches in BLO around the top inside rim (Rnd 30) using a hook 0.5 mm smaller. This creates a subtle inward rim that holds the sleeve firmly in place.
Happy Crocheting!
You are all finished! Your new Poinsettia Pot Cover is ready to bring holiday christmas crochet decor to your home or serve as a thoughtful handmade hostess gift.
If you loved making this easy christmas crochet project, save this free crochet pattern on Pinterest and share your finished color combinations in the comments below!
📄 Your free PDF pattern
⏳ Preparing your free PDF… 30s
Like this one? Save it for later.