Reader Favorites
Crochet Christmas Tree Hat Free Christmas Pattern
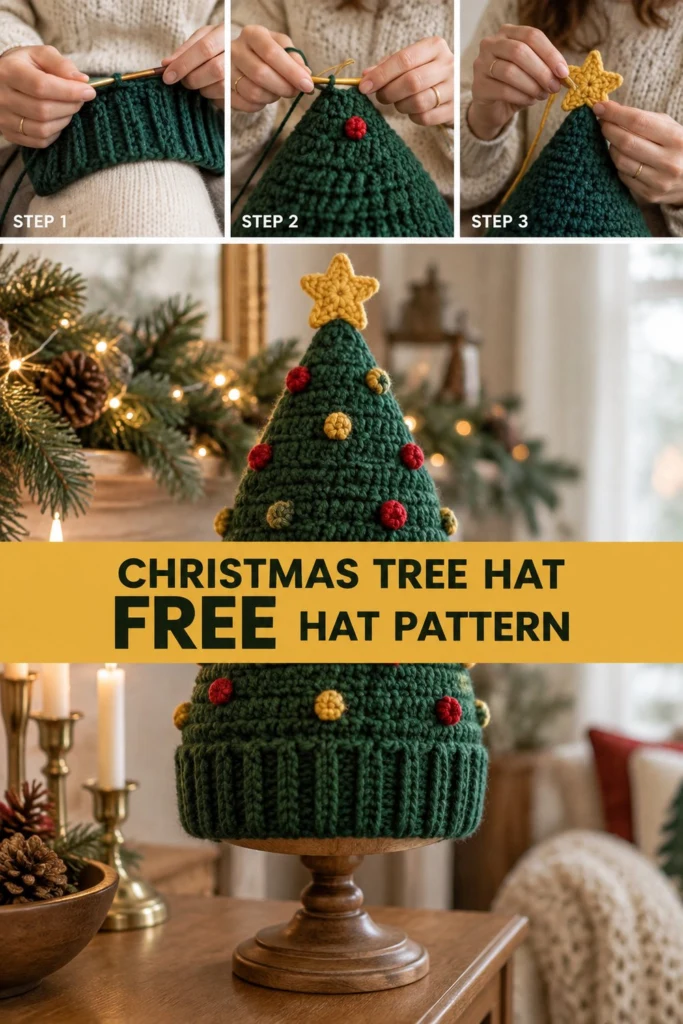
Bring festive holiday cheer to your winter wardrobe with this adorable crochet christmas tree hat! Featuring a stretchy ribbed brim, a classic pine green tapered cone body, and cheerful pop-out ornament bobbles worked directly into the rounds, this tree hat is topped with a bright yellow star for the ultimate holiday centerpiece. Whether you need a hilarious headpiece for an ugly sweater party or a cozy handmade gift, this free crochet pattern delivers warmth, structure, and endless festive joy.
Crochet Christmas Tree Hat Free Christmas Pattern
Quick Facts
- Skill level: Easy / Intermediate
- Finished size: Adult S, M, L (fits head circumferences 19 in / 48 cm to 24 in / 61 cm)
- Yarn: Medium (Category 4) worsted weight yarn in Pine Green, Crimson Red, and Sunshine Yellow
- Hook: 5.0 mm (US H-8) and 4.0 mm (US G-6)
- Stitches used: ch, sl st, sc, BLO sc, hdc, hdc2tog, 4-dc Bobble
- Time to make: 4 to 6 hours
💡 Designer Tip: Customizing your sizing is easy! See our detailed circumference and ease recommendations in the Size Customization section below.
What Makes This Christmas Tree Hat Special
This design blends classic hat construction with creative holiday embellishments:
– Integrated Bobble Ornaments: The vibrant red and yellow ornament bobbles are worked directly into the half double crochet body as you go. No tiny ornament balls to sew on individually!
– Deep Ribbed Brim: Worked in turned rows of back-loop-only single crochet, the brim creates a snug, elastic fit that holds the cone securely on your head without slipping.
– Structured Cone Shaping: Evenly spaced half double crochet decreases give the tree its rigid, upright conical shape while keeping the fabric soft and comfortable.
– Top Star Accent: A small 5-pointed yellow star is crocheted separately and stitched firmly onto the apex of the tree cone to complete the festive look.
Skill Level
Easy to Intermediate.
This project is suitable for adventurous beginners who are comfortable with:
– Working in turned rows and continuous/joined rounds
– Basic single crochet and half double crochet stitches
– Simple color changes for bobble stitches
– Basic decreases (hdc2tog)
Finished Measurements
| Size | Fits Head Circumference | Brim Circumference (Unstretched) | Hat Height (Excluding Star) |
|---|---|---|---|
| Small (S) | 19–20 in / 48–51 cm | 16 in / 40.5 cm | 11 in / 28 cm |
| Medium (M) | 21–22 in / 53–56 cm | 18 in / 45.5 cm | 12 in / 30.5 cm |
| Large (L) | 23–24 in / 58.5–61 cm | 20 in / 51 cm | 13 in / 33 cm |
Materials You Will Need
| Material | Color / Detail | Quantity / Length |
|---|---|---|
| Worsted Yarn (Category 4) | Pine Green (Main Color – MC) | 160 (185, 210) yds / 146 (169, 192) m |
| Worsted Yarn (Category 4) | Crimson Red (Contrast Color 1 – CC1) | 25 yds / 23 m |
| Worsted Yarn (Category 4) | Sunshine Yellow (Contrast Color 2 – CC2) | 30 yds / 27 m |
| Crochet Hooks | 5.0 mm (US H-8) & 4.0 mm (US G-6) | 1 each |
| Tapestry Needle | Yarn needle for weaving ends | 1 |
| Stitch Marker | Locking stitch marker | 1 |
| Measuring Tape | Flexible measuring tape | 1 |
| Scissors | Small craft scissors | 1 pair |
Yarn Suggestions
| Yarn Name | Weight & Fiber | Yardage per Skein | Notes |
|---|---|---|---|
| Lion Brand Vanna’s Choice | Category 4 Worsted (100% Acrylic) | 170 yds / 156 m (3.5 oz / 100 g) | Excellent stitch definition, holds conical shape well. |
| Red Heart Super Saver | Category 4 Worsted (100% Acrylic) | 364 yds / 333 m (7 oz / 198 g) | Durable, rigid body structure, wide holiday color palette. |
| Paintbox Yarns Simply Aran | Category 4 Worsted (100% Acrylic) | 201 yds / 184 m (3.5 oz / 100 g) | Soft texture, rich green tone, easy color switching. |
⚠️ Note: Avoid lightweight DK yarns or loosely spun wools for the main hat body; they will lack the structural integrity needed to keep the top of the tree standing upright without stuffing.
Gauge
- Ribbed Brim (5.0 mm hook): 16 sts x 16 rows = 4 in x 4 in (10 cm x 10 cm) in BLO sc ribbing.
- Tree Body (5.0 mm hook): 14 sts x 10 rnds = 4 in x 4 in (10 cm x 10 cm) in hdc.
Abbreviations
| Abbreviation | Full Name / Description (US Terms) |
|---|---|
| ch | chain |
| sl st | slip stitch |
| sc | single crochet |
| hdc | half double crochet |
| BLO | back loop only |
| hdc2tog | half double crochet 2 stitches together (decrease) |
| Bobble | 4-double-crochet bobble stitch (explained below) |
| st(s) | stitch(es) |
| rnd(s) | round(s) |
| rep | repeat |
| MC | Main Color (Pine Green) |
| CC1 | Contrast Color 1 (Crimson Red) |
| CC2 | Contrast Color 2 (Sunshine Yellow) |
UK Conversion: sc = dc, hdc = htr, dc = tr.
Special Stitches Explained
1. Back Loop Only Single Crochet (BLO sc)
Insert hook under only the back strand (the strand farthest from you) of the top V of the indicated stitch. Yarn over, pull up a loop, yarn over, and draw through both loops on the hook.
2. 4-Double-Crochet Bobble Stitch (Bobble)
- Yarn over, insert hook into the designated stitch in the indicated contrast color (CC1 or CC2).
- Yarn over and pull up a loop (3 loops on hook). Yarn over and pull through 2 loops (2 loops remaining on hook).
- Rep Step 2 three more times in the same stitch until you have 5 loops on hook.
- Drop contrast yarn, pick up Main Color (MC) Pine Green yarn, yarn over and pull through all 5 loops to complete the bobble and secure the stitch.
Pattern Instructions
Section 1: Ribbed Brim (Pine Green MC, 5.0 mm hook, make 1)
💡 Designer Tip: The brim is worked flat in turned rows to create vertical elastic ribs, then slip-stitched into a ring.
Foundation: With 5.0 mm hook and Pine Green (MC), ch 11.
Row 1: Sc in 2nd ch from hook and in each ch across, turn (10 sc).
Row 2: Ch 1 (does not count as st here and throughout), BLO sc in each of the 10 sts across, turn (10 sc).
Rows 3 to 64 (72, 80): Rep Row 2 (10 sc).
Joining Brim Ring: Bring short edges together with right sides facing. Ch 1, working through both the back loop of the last row and the starting foundation chain of Row 1, sl st across all 10 sts to join the band into a ring (10 sl st). Do not cut yarn. Turn brim right side out.
✅ Checkpoint: Measure your flat brim band unstretched. Size S should measure ~16 in (40.5 cm); Size M ~18 in (45.5 cm); Size L ~20 in (51 cm).
Section 2: Tree Body Cone (Pine Green MC, Red CC1, Yellow CC2, 5.0 mm hook)
Worked along the top side edge of the brim rows. Fasten off contrast bobble colors after each bobble round, carrying MC along the inside.
Rnd 1 (Pine Green MC): Ch 1, work 1 hdc into each row-end around the top edge of the ribbed brim, sl st to first hdc to join (64 (72, 80) hdc).
Rnd 2 (MC): Ch 1, hdc in each st around, sl st to first hdc (64 (72, 80) hdc).
Rnd 3 (Decrease Rnd – MC): Ch 1, *hdc in next 6 (7, 8) sts, hdc2tog; rep from * around, sl st to first hdc (56 (64, 72) hdc).
Rnd 4 (Bobble Rnd – MC, CC1, CC2): Ch 1, *hdc in next 6 sts in MC, work Bobble in CC1 (Red) or CC2 (Yellow); rep from * around alternating CC1 and CC2 bobbles, sl st to first hdc (56 (64, 72) sts: 48 (56, 63) hdc, 8 (8, 9) bobbles).
Rnd 5 (MC): Ch 1, hdc in each st around, sl st to first hdc (56 (64, 72) hdc).
Rnd 6 (Decrease Rnd – MC): Ch 1, *hdc in next 5 (6, 7) sts, hdc2tog; rep from * around, sl st to first hdc (48 (56, 64) hdc).
Rnd 7 (MC): Ch 1, hdc in each st around, sl st to first hdc (48 (56, 64) hdc).
Rnd 8 (Bobble Rnd – MC, CC1, CC2): Ch 1, *hdc in next 7 sts in MC, work Bobble in CC1/CC2; rep from * around alternating bobble colors, sl st to first hdc (48 (56, 64) sts).
Rnd 9 (Decrease Rnd – MC): Ch 1, *hdc in next 4 (5, 6) sts, hdc2tog; rep from * around, sl st to first hdc (40 (48, 56) hdc).
Rnd 10 (MC): Ch 1, hdc in each st around, sl st to first hdc (40 (48, 56) hdc).
Rnd 11 (Bobble Rnd – MC, CC1, CC2): Ch 1, *hdc in next 7 sts in MC, work Bobble in CC1/CC2; rep from * around alternating bobble colors, sl st to first hdc (40 (48, 56) sts).
Rnd 12 (Decrease Rnd – MC): Ch 1, *hdc in next 3 (4, 5) sts, hdc2tog; rep from * around, sl st to first hdc (32 (40, 48) hdc).
Rnd 13 (MC): Ch 1, hdc in each st around, sl st to first hdc (32 (40, 48) hdc).
Rnd 14 (Bobble Rnd – MC, CC1, CC2): Ch 1, *hdc in next 7 sts in MC, work Bobble in CC1/CC2; rep from * around alternating bobble colors, sl st to first hdc (32 (40, 48) sts).
Rnd 15 (Decrease Rnd – MC): Ch 1, *hdc in next 2 (3, 4) sts, hdc2tog; rep from * around, sl st to first hdc (24 (32, 40) hdc).
Rnd 16 (MC): Ch 1, hdc in each st around, sl st to first hdc (24 (32, 40) hdc).
Rnd 17 (Decrease Rnd – MC): Ch 1, *hdc in next 1 (2, 3) sts, hdc2tog; rep from * around, sl st to first hdc (16 (24, 32) hdc).
⚠️ Note for Sizes M & L: Continue decreasing by 8 sts every round until 16 sts remain.
Rnd 18 (Size S Rnd 18 / Size M Rnd 18 / Size L Rnd 20 – MC): Ch 1, hdc in each st around, sl st to first hdc (16 hdc).
Rnd 19 (MC): Ch 1, *hdc2tog; rep from * around, sl st to first hdc *(8 hdc)*.
Rnd 20 (MC): Ch 1, *hdc2tog; rep from * around *(4 hdc)*.
Fasten off MC leaving an 8 in (20 cm) tail. Thread tail onto tapestry needle, weave through front loops of final 4 sts, pull tight to close peak, and knot securely inside.
✅ Checkpoint: The finished body should form a sturdy, tapered green cone. Push bobbles outward from the inside of the hat so they pop sharply against the background.
Section 3: Top Star Ornament (Sunshine Yellow CC2, 4.0 mm hook, make 1)
Using 4.0 mm hook and Sunshine Yellow (CC2):
Rnd 1: Form magic ring, ch 1, work 10 sc into ring, sl st to first sc to join (10 sc).
Rnd 2 (Star Points): (Ch 3, sl st in 2nd ch from hook, hdc in 3rd ch from hook, sk next st on Rnd 1 ring, sl st in next st on Rnd 1 ring) rep 5 times total (5 star points).
Fasten off leaving a 10 in (25 cm) tail for assembly.
Assembly
- Position the yellow star directly over the closed peak of the pine green tree hat cone.
- Thread the 10 in (25 cm) yellow tail onto a tapestry needle.
- Pass the needle down through the star center and through the top tip of the hat body, securing the base of each star point flat against the peak of the cone with neat stitches.
- Knot yarn securely inside the peak of the hat cone.
Finishing
- Turn the hat inside out.
- Weave in all loose yarn tails from contrast bobble color changes and main body yarn using your tapestry needle.
- Flip the hat right side out and adjust the bobble ornaments with your fingers to ensure all bobbles are fully popped outward.
Size Customization Tips
- Child Sizing: Work 56 brim rows instead of 64. Start Rnd 1 with 56 hdc and begin decreases on Rnd 3 using
(hdc in next 5 sts, hdc2tog) x 8. - Slouchy vs. Rigid Cone: If you prefer a firmer, extra-upright cone shape without stuffing, use a 4.5 mm hook for the cone rounds while keeping yarn weight the same.
- Extra Ornaments: You can add metallic thread to the contrast yellow yarn or attach tiny jingle bells inside the top peak for extra fun!
Care Instructions
- Washing: Machine wash cold on delicate cycle inside a laundry mesh bag, or hand wash gently in cool water with mild detergent.
- Drying: Reshape cone over an upside-down bowl or paper tube towel roll and lay flat to dry. Do not tumble dry.
FAQ
Can I make this christmas crochet hat pattern with single crochet instead of half double crochet?
Yes! Single crochet rounds will create a slightly denser, shorter cone. If switching to single crochet for the body, add 4 to 6 additional straight rounds throughout the hat body to maintain the tall christmas tree height.
How do I prevent gaps when switching colors for bobbles?
Pull the new color tail firmly on the final yarn-over pull-through step of the bobble, and keep the main color yarn pulled snug across the back of the work.
Is this funny christmas hat crochet suitable as a crochet christmas gift for beginners?
Absolutedly! Because the bobbles are worked directly into the rounds and require no sewing except for the top star, it is a fast, fun, and satisfying easy crochet hat project for holiday gift giving.
Happy Crocheting!
You are all done! Wear your handmade crochet christmas tree hat with festive pride or gift it to someone special. Don’t forget to save this project to your favorite Pinterest board for holiday inspiration!
📄 Your free PDF pattern
⏳ Preparing your free PDF… 30s
Like this one? Save it for later.