Reader Favorites
Pumpkin Pie Slice Crochet Amigurumi Free Thanksgiving Pattern
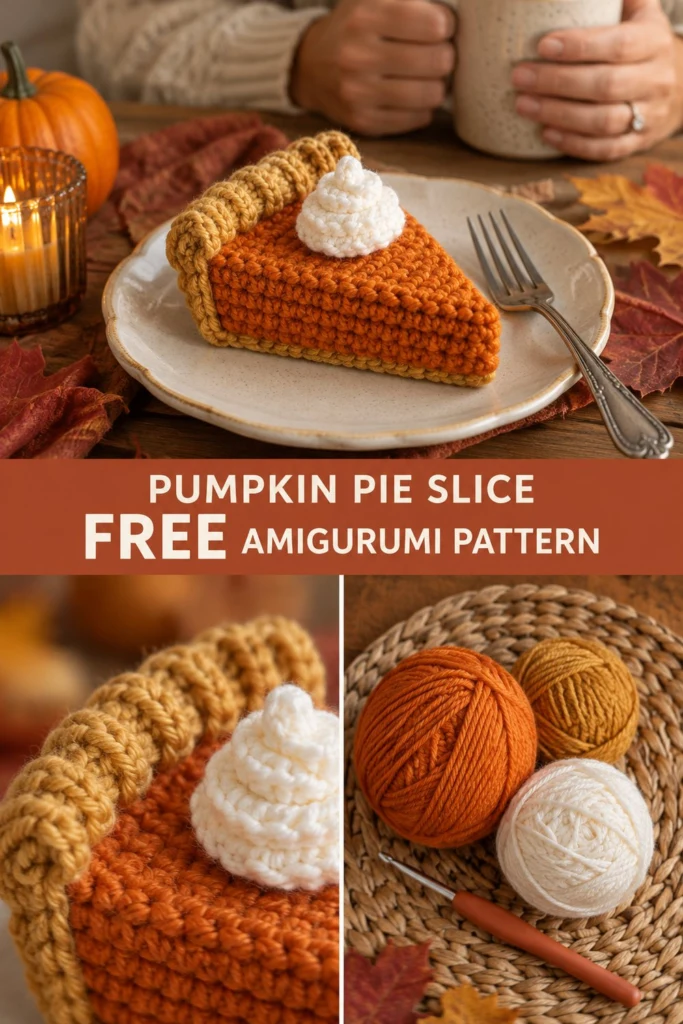
Bring the comforting warmth of autumn into your home with this adorable, realistic pumpkin pie slice. Complete with rich terracotta filling, a golden-brown crimped crust, and a fluffy dollop of whipped cream, this play food piece looks fresh from the bakery display. It stands sturdy and flat on any dessert plate or tiered tray, making it a delightful Thanksgiving table centerpiece or play food item.
Pumpkin Pie Slice Crochet Amigurumi Free Thanksgiving Pattern
Quick Facts
- Skill level: Easy / Intermediate
- Finished size: 5 in (12.5 cm) long, 4.5 in (11.5 cm) wide, 3 in (7.5 cm) tall including cream
- Yarn: Worsted weight (Category 4) in Pumpkin Orange, Warm Gold, and Off-White
- Hook: 3.5 mm (US E-4) crochet hook
- Stitches used: Single crochet (sc), Half double crochet (hdc), Front post double crochet (fpdc), Back post double crochet (bpdc), Increases, Decreases
- Time to make: 2.5 to 3.5 hours
💡 Designer Tip: Scroll down to the size customization section to learn how to scale this pattern up or down using different yarn weights!
What Makes This Pumpkin Pie Slice Special
This amigurumi pie slice uses structured panel construction rather than standard spherical rounds. By creating two flat triangle panels for the top and bottom and attaching side walls with tight single crochet stitches, the wedge maintains sharp, crisp edges without bulging. The signature crimped back crust is achieved using alternating front post and back post double crochet stitches, giving it that authentic baked texture visible in the photos. Making a crochet pumpkin pie slice with this free crochet pattern is a rewarding project for seasonal decor and play food collection.
Skill Level
- Working in flat rows with edge increases
- Single crochet joining along panel seams
- Front post and back post double crochet (FPDC/BPDC)
- Working into back loops (BLO) and front loops (FLO)
This easy amigurumi pattern is straightforward and beginner-friendly if you take your time counting your row-end stitches during assembly!
Finished Measurements
| Dimension | Inches | Centimeters |
|---|---|---|
| Length (Tip to Back Crust) | 5.0 in | 12.5 cm |
| Back Crust Width | 4.5 in | 11.5 cm |
| Slice Height (Pie Only) | 1.5 in | 4.0 cm |
| Total Height (With Cream) | 3.0 in | 7.5 cm |
Materials You Will Need
| Material / Item | Specification / Color | Quantity |
|---|---|---|
| Main Filling Yarn | Worsted Weight (Category 4) / Pumpkin Orange | 65 yds (59 m) |
| Crust Yarn | Worsted Weight (Category 4) / Warm Gold | 50 yds (46 m) |
| Whipped Cream Yarn | Worsted Weight (Category 4) / Off-White | 20 yds (18 m) |
| Crochet Hook | 3.5 mm (US E-4) ergonomic hook | 1 |
| Fiberfill Stuffing | Polyester fiberfill | ~1.5 oz (40 g) |
| Tapestry Needle | Blunt-ended yarn needle | 1 |
| Stitch Markers | Locking plastic markers | 4 |
Yarn Suggestions
| Brand & Yarn Line | Recommended Colorways | Skein Size | Notes |
|---|---|---|---|
| Lion Brand Vanna’s Choice | Rust, Honey, White | 170 yds / 100 g | Durable acrylic with great stitch clarity. |
| Paintbox Yarns Simply Aran | Spice (230), Mustard Yellow (223), Paper White (201) | 201 yds / 100 g | Soft texture with crisp autumn hues. |
| Caron Simply Soft | Pumpkin, Gold, Off-White | 315 yds / 170 g | Gives a smooth finish; keep tension tight. |
⚠️ Note: Avoid using fuzzy or boucle yarns for the main pie panels, as they obscure stitch counts and make joining panel edges cleanly much harder when making your crochet pie slice.
Gauge
| Stitch / Swatch | Measurement (Imperial) | Measurement (Metric) |
|---|---|---|
| 18 sc x 20 rows (Single Crochet) | 4 x 4 in | 10 x 10 cm |
| Triangle Rows 1 to 10 | 2.5 in wide x 2.25 in tall | 6.5 cm wide x 5.7 cm tall |
Abbreviations
| Abbreviation | Full Name (US Terms) |
|---|---|
| ch | Chain |
| sc | Single crochet |
| hdc | Half double crochet |
| dc | Double crochet |
| fpdc | Front post double crochet |
| bpdc | Back post double crochet |
| inc | Increase (2 sc in same st) |
| dec | Invisible decrease (sc2tog) |
| BLO | Back loop only |
| FLO | Front loop only |
| st(s) | Stitch(es) |
| sl st | Slip stitch |
| rnd(s) | Round(s) |
UK Conversion: sc = dc, hdc = htr, dc = tr.
Special Stitches Explained
- Front Post Double Crochet (FPDC): Yarn over, insert hook from front to back to front around the post of the indicated stitch below. Yarn over, pull up a loop (3 loops on hook), [yarn over, draw through 2 loops] twice.
- Back Post Double Crochet (BPDC): Yarn over, insert hook from back to front to back around the post of the indicated stitch below. Yarn over, pull up a loop (3 loops on hook), [yarn over, draw through 2 loops] twice.
- Invisible Decrease (dec): Insert hook into the front loop of the first stitch, then directly into the front loop of the next stitch. Yarn over, draw through both front loops, yarn over, draw through remaining loops on hook.
Pattern Instructions
Pattern Notes
- Turning chains do not count as stitches throughout this pattern.
- Work flat panels in turned rows. Work the whipped cream topping in continuous spiral rounds without joining.
- Keep your tension snug so stuffing does not show through the crochet food pattern.
Section 1: Top Filling Panel (Pumpkin Orange, make 1)
Worked flat from the tip of the slice to the back edge.
- Row 1: Ch 2, work 2 sc in 2nd ch from hook, turn (2 sc)
- Row 2: Ch 1, turn, inc in each st across (4 sc)
- Row 3: Ch 1, turn, sc in each st across (4 sc)
- Row 4: Ch 1, turn, inc in first st, sc 2, inc in last st (6 sc)
- Row 5: Ch 1, turn, sc in each st across (6 sc)
- Row 6: Ch 1, turn, inc in first st, sc 4, inc in last st (8 sc)
- Row 7: Ch 1, turn, sc in each st across (8 sc)
- Row 8: Ch 1, turn, inc in first st, sc 6, inc in last st (10 sc)
- Row 9: Ch 1, turn, sc in each st across (10 sc)
- Row 10: Ch 1, turn, inc in first st, sc 8, inc in last st (12 sc)
- Row 11: Ch 1, turn, sc in each st across (12 sc)
- Row 12: Ch 1, turn, inc in first st, sc 10, inc in last st (14 sc)
- Row 13: Ch 1, turn, sc in each st across (14 sc)
- Row 14: Ch 1, turn, inc in first st, sc 12, inc in last st (16 sc)
- Row 15: Ch 1, turn, sc in each st across (16 sc)
- Row 16: Ch 1, turn, inc in first st, sc 14, inc in last st (18 sc)
- Row 17: Ch 1, turn, sc in each st across (18 sc)
- Row 18: Ch 1, turn, inc in first st, sc 16, inc in last st (20 sc)
- Row 19: Ch 1, turn, sc in each st across (20 sc)
Fasten off and weave in ends.
✅ Checkpoint: Top panel should form a flat, symmetrical isosceles triangle measuring 5 in long by 4.5 in wide at the back edge.
Section 2: Bottom Crust Base Panel (Warm Gold, make 1)
Worked identically to Section 1, using Warm Gold yarn.
- Row 1: Ch 2, work 2 sc in 2nd ch from hook, turn (2 sc)
- Row 2: Ch 1, turn, inc in each st across (4 sc)
- Row 3: Ch 1, turn, sc in each st across (4 sc)
- Row 4: Ch 1, turn, inc in first st, sc 2, inc in last st (6 sc)
- Row 5: Ch 1, turn, sc in each st across (6 sc)
- Row 6: Ch 1, turn, inc in first st, sc 4, inc in last st (8 sc)
- Row 7: Ch 1, turn, sc in each st across (8 sc)
- Row 8: Ch 1, turn, inc in first st, sc 6, inc in last st (10 sc)
- Row 9: Ch 1, turn, sc in each st across (10 sc)
- Row 10: Ch 1, turn, inc in first st, sc 8, inc in last st (12 sc)
- Row 11: Ch 1, turn, sc in each st across (12 sc)
- Row 12: Ch 1, turn, inc in first st, sc 10, inc in last st (14 sc)
- Row 13: Ch 1, turn, sc in each st across (14 sc)
- Row 14: Ch 1, turn, inc in first st, sc 12, inc in last st (16 sc)
- Row 15: Ch 1, turn, sc in each st across (16 sc)
- Row 16: Ch 1, turn, inc in first st, sc 14, inc in last st (18 sc)
- Row 17: Ch 1, turn, sc in each st across (18 sc)
- Row 18: Ch 1, turn, inc in first st, sc 16, inc in last st (20 sc)
- Row 19: Ch 1, turn, sc in each st across (20 sc)
Fasten off and weave in ends.
Section 3: Side Filling Wall Panels (Pumpkin Orange, make 2)
Worked flat to create the two side walls of the wedge.
- Row 1: Ch 8, sc in 2nd ch from hook and in each ch across, turn (7 sc)
- Rows 2 to 19: Ch 1, turn, sc in each st across (7 sc)
Fasten off, leaving a 12 in (30 cm) tail on each side panel for joining.
Section 4: Back Crust Panel & Crimped Rim (Warm Gold, make 1)
Worked flat from the base of the back wall upward, ending with the textured crimped crust rim.
Back Wall Base
- Row 1: Ch 21, sc in 2nd ch from hook and in each ch across, turn (20 sc)
- Rows 2 to 7: Ch 1, turn, sc in each st across (20 sc)
Crimped Crust Rim
- Row 8 (Rim Base): Ch 2 (does not count as st), turn, hdc in each st across (20 hdc)
- Row 9 (Texture): Ch 2, turn, FPDC in next st, BPDC in next st repeat 10 times across (20 sts)
- Row 10 (Texture): Ch 2, turn, FPDC around next FPDC, BPDC around next BPDC repeat 10 times across (20 sts)
Fasten off, leaving an 18 in (45 cm) tail for assembly.
Section 5: Whipped Cream Topping (Off-White, make 1)
Base Dollop Cone
Worked in continuous spiral rounds for this thanksgiving amigurumi decoration.
- Rnd 1: 6 sc in magic ring (6 sc)
- Rnd 2: (inc) x 6 (12 sc)
- Rnd 3: Working in BLO, (1 sc, inc) x 6 (18 sc)
- Rnd 4: Working in BLO, (2 sc, inc) x 6 (24 sc)
- Rnd 5: Working in BLO, sc in each st around (24 sc)
- Rnd 6: Working in BLO, (2 sc, dec) x 6 (18 sc)
- Rnd 7: Working in BLO, (1 sc, dec) x 6 (12 sc)
- Rnd 8: Working in BLO, (dec) x 6 (6 sc)
Stuff the dollop firmly with fiberfill. Fasten off and weave thread through the front loops of Rnd 8 to pull opening closed.
Whipped Cream Surface Swirl
Join Off-White yarn to the first unworked front loop of Rnd 3 at the top. Working spirally down toward the base:
- Work (sc, hdc, dc) in next FLO, sl st in next FLO, repeat around exposed front loops down to Rnd 7.
Fasten off, leaving a 12 in (30 cm) tail for sewing onto the pie.
Assembly
- Join Side Panels to Top Panel: Align one long edge of a Pumpkin Orange side wall panel (Rows 1 to 19) with one side of the Pumpkin Orange top triangle (Row-ends 1 to 19). Using Pumpkin Orange yarn, sc the edges together from tip to back. Repeat for the second side wall panel on the opposite side of the triangle.
- Attach Back Crust Panel: Place the Warm Gold back panel across the back width of the pie (20 sts wide). Join the side edges of the back panel (Rows 1 to 7) to the 7-stitch ends of the side panels using Warm Gold yarn. Single crochet the bottom row of the back panel across the 20 sts of the top panel back edge.
- Attach Bottom Crust Panel: Position the Warm Gold bottom triangle against the open bottom of the pie structure. Using Warm Gold yarn, sc along both side edges and the back edge, joining the bottom panel to the side panels and back wall.
- Stuffing the Pie: Stop crocheting when 2 inches (5 cm) of the final edge remains open. Stuff the pie firmly with fiberfill, smoothing out the corners so the wedge shape remains sharp and flat. Finish single crocheting the edge closed, sl st to join, and weave in all yarn ends.
- Attach Whipped Cream: Position the whipped cream dollop centered on the top Orange triangle, roughly 1.5 in (4 cm) back from the pointed tip. Securely sew in place using the yarn tail and a tapestry needle.
Finishing
- Gently squeeze the side edges and flatten the top and bottom surfaces against a flat table to settle the fiberfill evenly.
- Lightly pinch the crimped back crust to highlight the raised FPDC ridges.
Size Customization Tips
- Larger Pie Slice (Chunky Yarn): Use Super Bulky (Category 6) yarn with a 6.0 mm hook. Maintain exact stitch counts. The finished slice will measure approx. 8 in (20 cm) long by 5 in (12.5 cm) tall—perfect for a floor cushion or playful decor item!
- Miniature Pie Slice (Keychain / Bag Charm): Use Fingering weight (Category 1) cotton yarn with a 2.0 mm hook. The finished piece will be roughly 2 in (5 cm) long, creating a cute crochet play food pattern accessory.
Care Instructions
- Cleaning: Spot clean with cold water and mild detergent. Do not wring or twist.
- Drying: Air dry flat on a clean towel away from direct heat or sunlight.
- Reshaping: Re-fluff the stuffing manually after cleaning to restore the crisp wedge profile.
FAQ
Can I crochet the pie in one piece without sewing panels?
While continuous working is possible, piecing flat panels together gives sharp 90-degree side edges that mimic a real cut slice of pie far better than seamless rounds.
My side walls are bulging outward. How do I fix this?
Ensure you stuff the pie evenly without over-packing. Placing a stiff piece of plastic canvas cut to size inside the top and bottom panels before stuffing keeps the faces flat and prevents bulging!
Is this toy safe for young children?
Yes! Because all parts are crocheted and sewn without safety eyes or plastic pieces, this pattern is 100% safe for toddlers and play kitchens.
Happy Crocheting!
You’ve finished your delicious Pumpkin Pie Slice! Save this pattern on Pinterest and share your finished creation with your crafting friends.
📄 Your free PDF pattern
⏳ Preparing your free PDF… 30s
Like this one? Save it for later.