Plump Turkey Gnome Crochet Shelf Sitter Free Thanksgiving Pattern
Reader Favorites










Snowy Hooded Crochet Baby Sleep Sack Free Winter Pattern

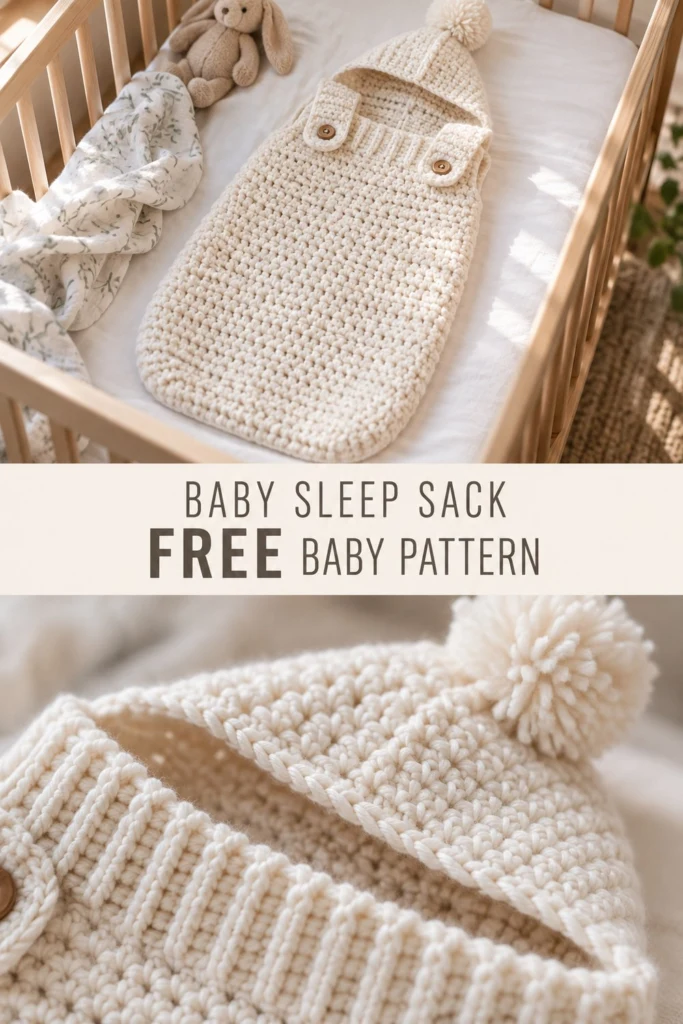
For winter babies and newborn photo sessions, this hooded sleep sack keeps little ones snug, warm, and secure. Worked from the bottom up in soft half double crochet with wide shoulder flaps, a ribbed opening, and a tiny matching pompom, it makes a breathtaking handmade gift for an upcoming baby shower.
Snowy Hooded Crochet Baby Sleep Sack Free Winter Pattern
Quick Facts
- Skill level: Intermediate
- Finished size: Newborn (0–3 months)
- Yarn: Soft baby-weight acrylic/nylon blend in Cream
- Hook: 5.0 mm (H-8) crochet hook
- Stitches used: Ch, sl st, hdc, hdc2tog, blo
- Time to make: 6 to 8 hours
Size tips and customization instructions are included further down the page.
What Makes This Crochet Baby Sleep Sack Special
This sleep sack brings together classic warmth and thoughtful modern design. The body uses a dense half double crochet fabric to keep chilly drafts out, while the textured ribbed upper opening gives a neat, professional finish. Wide shoulder straps fasten securely with wooden-style buttons over the chest, keeping the hood gently in place around the baby’s head. Topped with a fluffy handmade pompom, it captures that heirloom winter aesthetic perfectly.
Skill Level
- Working in joined rounds and turned rows
- Basic increases and decreases (hdc2tog)
- Working in the back loop only (blo) for ribbing
- Attaching a pompom securely
Don’t worry if you are new to garment construction—every step is explained clearly below so you can work at your own relaxed pace.
Finished Measurements
| Size | Width (Flat) | Length (Base to Shoulder) |
|---|---|---|
| Newborn | 10 inches / 25.5 cm | 18 inches / 45.5 cm |
| 0–3 Months | 12 inches / 30.5 cm | 21 inches / 53.5 cm |
Materials You Will Need
| Material | Description / Color | Quantity |
|---|---|---|
| Yarn | Baby-weight (#3 Light) yarn in Cream | 450 (550) yards / 410 (502) meters |
| Hook | 5.0 mm (H-8) crochet hook | 1 hook |
| Notions | 2 wooden-style buttons (20mm, smooth finish), tapestry needle, locking stitch markers, scissors | As needed |
⚠️ Note: Always choose a smooth, washable, non-scratchy baby yarn that is explicitly labeled safe for infants. Ensure buttons are tightly sewn with heavy-duty thread and checked frequently for safety if used for display or photography.
Yarn Suggestions
| Yarn Line | Skein Yardage | Notes |
|---|---|---|
| Bernat Softee Baby | 362 yards / 331 meters per 140g skein | Ultra-soft, gentle sheen, excellent stitch definition |
| Lion Brand Baby Soft | 459 yards / 420 meters per 140g skein | Lightweight, durable, wonderful warmth |
⚠️ Note: Avoid novelty yarns with long fuzzy fibers (like eyelash yarn) for baby items, as loose fibers can pose an inhalation hazard.
Gauge
- 16 hdc x 12 rows = 4 inches / 10 cm using a 5.0 mm hook.
- Check your gauge carefully before starting to ensure the sleep sack fits newborn proportions correctly.
Abbreviations
- ch = chain
- sl st = slip stitch
- hdc = half double crochet
- hdc2tog = half double crochet 2 together (decrease)
- blo = back loop only
- st(s) = stitch(es)
- rep = repeat
- rnd(s) = round(s)
- row(s) = row(s)
UK terminology note: UK sc = US sc, UK hdc = US dc, UK dc = US tr. This pattern is written in standard US terms.
Special Stitches Explained
- hdc2tog (Half Double Crochet 2 Together): Yarn over, insert hook in indicated st, yarn over and pull up a loop (3 loops on hook). Yarn over, insert hook in next st, yarn over and pull up a loop (5 loops on hook). Yarn over and draw through all 5 loops on hook.
- Back Loop Only (blo): Work the indicated stitch inserting your hook only under the back loop of the stitch from the previous row or round, leaving the front loop free.
Pattern Instructions
Pattern Notes:
– The sleep sack is worked seamlessly from the bottom up in joined rounds, then divided for the front opening and shoulder flaps.
– Turning ch-2 at the start of rows/rounds does NOT count as a stitch unless specified.
Section 1: Lower Body (Cream, make 1)
Using 5.0 mm hook, ch 40 (48). Join with sl st to first ch to form a ring, being careful not to twist.
Rnd 1: Ch 2, work 1 hdc in each ch around, join with sl st to first hdc. (40 (48) hdc)
Rnds 2 to 35 (42): Ch 2, 1 hdc in each st around, join with sl st to first hdc. (40 (48) hdc)
✅ Checkpoint: At the end of Rnd 35 (Newborn) or Rnd 42 (0-3M), your tube should measure approximately 11.5 (14) inches from the bottom edge.
Section 2: Upper Front and Back Split (Cream, make 1)
Now you will work in turned rows to create the front opening and shoulder shaping.
Row 1: Ch 2, work 1 hdc in each of the next 20 (24) sts, turn, leaving remaining 20 (24) sts unworked for the back. (20 (24) hdc)
Rows 2 to 8 (10): Ch 2, 1 hdc in each st across, turn. (20 (24) hdc)
Fasten off, leaving a 12-inch tail.
Attach yarn to the back unworked 20 (24) sts and repeat Rows 1 to 8 (10) for the back flap. Fasten off.
Section 3: Hood (Cream, make 1)
Fold the upper back and front flaps together along the top shoulder line. Join yarn at the top left corner of the hood opening.
Row 1: Ch 2, work 40 (48) hdc evenly across the top edge of the folded flaps, turn. (40 (48) hdc)
Rows 2 to 12 (14): Ch 2, 1 hdc in each st across, turn. (40 (48) hdc)
Fasten off, leaving a 20-inch tail. Fold the final row of the hood in half and use the yarn tail to seam the top closed using a mattress stitch.
Section 4: Ribbed Opening Trim (Cream, make 1)
Join yarn along the front vertical opening edge.
Row 1: Ch 6, working back down the chain, 1 sl st in 2nd ch from hook and in each of next 4 chs (5 sts made), sl st into the next row-end of the sleep sack front opening, sl st into the very next row-end, turn.
Row 2: Skip 2 sl sts just made, work 1 hdc in blo of each of the next 5 sts, turn. (5 hdc)
Row 3: Ch 1, work 1 hdc in blo of each of the next 5 sts, sl st into the next available row-end of the sleep sack opening, sl st into the next row-end, turn. (5 hdc)
Repeat Rows 2 and 3 all the way around the front opening. Fasten off and weave in ends.
Section 5: Pompom and Straps (Cream, make 1)
Pompom: Wrap yarn around a 2-inch pompom maker 80 times. Tie tightly in the center, cut loops, and trim evenly into a 1.5-inch round pompom. Securely attach to the top point of the hood.
Shoulder Flaps & Buttons: Create two small button loops at the end of the shoulder extensions by chaining 4 and slip stitching back into the base. Sew one wooden-style button firmly to each side of the front chest panel to align with the button loops.
💡 Designer Tip: When making the pompom, wrap the center tie string around the bundle twice and knot it as tightly as possible before cutting the loops so your pompom stays fluffy and secure.
Assembly
- Turn the sleep sack inside out and whipstitch the bottom base closed securely.
- Weave in all loose yarn ends using your tapestry needle.
- Fasten the shoulder straps over the front buttons.
Finishing
Block your finished sleep sack lightly by misting with water and laying flat to dimensions specified in the sizing chart. Ensure all buttons pass safety checks.
Size Customization Tips
- Each additional 4-stitch multiple in the starting chain adds approximately 1 inch to the overall body width of the sleep sack.
- To make the length longer, simply add 3 to 5 extra straight rounds in Section 1 before beginning the split.
Care Instructions
- Hand wash gently in cool water using mild baby detergent.
- Do not bleach or iron.
- Lay flat in shade to dry completely before use.
FAQ
Can I use a different yarn weight for this pattern?
It is best to stick to a light baby-weight (#3) yarn to ensure the fabric remains breathable and safely drapes correctly for a newborn.
Can I machine wash the finished sleep sack?
If you select a superwash acrylic baby yarn, you can machine wash on a delicate, cool cycle inside a mesh laundry bag, though hand washing is always recommended to preserve the buttons and pompom.
Are the buttons safe for a newborn?
Buttons are intended for decorative newborn photography and supervised wear. For everyday sleep use, omit buttons and sew the shoulder straps directly in place.
Happy Crocheting!
I hope you love creating this cozy winter sleep sack! Save this pin on Pinterest to keep the tutorial handy for your next handmade baby gift, and leave a comment below sharing what color you plan to make yours in. Happy crocheting!
📄 Your free PDF pattern
⏳ Preparing your free PDF… 30s
Like this one? Save it for later.