Plump Turkey Gnome Crochet Shelf Sitter Free Thanksgiving Pattern
Reader Favorites










Little Reindeer Crochet Baby Rattle Free Christmas Pattern

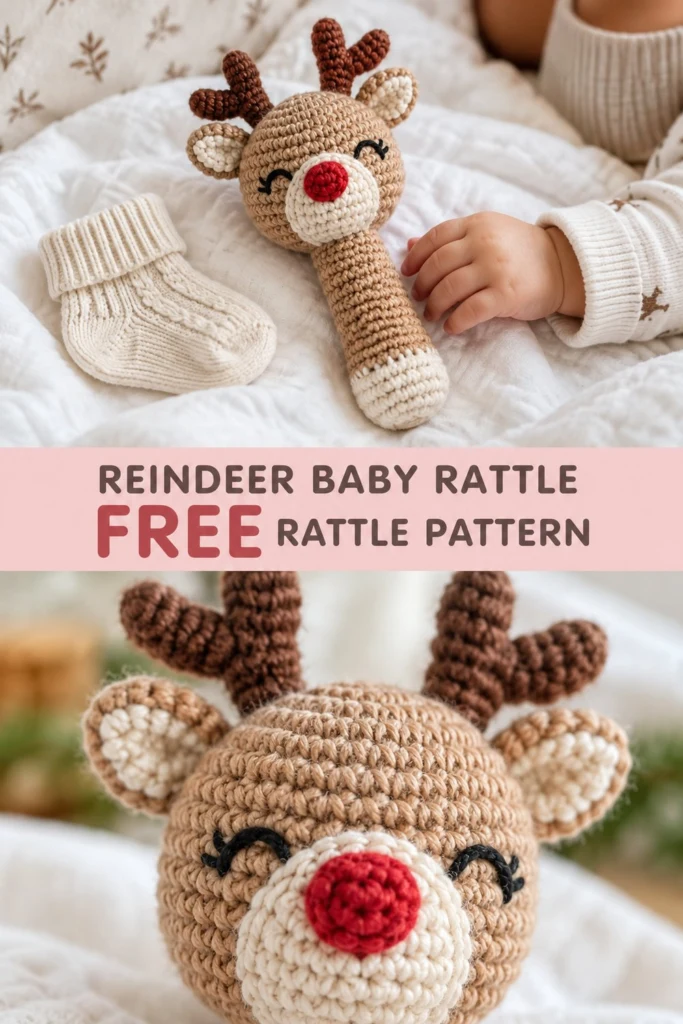
There is something uniquely comforting about crafting a handmade baby gift for the holiday season. This adorable reindeer rattle features a plush spherical head with a noise-maker rattle disk enclosed inside, soft perky ears, tiny dark brown antlers, a cheerful red nose, and a sturdy cylindrical handle designed specifically for small hands to grip easily.
Little Reindeer Crochet Baby Rattle Free Christmas Pattern
Quick Facts
- Skill level: Easy / Intermediate
- Finished size: Approx. 6.5 in (16.5 cm) tall by 3.5 in (9 cm) wide
- Yarn: DK weight 100% cotton yarn in Camel, Cream, Dark Brown, and Red
- Hook: 2.5 mm (US C-2) crochet hook
- Stitches used: Magic Ring (MR), Single Crochet (sc), Increase (inc), Invisible Decrease (dec), Back Loop Only (BLO)
- Time to make: 2–3 hours
Size customization tips are included further down the article.
What Makes This Reindeer Rattle Special
- 100% Baby-Safe Design: Everything is embroidered or soft-stitched using cotton yarn; there are no hard plastic safety eyes or clip-on components that could pose a choking hazard.
- Ergonomic Handle: The straight tubular base is proportional to a infant’s natural grip, allowing tiny fingers to hold and shake the toy effortlessly.
- Textured Elements: The contrast between the cream base cuff, smooth snout, cupped ears, and branched antlers provides delightful tactile feedback for baby’s sensory development.
- Enclosed Rattle Box: Inserting a durable plastic rattle capsule wrapped in fiberfill ensures a gentle, soothing sound without compromising softness.
Skill Level
This project is suitable for an adventurous beginner or intermediate crocheter. Required skills include:
* Working in continuous spiral rounds (amigurumi style)
* Basic increases and invisible decreases
* Simple color changes between sections
* Basic surface sewing and eyelash embroidery
If you can hold a hook and make single crochet stitches, you can confidently finish this pattern in an afternoon!
Finished Measurements
| Measurement | Inches | Centimeters |
|---|---|---|
| Total Height (top of antlers to base) | 6.5 in | 16.5 cm |
| Head Width (excluding ears) | 3.25 in | 8.25 cm |
| Handle Length | 3.0 in | 7.5 cm |
| Handle Diameter | 1.1 in | 2.8 cm |
Materials You Will Need
| Material / Item | Details / Specifications | Quantity |
|---|---|---|
| Main Yarn (Camel) | DK weight / 8-ply cotton yarn | ~50 yds (45 m) |
| Accent Yarn (Cream) | DK weight / 8-ply cotton yarn | ~25 yds (23 m) |
| Antler Yarn (Dark Brown) | DK weight / 8-ply cotton yarn | ~15 yds (14 m) |
| Nose Yarn (Red) | DK weight / 8-ply cotton yarn | ~5 yds (4.5 m) |
| Eye Detail (Black) | Black embroidery floss or thin yarn | Small scrap |
| Crochet Hook | Size 2.5 mm (US C-2 or B-1) | 1 hook |
| Rattle Element | 24 mm or 28 mm plastic rattle sphere/box | 1 piece |
| Stuffing | Hypoallergenic polyester fiberfill | Small handful |
| Notions | Yarn needle, stitch markers, scissors | 1 set |
Yarn Suggestions
| Yarn Brand & Line | Fiber Content | Skein Weight / Yardage | Notes |
|---|---|---|---|
| Rico Baby Cotton Soft | 50% Cotton, 50% Acrylic | 50 g / 136 yds (125 m) | Ultra-soft finish, washable, gentle on skin. |
| Paintbox Yarns Cotton DK | 100% Cotton | 50 g / 137 yds (125 m) | Great stitch definition and crisp matte colors. |
| Schachenmayr Catania | 100% Mercerized Cotton | 50 g / 137 yds (125 m) | Durable structure that holds shape well. |
⚠️ Note: Avoid using fuzzy mohair, acrylic yarns prone to heavy shedding, or novelty yarn with loose fibers for toys intended for infants under 12 months.
Gauge
| Stitch Type | Count (4 in / 10 cm) | Count (1 in / 2.5 cm) |
|---|---|---|
| Single Crochet (sc) | 24 stitches x 26 rounds | 6 stitches x 6.5 rounds |
Amigurumi Check: Rounds 1 to 6 of the Head flat circle should measure approximately 2.0 in (5 cm) across.
Abbreviations
| Abbreviation | Full Name (US Terminology) |
|---|---|
| MR | Magic Ring |
| sc | Single crochet |
| inc | Increase (2 sc in same st) |
| dec | Invisible decrease (sc2tog in front loops) |
| BLO | Back Loop Only |
| st(s) | Stitch(es) |
| rnd(s) | Round(s) |
| [ ] | Total stitch count at end of round |
| ( ) x N | Repeat instructions inside parentheses N times |
UK Conversion Note: UK dc = US sc; UK htr = US hdc; UK tr = US dc.
Special Stitches Explained
1. Magic Ring (MR)
Create a loop around your fingers, insert the hook, yarn over, pull up a loop, chain 1, and work the specified number of single crochets directly into the ring. Pull the tail end tightly to close the hole completely.
2. Invisible Decrease (dec)
Insert your hook into the front loop only of the first stitch, then immediately insert the hook into the front loop only of the second stitch. Yarn over, pull through both front loops, yarn over, and pull through both remaining loops on hook.
Pattern Instructions
Pattern Notes
- All parts are worked in continuous spiral rounds without joining, unless explicitly stated otherwise.
- Use a stitch marker to move up the first stitch of every round.
- Stuff components firmly as you go, inserting the rattle insert into the center of the head before closing.
Section 1: Head (Camel yarn, make 1)
Using Camel yarn:
- Rnd 1: 6 sc in MR (6 sc)
- Rnd 2: inc x 6 (12 sc)
- Rnd 3: (1 sc, inc) x 6 (18 sc)
- Rnd 4: (2 sc, inc) x 6 (24 sc)
- Rnd 5: (3 sc, inc) x 6 (30 sc)
- Rnd 6: (4 sc, inc) x 6 (36 sc)
- Rnd 7: (5 sc, inc) x 6 (42 sc)
- Rnds 8–16: sc in each st around (42 sc)
✅ Checkpoint: At the end of Rnd 16, your head piece should measure roughly 3.25 in (8.25 cm) wide.
- Rnd 17: (5 sc, dec) x 6 (36 sc)
- Rnd 18: (4 sc, dec) x 6 (30 sc)
- Rnd 19: (3 sc, dec) x 6 (24 sc)
Begin stuffing the head firmly. Place your plastic rattle insert into the center, surrounding it with polyester stuffing so the rattle stays centered and quieted slightly by fiberfill padding.
- Rnd 20: (2 sc, dec) x 6 (18 sc)
- Rnd 21: (1 sc, dec) x 6 (12 sc)
- Rnd 22: dec x 6 (6 sc)
Fasten off, weave the tail through the front loops of the remaining 6 stitches, pull tight to close, and weave in the end securely inside the head.
Section 2: Snout (Cream yarn, make 1)
Using Cream yarn:
- Rnd 1: 6 sc in MR (6 sc)
- Rnd 2: inc x 6 (12 sc)
- Rnd 3: (1 sc, inc) x 6 (18 sc)
- Rnd 4: (2 sc, inc) x 6 (24 sc)
Fasten off, leaving a 12 in (30 cm) tail for sewing.
Section 3: Nose (Red yarn, make 1)
Using Red yarn:
- Rnd 1: 6 sc in MR (6 sc)
- Rnd 2: (1 sc, inc) x 3 (9 sc)
- Rnd 3: sc in each st around (9 sc)
Fasten off, leaving a 10 in (25 cm) tail for sewing.
Section 4: Ears (Make 2 set pairs)
Each ear consists of a Cream inner piece joined to a Camel outer piece.
Inner Ear (Cream yarn, make 2):
- Rnd 1: 6 sc in MR (6 sc)
- Rnd 2: inc x 6 (12 sc)
- Rnd 3: (1 sc, inc) x 6 (18 sc)
Fasten off Cream yarn.
Outer Ear & Joining (Camel yarn, make 2):
- Rnd 1: 6 sc in MR (6 sc)
- Rnd 2: inc x 6 (12 sc)
- Rnd 3: (1 sc, inc) x 6 (18 sc)
Do not cut the Camel yarn. Place one Cream inner ear piece back-to-back with the Camel outer ear piece (wrong sides together).
- Rnd 4: Working through both layers around the outer edge, sc in each of the 18 sts (18 sc).
Fasten off, leaving a 12 in (30 cm) tail. Pinch the bottom base of the ear together into a slight curve before sewing to the head.
Section 5: Antlers (Dark Brown yarn, make 2 complete sets)
Each antler consists of one short branch joined to one main branch.
Short Branch (Dark Brown yarn, make 2):
- Rnd 1: 6 sc in MR (6 sc)
- Rnds 2–4: sc in each st around (6 sc)
Fasten off. Stuff lightly.
Main Branch (Dark Brown yarn, make 2):
- Rnd 1: 6 sc in MR (6 sc)
- Rnds 2–7: sc in each st around (6 sc)
Fasten off, leaving a 12 in (30 cm) tail. Stuff lightly.
Sew the open end of the short branch onto the side of the main branch at approx. Rnd 4 of the main branch.
Section 6: Handle (Cream & Camel yarn, make 1)
Start using Cream yarn:
- Rnd 1: 6 sc in MR (6 sc)
- Rnd 2: inc x 6 (12 sc)
- Rnd 3: (1 sc, inc) x 6 (18 sc)
- Rnd 4: BLO sc in each st around (18 sc)
- Rnds 5–7: sc in each st around (18 sc)
Switch to Camel yarn on the last stitch of Rnd 7.
- Rnds 8–22: sc in each st around (18 sc)
✅ Checkpoint: The handle should measure approx. 3.0 in (7.5 cm) long and 1.1 in (2.8 cm) wide.
Fasten off Camel yarn, leaving a long 14 in (35 cm) tail for sewing onto the head. Stuff the handle firmly throughout.
Assembly
- Snout: Position the Cream snout piece centrally on the front lower portion of the head, across Rnds 12 to 18. Sew into place securely using the tail end. Add a tiny pinch of fiberfill behind the snout before closing the final stitches.
- Nose: Position the Red nose onto the top-center of the cream snout (Rnds 1–2 of the snout). Sew firmly into place.
- Ears: Sew the bottom pinched edges of the ears to the upper sides of the head at Rnd 7, spaced about 8 stitches apart across the top.
- Antlers: Sew the base of each antler to the top of the head at Rnds 4–5, positioned slightly inward from and just above the ears.
- Handle: Align the open top of the stuffed handle with the very bottom center of the head (covering Rnds 20–22 of the head). Sew around the entire 18-stitch rim twice to ensure a sturdy, durable join.
Finishing
- Eyes: Using black embroidery floss or thin black yarn, embroider curved sleeping eyes onto the head on either side of the snout (around Rnd 11). Each eye forms a gentle arc spanning about 3 stitches wide, with two tiny angled eyelash stitches at the outer corners as seen in the photo.
- Secure Threads: Weave in all loose yarn ends deeply inside the stuffed head and handle to secure them permanently.
Size Customization Tips
- Thicker Grip Handle: If you want a wider handle, increase Rnd 3 to 24 sts (e.g.
(3 sc, inc) x 6), work Rnd 4 in BLO, and maintain 24 sts throughout the handle height. - Yarn Substitution: Using a Worsted / 10-ply cotton yarn with a 3.5 mm hook will yield a larger rattle measuring approximately 8.0 in (20 cm) tall.
Care Instructions
- Washing: Place the finished rattle inside a mesh laundry bag. Machine wash on gentle cycle using cold water and mild baby detergent.
- Drying: Reshape while damp and lay flat to dry thoroughly away from direct sunlight. Do not tumble dry.
FAQ
Can I use plastic safety eyes for this rattle?
If this rattle is intended for a baby or toddler under 3 years old, safety eyes are not recommended because they can present a choking hazard if pulled off. Hand-embroidering the eyes with black yarn or embroidery floss is the safest choice.
How do I make sure the rattle box stays central?
Wrap the plastic rattle box inside a layer of polyester stuffing before placing it into the head. As you stuff around the sides, check that there is an even pillow of padding surrounding the insert.
What yarn works best for baby rattles?
A 100% cotton or cotton-acrylic blend yarn is ideal. Cotton creates smooth, clear stitches, holds its shape without stretching, doesn’t shed fibers, and handles frequent washings easily.
Happy Crocheting!
You have created a sweet, handmade reindeer baby rattle that makes a perfect first Christmas keepsake! Save this pattern to your favorite Pinterest board so you can make it again for future baby showers and holiday gifts. Happy crafting!
📄 Your free PDF pattern
⏳ Preparing your free PDF… 30s
Like this one? Save it for later.