Plump Turkey Gnome Crochet Shelf Sitter Free Thanksgiving Pattern
Reader Favorites










Knit Look Crochet Camel Stitch Cardigan Free Crochet Pattern

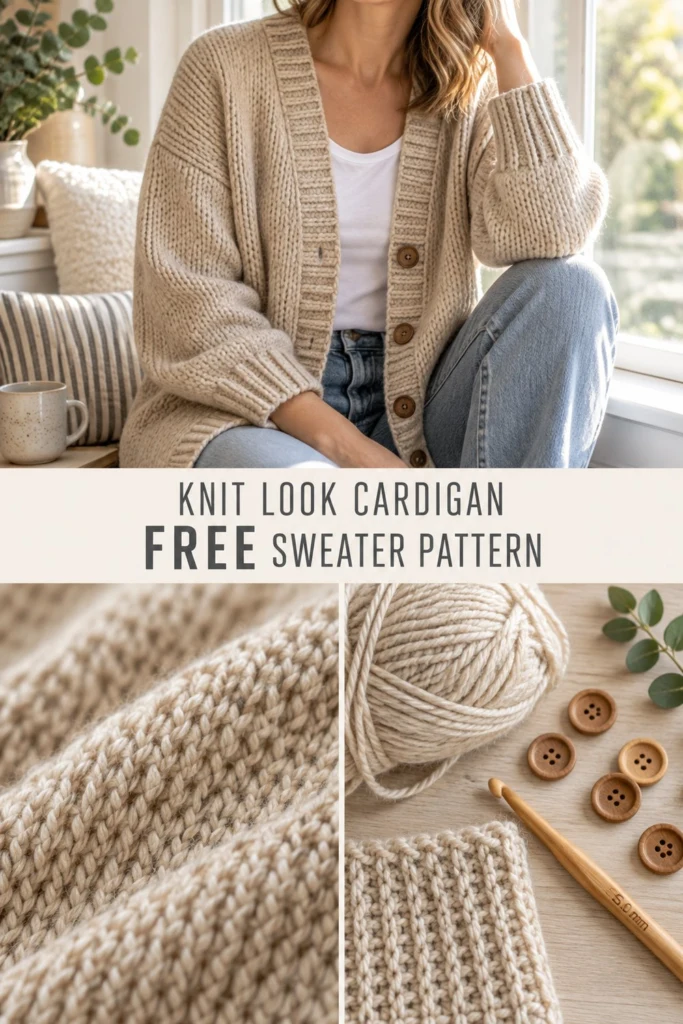
If you have ever wanted the relaxed, cozy aesthetic of a hand-knitted cardigan without picking up a pair of knitting needles, this pattern is your ultimate solution. Crafted with soft, natural oatmeal yarn, this cardigan features classic ribbed cuffs, a wide button band, and rich stockinette-like texture created using the crochet camel stitch. Designed for everyday comfort and effortless style, it is a timeless addition to any handmade wardrobe.
Knit Look Crochet Camel Stitch Cardigan Free Crochet Pattern
Quick Facts
- Skill level: Easy / Intermediate
- Finished size: Women’s XS (S, M, L, XL, 2XL) to fit chest sizes 30–52 in / 76–132 cm (with 5–6 in / 13–15 cm positive ease)
- Yarn: Worsted / Aran Weight (Category 4) in Cream / Natural Oatmeal
- Hook: 5.0 mm (US H/8) wooden crochet hook
- Stitches used: Chain (ch), Slip Stitch (sl st), Single Crochet (sc), Half Double Crochet (hdc), Half Double Crochet in 3rd Loop (Camel Stitch), Half Double Crochet Back Loop Only (hdc BLO)
- Time to make: 12 to 16 hours
Detailed instructions for tailoring garment fit and length are included in the size customization section below.
What Makes This Knit Look Cardigan Special
The secret behind this sweater’s faux-knit appearance lies in the camel stitch—a variation of half double crochet worked directly into the third loop of the stitch below. Working into the third loop pushes the standard front and back loops forward, creating horizontal “V” ridges that mimic classic knitted stockinette stitch.
Unlike traditional knitted garments that require intricate cast-ons and needle control, this cardigan is constructed from simple rectangular panels for the back, fronts, and sleeves. Vertical ribbed edging along the hem, cuffs, and front collar frames the plush textured fabric, while five natural wooden buttons add an authentic artisanal touch.
Skill Level
This pattern is suited for an confident beginner or intermediate crocheter comfortable with basic stitches and shaping.
* Working in row-ends and back loops
* Locating and working into the third loop of half double crochet (Camel Stitch)
* Basic garment assembly and seaming
* Creating neat buttonholes within ribbed bands
💡 Designer Tip: If you have never worked the camel stitch before, practice on a small 10-stitch swatch for 4 rows. Once you locate the third loop (located just behind or below the top V), the stitch flows smoothly and quickly!
Finished Measurements
| Measurement | XS | S | M | L | XL | 2XL |
|---|---|---|---|---|---|---|
| Finished Chest (in) | 36 in | 40 in | 44 in | 48 in | 52 in | 56 in |
| Finished Chest (cm) | 91.5 cm | 101.5 cm | 112 cm | 122 cm | 132 cm | 142 cm |
| Total Length (in) | 23.5 in | 24 in | 25 in | 26 in | 26.5 in | 27 in |
| Total Length (cm) | 59.5 cm | 61 cm | 63.5 cm | 66 cm | 67.5 cm | 68.5 cm |
| Sleeve Length (in) | 18 in | 18 in | 18.5 in | 19 in | 19.5 in | 20 in |
| Sleeve Length (cm) | 45.5 cm | 45.5 cm | 47 cm | 48.5 cm | 49.5 cm | 51 cm |
| Armhole Depth (in) | 7 in | 7.5 in | 8 in | 8.5 in | 9 in | 9.5 in |
| Armhole Depth (cm) | 18 cm | 19 cm | 20.5 cm | 21.5 cm | 23 cm | 24 cm |
Materials You Will Need
| Item | Specification | Quantity |
|---|---|---|
| Yarn | Category 4 Worsted / Aran weight (Natural Cream / Oatmeal) | 1,150 (1,280, 1,420, 1,580, 1,740, 1,900) yards / 1,050 (1,170, 1,300, 1,445, 1,590, 1,735) meters |
| Crochet Hook | 5.0 mm (US H/8) wooden or ergonomic hook | 1 |
| Buttons | 1 in / 25 mm natural 4-hole wooden buttons | 5 |
| Tapestry Needle | Yarn needle with large eye | 1 |
| Stitch Markers | Locking stitch markers | 6–8 |
| Scissors | Small craft scissors | 1 pair |
Yarn Suggestions
| Yarn Name | Fiber Content | Yardage / Weight | Notes |
|---|---|---|---|
| Lion Brand Wool-Ease | 80% Acrylic, 20% Wool | 197 yds (180 m) / 85 g | Soft drape, beautiful stitch definition, washable. |
| Patons Classic Wool Worsted | 100% Wool | 210 yds (192 m) / 100 g | Excellent structure and warmth for a true hand-knit feel. |
| Paintbox Yarns Simply Aran | 100% Premium Acrylic | 201 yds (184 m) / 100 g | Affordable, durable option with crisp stitch definition. |
⚠️ Note: Avoid using stiff cotton yarns or extra-bulky yarns for this cardigan. The camel stitch creates a dense fabric, so a soft acrylic, wool, or wool blend with good flexibility is essential to maintain proper drape and comfort.
Gauge
14 sts x 11 rows = 4 x 4 in (10 x 10 cm) in main camel stitch pattern using 5.0 mm hook.
| Swatch Rows | Instructions | Gauge Checkpoint |
|---|---|---|
| 16 ch foundation | Work 14 hdc across for 11 rows in Camel Stitch pattern | 4 in (10 cm) wide by 4 in (10 cm) tall |
Abbreviations
This pattern uses standard US crochet terms.
| Abbreviation | Full Name |
|---|---|
| ch | Chain |
| sl st | Slip Stitch |
| sc | Single Crochet |
| hdc | Half Double Crochet |
| hdc BLO | Half Double Crochet Back Loop Only |
| 3rd loop hdc | Half Double Crochet into 3rd loop (Camel Stitch) |
| st(s) | Stitch(es) |
| rs | Right Side |
| ws | Wrong Side |
| rep | Repeat |
| sk | Skip |
UK Conversion: sc = dc (double crochet), hdc = htr (half treble crochet).
Special Stitches Explained
Half Double Crochet in 3rd Loop (Camel Stitch)
- On Right Side (RS) Rows: Yarn over, insert hook into the diagonal strand located directly behind the top V of the half double crochet stitch from the previous row. Yarn over, pull up a loop (3 loops on hook). Yarn over, pull through all 3 loops.
- On Wrong Side (WS) Rows: Yarn over, insert hook from right to left into the 3rd loop located on the side facing you (just beneath the front loop). Yarn over, pull up a loop (3 loops on hook). Yarn over, pull through all 3 loops.
- This technique pushes the top two loops of the previous row forward to create a smooth, raised V-ridge resembling knitted knit-and-purl stockinette stitch.
Pattern Instructions
Pattern Notes
- Turning chains do not count as a stitch throughout the pattern unless specifically noted.
- Garment panels are worked from the bottom hem upwards. Bottom ribbing is worked horizontally first, then body rows are worked directly into the side edge of the ribbing.
- Numbers written as XS (S, M, L, XL, 2XL). When only one number is given, it applies to all sizes.
Section 1: Bottom Ribbing & Back Panel (Cream Yarn, make 1)
Bottom Ribbing (Back)
Ch 10.
* Row 1: hdc in 2nd ch from hook and in each ch across, turn (9 hdc).
* Row 2: Ch 1, hdc BLO in each st across, turn (9 hdc).
* Rows 3 to 63 (70, 77, 84, 91, 98): Rep Row 2 (9 hdc).
Do not fasten off. Turn ribbing 90 degrees to work along the long row-end edge.
Back Body Panel
- Row 1 (RS): Ch 1, work 1 hdc into the end of each ribbing row across, turn (63 (70, 77, 84, 91, 98) hdc).
- Row 2 (WS): Ch 1, work 1 3rd loop hdc in each st across, turn (63 (70, 77, 84, 91, 98) hdc).
- Row 3 (RS): Ch 1, work 1 3rd loop hdc in each st across, turn (63 (70, 77, 84, 91, 98) hdc).
- Rows 4 to 56 (58, 60, 62, 64, 66): Rep Rows 2 and 3 sequentially (63 (70, 77, 84, 91, 98) hdc).
Fasten off, leaving a 24 in (60 cm) yarn tail for shoulder seaming.
✅ Checkpoint: Back Panel should measure 18 (20, 22, 24, 26, 28) in / 45.5 (51, 56, 61, 66, 71) cm wide and 23.5 (24, 25, 26, 26.5, 27) in / 59.5 (61, 63.5, 66, 67.5, 68.5) cm tall including ribbing.
Section 2: Left Front Panel (Cream Yarn, make 1)
Bottom Ribbing (Left Front)
Ch 10.
* Row 1: hdc in 2nd ch from hook and in each ch across, turn (9 hdc).
* Row 2: Ch 1, hdc BLO in each st across, turn (9 hdc).
* Rows 3 to 28 (31, 34, 37, 40, 43): Rep Row 2 (9 hdc).
Do not fasten off. Turn ribbing 90 degrees to work along the long row-end edge.
Left Front Body Panel
- Row 1 (RS): Ch 1, work 1 hdc into the end of each ribbing row across, turn (28 (31, 34, 37, 40, 43) hdc).
- Row 2 (WS): Ch 1, work 1 3rd loop hdc in each st across, turn (28 (31, 34, 37, 40, 43) hdc).
- Row 3 (RS): Ch 1, work 1 3rd loop hdc in each st across, turn (28 (31, 34, 37, 40, 43) hdc).
- Rows 4 to 56 (58, 60, 62, 64, 66): Rep Rows 2 and 3 sequentially (28 (31, 34, 37, 40, 43) hdc).
Fasten off.
Section 3: Right Front Panel (Cream Yarn, make 1)
Bottom Ribbing (Right Front)
Ch 10.
* Row 1: hdc in 2nd ch from hook and in each ch across, turn (9 hdc).
* Row 2: Ch 1, hdc BLO in each st across, turn (9 hdc).
* Rows 3 to 28 (31, 34, 37, 40, 43): Rep Row 2 (9 hdc).
Do not fasten off. Turn ribbing 90 degrees to work along the long row-end edge.
Right Front Body Panel
- Row 1 (RS): Ch 1, work 1 hdc into the end of each ribbing row across, turn (28 (31, 34, 37, 40, 43) hdc).
- Row 2 (WS): Ch 1, work 1 3rd loop hdc in each st across, turn (28 (31, 34, 37, 40, 43) hdc).
- Row 3 (RS): Ch 1, work 1 3rd loop hdc in each st across, turn (28 (31, 34, 37, 40, 43) hdc).
- Rows 4 to 56 (58, 60, 62, 64, 66): Rep Rows 2 and 3 sequentially (28 (31, 34, 37, 40, 43) hdc).
Fasten off.
✅ Checkpoint: Both Left and Right Front Panels should measure 8 (8.8, 9.7, 10.6, 11.4, 12.3) in / 20.5 (22.5, 24.5, 27, 29, 31) cm wide.
Section 4: Sleeves (Cream Yarn, make 2)
Cuff Ribbing
Ch 10.
* Row 1: hdc in 2nd ch from hook and in each ch across, turn (9 hdc).
* Row 2: Ch 1, hdc BLO in each st across, turn (9 hdc).
* Rows 3 to 24 (26, 28, 30, 32, 34): Rep Row 2 (9 hdc).
Do not fasten off. Turn cuff 90 degrees to work along the edge.
Sleeve Body
- Row 1 (RS): Ch 1, work 24 (26, 28, 30, 32, 34) hdc evenly across row-ends, turn (24 (26, 28, 30, 32, 34) hdc).
- Row 2 (WS – Increase): Ch 1, 2 3rd loop hdc in first st, 3rd loop hdc across to last st, 2 3rd loop hdc in last st, turn (26 (28, 30, 32, 34, 36) hdc).
- Row 3 (RS): Ch 1, 3rd loop hdc in each st across, turn (26 (28, 30, 32, 34, 36) hdc).
- Rows 4 to 35 (37, 39, 41, 43, 45): Rep increase pattern every 3rd row while maintaining camel stitch on all non-increase rows until stitch count reaches 38 (42, 46, 50, 54, 58) hdc.
- Rows 36 to 44 (44, 46, 48, 50, 52): Work straight in camel stitch without increasing (38 (42, 46, 50, 54, 58) hdc).
Fasten off, leaving a 30 in (75 cm) yarn tail for seaming.
Assembly
- Shoulder Seams: Lay Back Panel flat with RS facing up. Align Left and Right Front Panels on top with RS facing down. Using the yarn tail and tapestry needle, whipstitch outer 20 (23, 26, 29, 32, 35) sts of each front panel to the outer shoulder edges of the Back Panel. Center 23 (24, 25, 26, 27, 28) sts remain open for back neck.
- Attaching Sleeves: Lay body flat with open armholes exposed. Measure and mark 7 (7.5, 8, 8.5, 9, 9.5) in / 18 (19, 20.5, 21.5, 23, 24) cm down from shoulder seam on both front and back panels. Pin top center of sleeve edge to shoulder seam, then whipstitch sleeve cap across marked armhole opening. Repeat for second sleeve.
- Side & Sleeve Seams: Fold cardigan at shoulders with right sides facing inward. Match cuff edges, sleeve underarms, and side body seams down to hem ribbing. Mattress stitch or whipstitch continuously from cuff down to hem on both sides. Turn garment right-side out.
✅ Checkpoint: Sleeve seams and side body seams should be neatly aligned with no puckering. Test-fit sweater body across shoulders.
Section 5: Front Collar & Button Band (Cream Yarn)
Attach yarn to bottom right front corner hem to work along front opening, back neck, and down left front opening.
- Row 1 (RS): Ch 1, work hdc evenly up Right Front edge, across Back Neck opening, and down Left Front edge, placing 1 hdc per row-end along vertical edges, turn (145 (151, 157, 163, 169, 175) hdc).
- Row 2 (WS): Ch 1, 3rd loop hdc in each st across, turn (145 (151, 157, 163, 169, 175) hdc).
- Row 3 (RS – Buttonhole Row): Ch 1, 3rd loop hdc in first 4 sts, ch 2, sk 2 sts (buttonhole created), 3rd loop hdc in next 10 sts rep between * 4 more times (5 buttonholes total spaced along lower right front panel), 3rd loop hdc across remaining sts to end, turn (145 (151, 157, 163, 169, 175) sts including ch-2 spaces).
- Row 4 (WS): Ch 1, 3rd loop hdc in each st across (work 2 hdc into each ch-2 space), turn (145 (151, 157, 163, 169, 175) hdc).
- Row 5 (RS): Ch 1, 3rd loop hdc in each st across, turn (145 (151, 157, 163, 169, 175) hdc).
- Row 6 (WS): Sl st in each st across to create a clean, firm finished front border edge.
Fasten off.
Finishing & Button Placement
- Thread a tapestry needle with matching cream yarn.
- Align left front band directly under right front buttonholes.
- Sew 5 natural wooden buttons onto Left Front Band corresponding exactly to the positions of the 5 buttonholes on Right Front Band.
- Weave in all loose yarn ends securely on WS of fabric.
- Lightly steam block sweater panels with a damp cloth, taking care not to crush the raised textured ridges.
Size Customization Tips
- Adjusting Sleeve Length: Add or subtract camel stitch rows before starting sleeve decreases. Each 2 rows adds/removes approximately 0.7 in (1.8 cm).
- Adjusting Body Length: Add or subtract pairs of camel stitch rows (Rows 2–3 rep) on Back and Front panels prior to armhole shaping. Note that adding 4 rows adds 1.4 in (3.5 cm) to total length.
- Bust Customization: If you fall between sizes, choose the larger size for a trendy oversized slouchy look, or the smaller size for a tailored silhouette.
Care Instructions
- Washing: Hand wash in cold water using a mild wool wash or gentle detergent.
- Drying: Do not wring or twist. Gently squeeze out excess water with a clean bath towel and lay flat on a drying rack to preserve shape.
- Maintenance: Store folded rather than hung on coat hangers to prevent stretching out shoulder seams.
FAQ
Can I use a regular half double crochet stitch instead of camel stitch?
Yes! If you prefer a simpler texture, you can substitute standard half double crochet worked in both loops throughout. However, working into the 3rd loop is what creates the distinct knitted stockinette ridges shown in the photos.
How do I make buttonholes smaller or larger?
For smaller buttons (under 3/4 in / 20 mm), replace ch 2, sk 2 sts with ch 1, sk 1 st on Row 3 of the button band. For larger buttons (over 1.25 in / 30 mm), increase to ch 3, sk 3 sts.
Is this pattern suitable for wool-allergic crafters?
Absolutely! Premium 100% acrylic or cotton-blend worsted yarns in cream or soft beige will render identical knit-look stitch definition without causing skin irritation.
Happy Crocheting!
You have completed your Knit Look Camel Stitch Cardigan! Enjoy wrapping yourself in cozy, hand-crafted comfort. Save this pin to your Pinterest crochet board, and share your finished cardigan photos with your favorite yarn colors!
📄 Your free PDF pattern
⏳ Preparing your free PDF… 30s
Like this one? Save it for later.