Plump Turkey Gnome Crochet Shelf Sitter Free Thanksgiving Pattern
Reader Favorites










Twinkle Lights Crochet Christmas Necklace Free Christmas Pattern

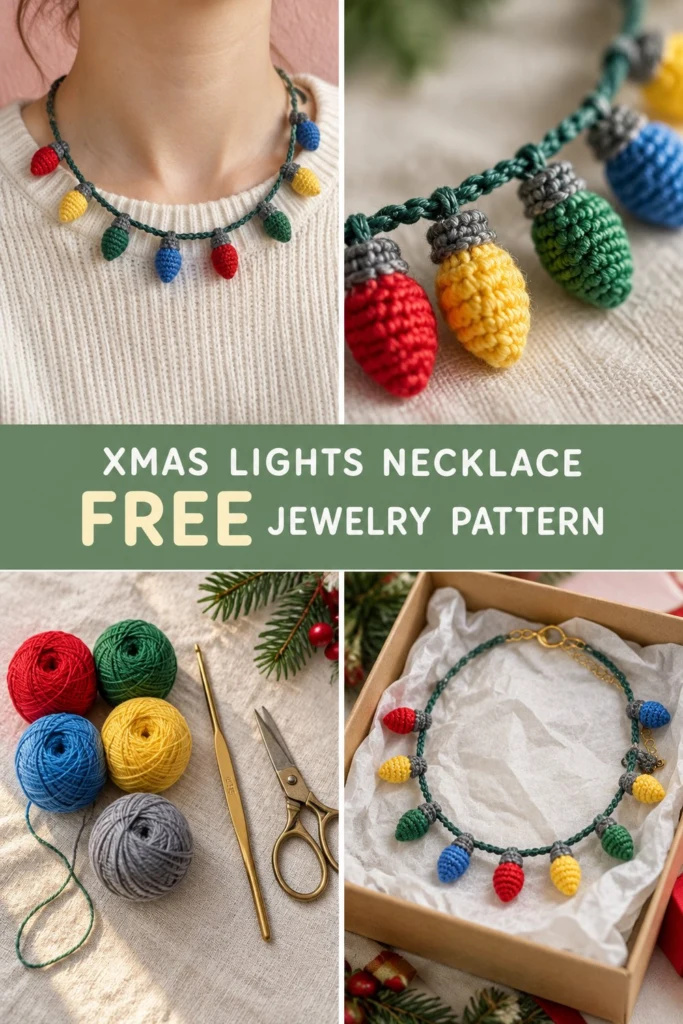
Bring a cheerful pop of holiday magic to your winter wardrobe with this adorable crocheted Christmas lights necklace! Handcrafted with smooth size 10 cotton thread, each tiny bulb is a plump, three-dimensional drop topped with a textured grey socket, spaced neatly along a rich dark green cord. Whether you are dressing up an ugly Christmas sweater or searching for the ultimate handmade stocking stuffer, this festive accessory is fast, lightweight, and guaranteed to spark conversations.
Twinkle Lights Crochet Christmas Necklace Free Christmas Pattern
Quick Facts
- Skill level: Easy / Advanced Beginner
- Finished size: Necklace cord length: 18 in (46 cm); Bulb height: 1.25 in (3 cm)
- Yarn: Size 10 Mercerized Cotton Thread (6 colors total)
- Hook: 1.75 mm (US Steel Hook Size 4)
- Stitches used: Magic Ring, Chain (ch), Single Crochet (sc), Single Crochet Increase (inc), Single Crochet Decrease (dec), Back Loop Only (BLO), Slip Stitch (sl st)
- Time to make: 2 to 3 hours
Note: Instructions for customizing the necklace length and bulb count are included in the Size Customization Tips section below.
What Makes This Christmas Lights Necklace Special
- 3D Amigurumi Bulb Shape: Stuffed lightly with synthetic fiberfill, each bulb keeps its iconic teardrop profile without drooping or flattening while worn.
- Textured Sockets: Working the grey cap in the back loops creates a realistic ridged collar that separates the bright bulb body from the attachment socket, just like real retro string lights.
- Customizable Palette: The design uses classic holiday shades—Bright Red, Bright Yellow, Bright Green, and Bright Blue—strung along a deep forest green cord, but can easily be adapted to pastel or monochromatic palettes.
- Lightweight Wearability: Crafted in fine cotton lace thread, the entire necklace weighs less than an ounce, making it exceptionally comfortable for all-day wear at holiday parties.
Skill Level
This project is ideal for an advanced beginner or intermediate crocheter comfortable with small-gauge thread work. You will need to know how to:
– Work in continuous spiral rounds (amigurumi style)
– Perform single crochet increases and basic decreases
– Work in the back loops only (BLO)
– Perform neat color changes
– Join metal jewelry findings (clasp and jump rings)
💡 Designer Tip: If working with size 10 thread feels unfamiliar, place a contrasting scrap of yarn under your working stitch as a running stitch marker so you never lose the first stitch of a round.
Finished Measurements
| Component | Inches | Centimeters |
|---|---|---|
| Necklace Cord Length | 18.0 in | 46.0 cm |
| Extension Chain Length | 2.0 in | 5.0 cm |
| Single Light Bulb Height | 1.25 in | 3.0 cm |
| Single Light Bulb Width | 0.6 in | 1.5 cm |
| Bulb Spacing (Center to Center) | 1.6 in | 4.0 cm |
Materials You Will Need
| Material / Item | Specification / Details | Quantity / Yardage |
|---|---|---|
| Dark Green Thread | Size 10 Mercerized Cotton Thread (Cord) | 15 yds / 14 m |
| Grey Thread | Size 10 Mercerized Cotton Thread (Sockets) | 10 yds / 9 m |
| Bright Red Thread | Size 10 Mercerized Cotton Thread (Bulbs) | 8 yds / 7 m |
| Bright Yellow Thread | Size 10 Mercerized Cotton Thread (Bulbs) | 8 yds / 7 m |
| Bright Green Thread | Size 10 Mercerized Cotton Thread (Bulbs) | 8 yds / 7 m |
| Bright Blue Thread | Size 10 Mercerized Cotton Thread (Bulbs) | 8 yds / 7 m |
| Crochet Hook | 1.75 mm (US Steel Hook Size 4) | 1 hook |
| Fiberfill Stuffing | Polyester fiberfill | Small pinch per bulb |
| Tapestry Needle | Fine steel yarn/embroidery needle | 1 needle |
| Jewelry Clasps | 12 mm Lobster clasp (Gold-tone) | 1 piece |
| Jump Rings | 5 mm Open jump rings (Gold-tone) | 2 pieces |
| Extension Chain | Short jewelry tail chain | 2 in (5 cm) |
| Jewelry Pliers | Chain-nose pliers for jump rings | 1 pair |
| Scissors | Small embroidery scissors | 1 pair |
Yarn Suggestions
| Yarn Brand & Line | Weight / Type | Yardage / Ball | Notes |
|---|---|---|---|
| Aunt Lydia’s Classic Crochet Thread Size 10 | 100% Mercerized Cotton | 350 yds (320 m) / 100g | Excellent stitch definition, huge color range, smooth sheen. |
| Scheepjes Maxi Sweet Treat | 100% Mercerized Cotton | 153 yds (140 m) / 25g | Ideal small bonbon sizes, high twist, vibrant festive shades. |
| DMC Natura Just Cotton Mercerized Size 10 | 100% Mercerized Cotton | 273 yds (250 m) / 50g | Premium finish, soft feel, durable structure. |
⚠️ Note: Avoid using fuzzy acrylic or soft untwisted embroidery floss for the main bulb bodies. Mercerized cotton provides the structural stiffness required for small 3D shapes to hold their form without stiffening spray.
Gauge
- Single Crochet (Thread Gauge): 32 sts x 36 rnds = 4 in (10 cm) worked in single crochet with a 1.75 mm hook.
- Bulb Motif Size Check: Rnds 1 to 6 of the light bulb motif should measure approximately 0.6 in (1.5 cm) across at the widest point.
Abbreviations
| Abbreviation | Full Term (US Crochet Terms) |
|---|---|
| ch | Chain |
| sc | Single Crochet |
| inc | Single Crochet Increase (2 sc in same st) |
| dec | Single Crochet Decrease (sc2tog) |
| BLO | Back Loop Only |
| sl st | Slip Stitch |
| st(s) | Stitch(es) |
| rnd(s) | Round(s) |
| rep | Repeat |
| MR | Magic Ring |
Note for UK readers: US single crochet (sc) = UK double crochet (dc); US single crochet decrease (dec) = UK double crochet 2 together (dc2tog).
Special Stitches Explained
1. Magic Ring (MR)
Create a loop with your yarn, leaving a 4-inch tail. Insert the hook into the loop, yarn over, and draw up a loop. Chain 1 (does not count as a stitch), then work the required number of single crochet stitches directly into the main ring. Pull the tail firmly to close the central hole tight.
2. Single Crochet Decrease (dec)
Insert hook into the front loop of the next stitch, then immediately insert hook into the front loop of the second stitch. Yarn over and pull through both front loops (2 loops remain on hook). Yarn over and pull through remaining 2 loops on hook. This invisible decrease creates a seamless stitch without gaps.
3. Back Loop Only (BLO)
Instead of inserting your hook beneath both top threads of a stitch, insert your hook under only the back thread (the loop farthest away from you). This leaves a decorative front loop ridge on the surface of your fabric.
Pattern Instructions
Pattern Notes
- Light bulb motifs are worked continuously in spiral rounds without joining at the end of each round. Do not chain 1 between rounds unless instructed.
- Fill each bulb lightly with polyfill before closing the top socket. Do not overstuff, or white fibers may peek through the stitches.
- The necklace requires 8 total light bulbs: 2 in Bright Red, 2 in Bright Yellow, 2 in Bright Green, and 2 in Bright Blue.
Section 1: Light Bulb Motifs (Make 8 total)
Make 2 in Bright Red, 2 in Bright Yellow, 2 in Bright Green, and 2 in Bright Blue.
Starting at the pointed tip of the bulb with bulb color:
- Rnd 1: 4 sc in MR (4 sc).
- Rnd 2: (1 sc, inc) x 2 (6 sc).
- Rnd 3: (1 sc, inc) x 3 (9 sc).
- Rnd 4: (2 sc, inc) x 3 (12 sc).
- Rnd 5: sc in each st around (12 sc).
- Rnd 6: (3 sc, inc) x 3 (15 sc).
- Rnd 7: sc in each st around (15 sc).
- Rnd 8: (3 sc, dec) x 3 (12 sc).
- Rnd 9: (1 sc, dec) x 4 (8 sc).
✅ Checkpoint: Your bulb should measure approximately 0.9 in (2.2 cm) from the tip. Stuff the bulb firmly with a small pinch of fiberfill using the end of a tapestry needle.
Change to Grey thread in the last loop of the final stitch in Rnd 9.
- Rnd 10: In BLO, sc in each st around (8 sc).
- Rnd 11: sc in each st around (8 sc).
Fasten off Grey thread, leaving an 8 in (20 cm) tail for assembly.
Section 2: Main Necklace Cord
Worked in Dark Green thread.
Leaving a 6 in (15 cm) tail for finishing, chain 121.
- Row 1: sc in 2nd ch from hook and in each remaining ch across (120 sc).
Fasten off Dark Green thread, leaving a 6 in (15 cm) tail.
Section 3: Assembly
- Positioning the Bulbs: Lay the green cord flat on a clean surface. Identify the 120 single crochet stitches along the cord.
- Calculate spacing so the 8 bulbs are evenly distributed across the middle section:
- Leave 14 free stitches on the left end of the cord.
- Attach Bulb 1 (Red) at stitch 15.
- Attach Bulb 2 (Yellow) at stitch 28 (13 sts apart).
- Attach Bulb 3 (Green) at stitch 41.
- Attach Bulb 4 (Blue) at stitch 54.
- Attach Bulb 5 (Red) at stitch 67.
- Attach Bulb 6 (Yellow) at stitch 80.
- Attach Bulb 7 (Green) at stitch 93.
- Attach Bulb 8 (Blue) at stitch 106.
-
Leaves 14 free stitches on the right end of the cord.
-
Securing the Bulbs: Thread the Grey yarn tail from a light bulb onto your tapestry needle. Pass the needle through stitch 10 of the grey socket, through the target stitch on the dark green cord, and back into the opposite side of the socket. Wrap around the cord 2–3 times tightly, tie a small secure knot inside the socket base, and weave the tail into the center of the stuffed bulb. Cut remaining thread. Repeat for all 8 bulbs.
✅ Checkpoint: Verify that all 8 bulbs hang vertically facing down and that spacing between each bulb remains equal along the curvature of the cord.
Section 4: Finishing & Jewelry Findings
- Weave Ends: Weave in any remaining yarn tails from the bulbs and cord using your tapestry needle.
- Attach Extension & Clasp:
- Using jewelry pliers, open one 5 mm jump ring. Loop it through the first single crochet at one end of the dark green cord and attach the 12 mm gold lobster clasp. Pinch jump ring closed securely.
- Open the second 5 mm jump ring. Loop it through the last single crochet at the opposite end of the dark green cord and attach the 2-inch gold extension chain. Pinch jump ring closed securely.
- Blocking: Lightly steam the dark green cord with a garment steamer or steam iron held 2 inches away (do not press directly onto the cotton) to relax the cord so it lays smoothly against the neck.
Size Customization Tips
- Adjusting Neck Length: Each single crochet on the cord measures approximately 0.15 inches (0.38 cm).
- To make a choker length (15 in / 38 cm): Chain 101 for the cord (100 sc). Space 8 bulbs 10 stitches apart, leaving 10 stitches free on each end.
-
To make a longer necklace (22 in / 56 cm): Chain 149 for the cord (148 sc). Add 2 extra bulbs (10 total bulbs: 3 Red, 3 Yellow, 2 Green, 2 Blue) spaced 12 stitches apart.
-
Earrings Variation: Make 2 individual light bulb motifs (Rnds 1–11). Pass a gold eye pin through the grey socket, add a small glass bead on top, loop the top of the pin with jewelry pliers, and attach to standard fishhook earring wires!
Care Instructions
- Spot Cleaning: Spot clean gentle spills with cold water and a drop of mild wool detergent. Do not submerge the metal findings in water for extended periods to prevent discoloration.
- Reshaping: If bulbs become squished during storage, gently squeeze the sides between your fingers to plump up the fiberfill.
- Storage: Store flat or hung on a jewelry stand to keep the green cord smooth and unkinked.
FAQ
Can I use scrap embroidery floss instead of size 10 thread?
Yes! Standard 6-strand cotton embroidery floss is roughly equivalent in thickness to size 10 crochet thread when used without splitting strands. Use all 6 strands together with the same 1.75 mm crochet hook.
How do I make the light bulbs stiffer so they don’t deform?
Mercerized cotton thread combined with dense continuous single crochet stitches creates a sturdy shell on its own. Stuffing the bulbs firmly with polyfill is all that is needed. If you prefer extra rigid bulbs, lightly dab diluted fabric stiffener or white craft glue diluted 50/50 with water onto the inner walls before stuffing.
Can I make this as a festive holiday garland instead of a necklace?
Absoutely! To create an ornament garland for your fireplace mantel or small Christmas tree, chain 300 in Dark Green thread with a 2.5 mm hook using category 2 (sport weight) yarn, and make 20 larger bulbs scaled up with a 2.5 mm hook.
Happy Crocheting!
You now have a delightful, festive Christmas lights necklace ready to wear or gift! Save this pin to your holiday crochet board on Pinterest and leave a comment below to share your custom color combinations. Happy crocheting!
📄 Your free PDF pattern
⏳ Preparing your free PDF… 30s
Like this one? Save it for later.