Plump Turkey Gnome Crochet Shelf Sitter Free Thanksgiving Pattern
Reader Favorites










Quilted Puff Crochet Crossbody Bag Free Crochet Pattern

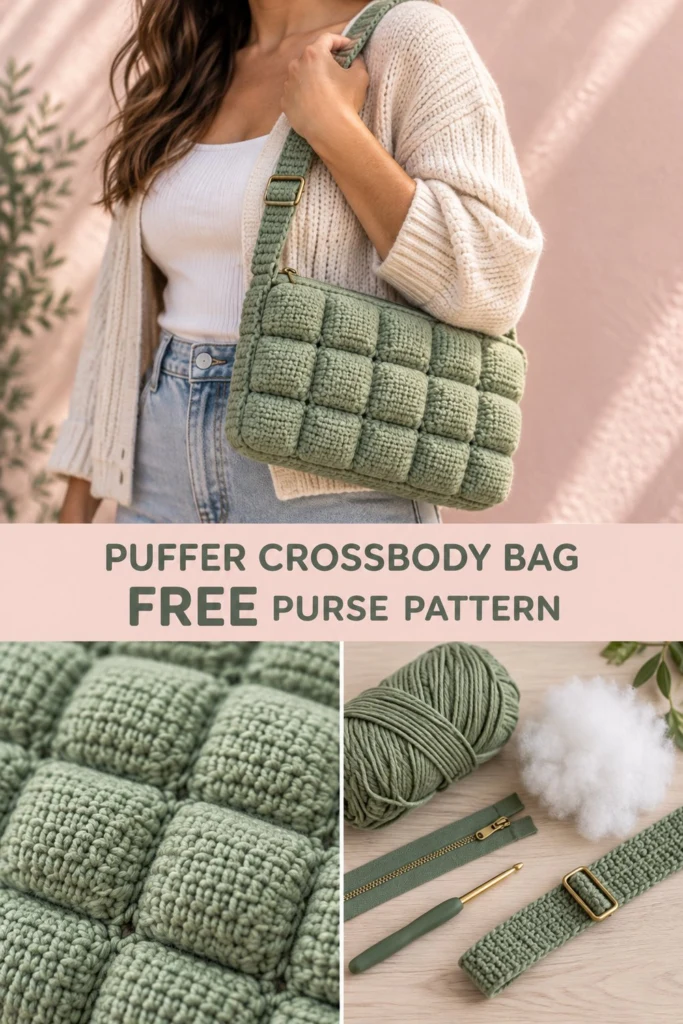
This quilted puff crochet crossbody bag is the ultimate everyday accessory, combining the viral puffer jacket trend with the handmade charm of crochet. Featuring a puffy, cloud-like grid texture, a sleek zip top, and an adjustable strap, it is surprisingly practical and holds all your daily essentials like a phone, keys, and lip balm. Whether you are running errands or heading out for a cosy evening, this stylish bag adds a handmade touch to any outfit.
Quilted Puff Crochet Crossbody Bag Free Crochet Pattern
Quick Facts
- Skill level: Intermediate
- Finished size: 9.5 in (24 cm) wide, 6 in (15 cm) high, 2.5 in (6.5 cm) deep
- Yarn: Lion Brand Wool-Ease Thick & Quick (or similar Aran/Bulky cotton-blend yarn in Sage Green) – approx. 350 yards (320 meters)
- Hook: 5.0 mm (US H/8) crochet hook
- Stitches used: Chain (ch), slip stitch (sl st), single crochet (sc), back loop only (BLO), front loop only (FLO)
- Time to make: 6 to 8 hours
💡 Designer Tip: Size adjustment tips for altering the bag dimensions are included at the bottom of the pattern.
What Makes This Crochet Crossbody Bag Special
Unlike standard flat crochet bags, this design relies on a clever double-layer construction. You crochet two grid panels with interconnected single crochet pockets, lightly stuff each individual square with polyester fiberfill to create that signature quilted “puffer” look, and then join them together. A sturdy base chain keeps the bag’s structure solid, while a single back-loop-only round creates a sharp turn for the sides. The result is a cloud-soft, structured purse that never sags.
Skill Level
- Intermediate
- Required skills: Working in the round, back loop only (BLO) crochet, basic sewing/zipper attachment, stuffing amigurumi-style sections evenly.
Don’t worry if you haven’t made a puffed bag before—the step-by-step instructions below will guide you through every single stitch!
Finished Measurements
| Dimension | Inches | Centimeters |
|---|---|---|
| Width | 9.5 in | 24 cm |
| Height | 6 in | 15 cm |
| Depth | 2.5 in | 6.5 cm |
| Strap Length (Adjustable) | 30 to 55 in | 76 to 140 cm |
Materials You Will Need
| Material | Details | Quantity |
|---|---|---|
| Yarn (Sage Green) | Aran / Bulky Weight (Category 4 or 5 cotton/acrylic blend) | 350 yds / 320 m |
| Crochet Hook | 5.0 mm (US H/8) | 1 |
| Polyester Fiberfill | Poly-fil stuffing | 1 small bag |
| Zipper | Matching 9-inch metal or nylon zipper in Sage Green | 1 |
| Hardware | Adjustable strap slider and D-rings in antique brass | 1 set |
| Notions | Stitch markers, tapestry needle, sewing thread and needle for zipper | As needed |
Yarn Suggestions
| Yarn Name | Weight | Skein Yardage | Notes |
|---|---|---|---|
| Lion Brand Wool-Ease Thick & Quick | Bulky (6) | 106 yds / 97 m | Sturdy, holds its shape well when stuffed. |
| Lily Sugar’n Cream (Held Double) | Worsted (4) | 120 yds / 109 m | Excellent stitch definition for the puff grid. |
| Caron One Pound (Held Double) | Aran (4) | 812 yds / 742 m | Durable and budget-friendly acrylic choice. |
⚠️ Note: Avoid fuzzy or brushed novelty yarns (like mohair or eyelash yarn) for this project, as they will obscure the clean grid lines and make stuffing difficult.
Gauge
- 14 sc and 16 rows = 4 in (10 cm) using a 5.0 mm hook.
- Each individual quilted puff square measures approximately 1.5 in x 1.5 in (3.8 cm x 3.8 cm).
Abbreviations (US Terminology)
- ch: chain
- sl st: slip stitch
- sc: single crochet
- BLO: back loop only
- FLO: front loop only
- st(s): stitch(es)
- rnd(s): round(s)
- rep: repeat
- inc: increase (2 sc in same st)
- dec: decrease (single crochet 2 together)
UK conversion note: UK sc = US dc, UK hdc = US htr, UK dc = US tr.
Special Stitches Explained
- Magic Ring: A movable starting loop used to begin working in the round.
- Invisible Decrease (inv-dec): Insert hook into the front loop only of the next two stitches, yarn over, pull through both loops, yarn over and pull through remaining two loops.
Pattern Instructions
Pattern Notes:
– Work in continuous spirals for the base and body unless otherwise specified. Do not join rounds with a slip stitch unless noted.
– Use a stitch marker to track the first stitch of each round.
Section 1: Bag Base and Body (Sage Green, make 1 main continuous piece)
Foundation Chain: Ch 32.
Row 1: Working in the back bumps of the foundation chain, sc in 2nd ch from hook, sc in each ch across to last ch, 3 sc in last ch, rotate to work along the opposite side of the chain, sc in each ch across, 2 sc in the final ch (64 sc).
Rnd 2: Working in BLO for this round only to create the sharp base edge, sc in each st around (64 sc).
Rnds 3 to 22: sc in each st around (64 sc per rnd).
Rnd 23: Sl st in next st, fasten off, leaving a long tail for assembly.
✅ Checkpoint: At the end of Rnd 22, your bag body should stand upright with a firm, defined rectangular base measuring about 9.5 inches long and 2.5 inches wide.
Section 2: Quilted Puff Grid Panels (Sage Green, make 2 – Front and Back Panels)
The puffer texture is created by working a grid of surface crochet lines over the flat panels.
Foundation Chain: Ch 34.
Row 1: Sc in 2nd ch from hook and in each ch across, turn (33 sc).
Rows 2 to 24: Ch 1, sc in each st across, turn (33 sc per row). Fasten off.
To create the puffy grid effect, use matching yarn and a tapestry needle to whipstitch vertical lines every 5 stitches and horizontal lines every 4 rows through both layers or across the surface ridges, creating individual square pockets.
Before closing the final side of each square pocket, insert a small pinch of polyester fiberfill into each compartment to achieve the cloud-like puffy texture shown in the photo.
Section 3: Crossbody Strap (Sage Green, make 1)
Foundation Chain: Ch 9.
Row 1: Sc in 2nd ch from hook and in each ch across, turn (8 sc).
Rows 2 to 140: Ch 1, sc in each st across, turn (8 sc per row). Fasten off, leaving a 10-inch tail.
Thread the strap through the adjustable antique brass slider hardware and attach the ends securely to the D-rings on the side gussets of the bag body.
Assembly
- Place the stuffed front and back quilted puff grid panels against the exterior sides of the main bag body.
- Using a tapestry needle and the yarn tails, whipstitch the panels securely to the front and back faces of the bag body.
- Align the 9-inch zipper along the top opening of the bag. Using sewing thread and a standard hand-sewing needle, carefully stitch the zipper tape to the top inside edge of the crochet opening.
- Securely stitch the antique brass D-rings to the left and right side seams of the bag just below the zipper line.
- Clip the adjustable strap onto the D-rings.
✅ Checkpoint: Check that your zipper opens and closes smoothly without catching on any interior yarn tails or stuffing fibers.
Finishing
Weave in all remaining ends securely using your tapestry needle. Trim any excess yarn. Fluff the individual quilted squares with your fingers to ensure the fiberfill is evenly distributed across all pockets.
Size Customization Tips
- Making it wider: Add chains to the foundation chain in multiples of 5 stitches (matching the grid width).
- Making it taller: Add extra rows to the bag body and puff grid panels, keeping in mind you will need slightly more yarn.
Care Instructions
- Spot clean gently with a damp cloth and mild soap.
- Do not submerge fully in water due to the polyester fiberfill stuffing and metal zipper/hardware.
- Lay flat in the shade to dry.
Frequently Asked Questions
Can I machine wash this bag?
Because of the polyester stuffing and metal zipper/hardware, machine washing is not recommended. Spot cleaning is best to keep the puffy squares looking their best.
Can I use cotton yarn instead of wool-ease?
Yes! A heavy cotton yarn or a cotton-acrylic blend (like Lily Sugar’n Cream held double) provides fantastic stitch definition and keeps the bag sturdy.
How do I adjust the strap length?
Simply crochet fewer rows for a shorter shoulder strap, or more rows for a longer crossbody length, before attaching the slider hardware.
Happy Crocheting!
I hope you love making your new Quilted Puff Crochet Crossbody Bag as much as I did designing it! Be sure to save this pin on Pinterest to your favourite crochet boards, and leave a comment below sharing what color yarn you plan to use for yours. Happy stitching!
📄 Your free PDF pattern
⏳ Preparing your free PDF… 30s
Like this one? Save it for later.