Plump Turkey Gnome Crochet Shelf Sitter Free Thanksgiving Pattern
Reader Favorites










Holly Berry Crochet Bucket Bag Free Christmas Pattern

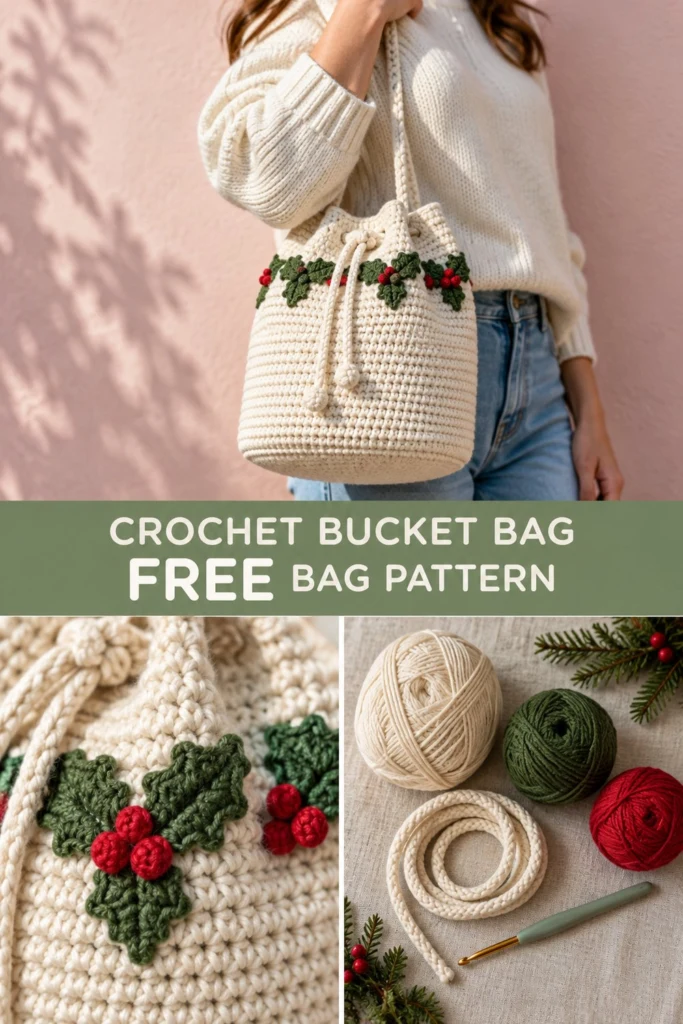
Bring a touch of festive magic to your holiday wardrobe with this handmade crochet bucket bag! Crafted in a sturdy cream yarn with a ring of dimensional green holly leaves and plump red berries around the rim, this festive accessory is as functional as it is stunning. Featuring a secure drawstring closure and a comfortable shoulder strap, it is perfect for winter market strolls, holiday gatherings, or gift-giving.
Holly Berry Crochet Bucket Bag Free Christmas Pattern
Quick Facts
- Skill level: Intermediate
- Finished size: 10 in wide x 9.5 in tall (25.5 cm x 24 cm) with 36 in (91.5 cm) strap
- Yarn: Worsted / Aran weight cotton yarn (#4) in Cream, Forest Green, and Festive Red
- Hook: 4.5 mm (US 7) crochet hook
- Stitches used: sc, hdc, dc, sl st, BLO, picot
- Time to make: 6 to 8 hours
💡 Designer Tip: Looking to change the size? Detailed customization guidelines and gauge notes are included later in this pattern.
What Makes This Bucket Bag Special
- Sturdy Seamless Construction: Worked from a flat oval base into tight single crochet rounds to ensure your purse holds its classic bucket shape without sagging.
- Dimensional Festive Trim: Vibrant, textured holly leaf clusters paired with pop-out 3D red berry spheres create a handcrafted heirloom look.
- Smooth Drawstring Closure: Built-in eyelet rounds make threading the custom crocheted drawstring effortless, keeping your phone, wallet, and essentials safe.
- Comfortable Strap: A thick, low-stretch single crochet strap distributes weight evenly across your shoulder for all-day wear.
Skill Level
This project is rated Intermediate.
- Working in continuous and joined rounds
- Crocheting into the back loops only (BLO)
- Basic motif shaping (ch, sc, hdc, dc, sl st, picot)
- Seamless 3D sphere construction for berries
- Basic assembly and hand sewing
Even if this is your first holiday purse, step-by-step instructions and stitch checkpoints will guide you safely through the entire project!
Finished Measurements
| Component | Imperial | Metric |
|---|---|---|
| Bag Width (Flat) | 10 in | 25.5 cm |
| Bag Height | 9.5 in | 24 cm |
| Oval Base Dimensions | 8 in x 4.5 in | 20 cm x 11.5 cm |
| Strap Length | 36 in | 91.5 cm |
| Strap Width | 1.25 in | 3 cm |
| Drawstring Length | 38 in | 96.5 cm |
Materials You Will Need
| Material | Detail / Color | Quantity |
|---|---|---|
| Main Yarn | Cream (Worsted / Heavy Cotton #4) | 310 yds / 283 m |
| Trim Yarn 1 | Forest Green (Worsted Cotton #4) | 45 yds / 41 m |
| Trim Yarn 2 | Festive Red (Worsted Cotton #4) | 30 yds / 27 m |
| Crochet Hook | 4.5 mm (US 7) | 1 |
| Tapestry Needle | Blunt end for weaving & sewing | 1 |
| Stitch Markers | Locking stitch markers | 2 to 4 |
| Measuring Tape | Standard soft tape measure | 1 |
| Fabric Lining (Optional) | Cotton fabric for inner lining | 0.5 yd / 0.5 m |
Yarn Suggestions
| Yarn Brand | Skein Size | Material | Notes |
|---|---|---|---|
| Paintbox Yarns Cotton Aran | 93 yds / 85 m (50g) | 100% Cotton | Crisp stitch definition, ideal for bags |
| Lily Sugar’n Cream Solids | 120 yds / 109 m (70.9g) | 100% Cotton | Very durable, holds shape extremely well |
| Lion Brand 24/7 Cotton | 186 yds / 170 m (100g) | 100% Mercerized Cotton | Beautiful sheen, low stretch |
⚠️ Note: Avoid using stretchy acrylic or fuzzy mohair yarns for the main bag body. Heavy contents will pull soft yarns out of shape, causing the bucket bag to droop. Stick with a firm 100% cotton yarn.
Gauge
| Stitch Type | Gauge Measurement |
|---|---|
| Single Crochet (in the rnd) | 16 sts x 18 rnds = 4 in x 4 in (10 cm x 10 cm) |
| Oval Base Checkpoint | Rnds 1 to 7 = 8 in x 4.5 in (20 cm x 11.5 cm) |
💡 Designer Tip: Check your oval base after Round 7. It should measure approximately 8 in (20 cm) long by 4.5 in (11.5 cm) wide. If your base is larger, switch to a smaller hook; if it is smaller, switch to a larger hook.
Abbreviations
| Abbreviation | Full Name (US Terms) |
|---|---|
| ch | chain |
| sc | single crochet |
| hdc | half double crochet |
| dc | double crochet |
| sl st | slip stitch |
| inc | increase (2 single crochet in same stitch) |
| dec | single crochet 2 together (sc2tog) |
| BLO | back loop only |
| picot | chain 2, sl st in 2nd ch from hook |
| sk | skip |
| sp | space |
| st(s) | stitch(es) |
| rnd(s) | round(s) |
| rep | repeat |
UK conversion: sc = dc, hdc = htr, dc = tr, sl st = single slip stitch.
Special Stitches Explained
- Picot (Leaf Point): Chain 2. Insert your hook into the 2nd chain from the hook, yarn over, and pull through both loops on your hook to form a small pointed tip.
- Back Loop Only (BLO): Insert hook under only the back loop of the designated stitch (the loop furthest away from you) rather than under both top loops.
- Single Crochet Increase (inc): Work 2 single crochet stitches into the exact same stitch to expand the round smoothly.
Pattern Instructions
Pattern Notes
- Main bag body is worked in continuous spiral rounds (do not join at the end of rounds unless instructed). Use a stitch marker to mark the first stitch of each round.
- Turning chains on rows do NOT count as stitches throughout this pattern.
- The shoulder strap is worked in turned rows.
Section 1: Bag Body (Cream, make 1)
Chain 21 in Cream.
- Rnd 1: Work sc in 2nd ch from hook, sc in next 18 ch, 3 sc in last ch. Turn to work down opposite side of foundation chain: sc in next 18 ch, inc in last ch (42 sc).
- Rnd 2: inc in first st, sc 18, inc in next 3 sts, sc 18, inc in last 2 sts (48 sc).
- Rnd 3: (sc 1, inc) 3 times, sc 18 rep 2 times (54 sc).
- Rnd 4: (sc 2, inc) 3 times, sc 18 rep 2 times (60 sc).
- Rnd 5: (sc 3, inc) 3 times, sc 18 rep 2 times (66 sc).
- Rnd 6: (sc 4, inc) 3 times, sc 18 rep 2 times (72 sc).
- Rnd 7: (sc 5, inc) 3 times, sc 18 rep 2 times (78 sc).
✅ Checkpoint: Base complete! Your piece should lay flat and measure approximately 8 in x 4.5 in (20 cm x 11.5 cm).
- Rnd 8 (Turning Round): Working in BLO, sc in each st around (78 sc).
- Rnds 9 to 34: Working in both loops, sc in each st around (78 sc).
- Rnd 35 (Eyelet Round): sc 4, ch 2, sk 2 sts rep 13 times around (52 sc, 13 ch-2 sps).
- Rnd 36: sc in next 4 sc, 2 sc in ch-2 sp rep 13 times around (78 sc).
- Rnds 37 to 38: sc in each st around (78 sc).
Fasten off with a sl st to next st. Weave in ends securely.
Section 2: Holly Leaves (Forest Green, make 12)
Using Forest Green, chain 8.
- Rnd 1: sl st in 2nd ch from hook, sc in next ch, hdc in next ch, (dc 1, picot, dc 1) in next ch, hdc in next ch, sc in next ch, sl st in last ch. Rotate to work down opposite side of foundation chain: sl st in same last ch, sc in next ch, hdc in next ch, (dc 1, picot, dc 1) in next ch, hdc in next ch, sc in next ch, sl st in first ch (18 sts including picots).
Fasten off, leaving an 8 in (20 cm) tail for assembly.
Section 3: Red Berries (Festive Red, make 18)
Using Festive Red, start with a magic ring.
- Rnd 1: 6 sc into magic ring (6 sc).
- Rnd 2: sc in each st around (6 sc).
- Rnd 3: dec 3 times (3 sc).
Fasten off, leaving a 6 in (15 cm) tail. Using a tapestry needle, thread yarn through front loops of remaining 3 stitches, pull tight to form a tiny round sphere, and knot securely.
Section 4: Shoulder Strap (Cream, make 1)
Using Cream, chain 7.
- Row 1: sc in 2nd ch from hook and in each ch across, turn (6 sc).
- Rows 2 to 140: ch 1, sc in each st across, turn (6 sc).
Strap should measure approximately 36 in (91.5 cm) un-stretched. Fasten off, leaving a 12 in (30 cm) tail on each end for sewing.
Section 5: Drawstring Cord & End Bobbles (Cream, make 1 cord & 2 bobbles)
Drawstring Cord
Using Cream, chain 140.
– Row 1: sl st in 2nd ch from hook and in each ch across (139 sl st).
Fasten off and weave in loose ends. Cord measures approx 38 in (96.5 cm).
Drawstring End Bobbles (Make 2)
Using Cream, start with a magic ring.
– Rnd 1: 6 sc in magic ring (6 sc).
– Rnd 2: (sc 1, inc) rep 3 times (9 sc).
– Rnd 3: sc in each st around (9 sc).
– Rnd 4: (sc 1, dec) rep 3 times (6 sc).
Fasten off, leaving a 6 in (15 cm) tail.
Assembly
- Holly & Berry Arrangement:
- Organize the 12 Holly Leaves into 6 pairs (2 leaves angled outward in a V-shape per cluster).
- Space the 6 clusters evenly around the circumference of the bag body, positioned between Rnds 30 and 34 (just underneath the drawstring eyelets). Space clusters approximately 13 stitches apart.
- Using the yarn tails and tapestry needle, stitch each leaf pair securely to the bag body.
-
Group 3 Red Berries at the center join of each leaf pair (6 clusters x 3 berries = 18 total berries). Stitch each berry securely through the bag wall and tie off inside.
-
Attaching the Shoulder Strap:
- Align the short ends of the Shoulder Strap inside the top rim of the bag (centered along the left and right side folds, overlapping the inside rim by 3 rounds).
-
Stitch securely using a square-with-an-X embroidery pattern for maximum strength.
-
Threading Drawstring & Securing Bobbles:
- Weave the Drawstring Cord in and out through the 13 eyelet holes created in Rnd 35, starting and ending at the front center of the bag.
- Slip one Drawstring End Bobble over each cord tip. Lightly stuff leftover yarn inside the bobble, then use the yarn tail to cinch Rnd 4 closed tightly around the cord end, stitching through the cord to anchor it permanently.
✅ Checkpoint: Verify that all ends are knotted tightly on the inside of the bag and that the drawstring slides smoothly through the eyelet round.
Finishing
- Weaving Ends: Weave all remaining yarn tails into the interior stitches.
- Optional Fabric Lining: For heavy item support and key protection, cut two pieces of cotton fabric matching the base and body dimensions (add 0.5 in seam allowance). Sew fabric lining, slip inside the bag, and hand-stitch to the inside rim just below the eyelet round.
Size Customization Tips
- Wider Base: Add extra increase rounds to the base before working the BLO round. Each additional increase round adds 6 stitches (approx 1.5 in / 3.8 cm around). Ensure your total stitch count remains a multiple of 6 so the eyelet round aligns properly.
- Taller Bag: Work additional straight sc rounds between Rnds 9 and 34. Each extra 2 rounds adds approximately 0.4 in (1 cm) of height.
- Crossbody Strap: For a longer crossbody strap, add 20 to 40 additional rows to the strap pattern until reaching your desired drop length (approx 45–48 in / 114–122 cm).
Care Instructions
- Washing: Hand wash gently in cold water using a mild wool/cotton detergent. Do not wring or twist.
- Drying: Press between clean towels to remove excess moisture. Reshape the bag base and lay flat to dry completely away from direct sunlight.
- Storage: Stuff lightly with tissue paper during off-season storage to keep the bucket structure crisp.
FAQ
Can I use acrylic yarn instead of cotton?
While acrylic yarn can be used for decorative items, cotton is strongly recommended for this purse. Cotton yarn provides structural stiffness that keeps the bucket bag standing upright and prevents unsightly stretching when loaded with personal items.
How do I stop the handle from stretching over time?
To minimize strap stretch, work single crochet stitches with a slightly tighter gauge, or sew a strip of matching non-stretch cotton grosgrain ribbon along the underside of the crocheted strap before sewing it to the bag.
Is this bag child-safe if given as a holiday gift?
The red berry spheres are small 3D items. If making this bag for a toddler or young child under 3 years old, omit the 3D spherical berries and instead embroider flat red satin stitch circles directly onto the bag for safety.
Happy Crocheting!
Your festive Holly Berry Bucket Bag is ready to celebrate the season in style! Save this project to your holiday Pinterest boards so it is ready when you begin your Christmas stitching. Share your color combinations and finished bags in the comments below—we love seeing your handmade creations!
📄 Your free PDF pattern
⏳ Preparing your free PDF… 30s
Like this one? Save it for later.