Plump Turkey Gnome Crochet Shelf Sitter Free Thanksgiving Pattern
Reader Favorites










Padded Crochet Laptop Sleeve Free Crochet Pattern

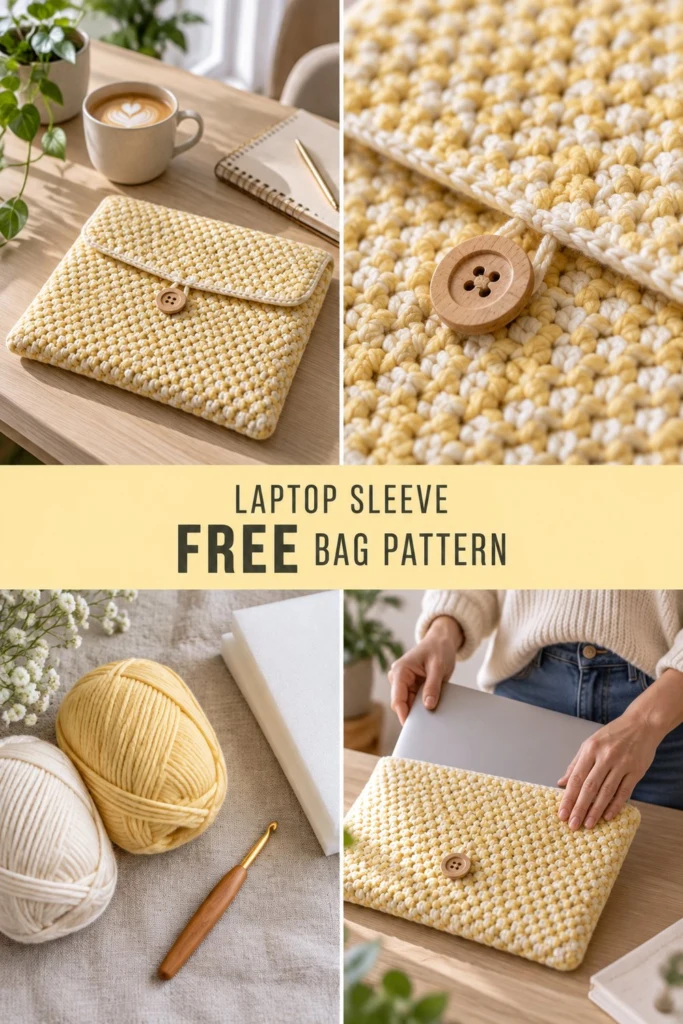
Protect your laptop in handcrafted style with a textured sleeve you can easily stitch together over a weekend. Two firm moss stitch panels securely hold a thin layer of protective foam padding inside, finished with a neat fold-over flap and a rustic wooden button.
Padded Crochet Laptop Sleeve Free Crochet Pattern
Quick Facts
- Skill level: Intermediate
- Finished size: Two sizes included: 13-inch and 15-inch laptop versions
- Yarn: Chunky / #5 bulky weight yarn in Cream and Buttercup Yellow
- Hook: 6.0 mm (US J/10) crochet hook
- Stitches used: Ch, sl st, sc, moss stitch (seed stitch / granite stitch)
- Time to make: 6 to 8 hours
Size customization tips for adjusting to different laptop dimensions are included further down.
What Makes This Crochet Laptop Sleeve Special
This design relies on structural integrity and clever layering. The moss stitch (alternating single crochet and chain stitches) creates a dense, non-stretchy fabric that won’t sag under the weight of a computer. Working in flat panels allows you to sandwich a custom-cut sheet of craft foam directly between the front and back pieces for genuine impact protection. A simple button loop attached to the flap secures everything neatly.
Skill Level
- Foundation chain and basic turning rows
- Working the moss stitch (alternating sc and ch-1 spaces)
- Basic seaming with slip stitches
- Attaching a button and creating a foundation chain loop
Don’t worry if you haven’t tried the moss stitch before—it works up quickly and creates a gorgeous, woven-look texture!
Finished Measurements
| Size | Width (in / cm) | Height (in / cm) | Depth / Padding (in / cm) |
|---|---|---|---|
| 13-Inch | 13.5 in / 34.3 cm | 10.0 in / 25.4 cm | 0.5 in / 1.3 cm |
| 15-Inch | 15.5 in / 39.4 cm | 11.0 in / 27.9 cm | 0.5 in / 1.3 cm |
(Note: Measurements are taken flat before inserting the laptop and foam padding.)
Materials You Will Need
| Material | Details | Quantity / Yardage |
|---|---|---|
| Yarn A (Cream) | Bulky #5 weight, 100% Cotton or Acrylic | 220 yds / 201 m (for 13″) | 260 yds / 238 m (for 15″) |
| Yarn B (Buttercup Yellow) | Bulky #5 weight, 100% Cotton or Acrylic | 220 yds / 201 m (for 13″) | 260 yds / 238 m (for 15″) |
| Crochet Hook | 6.0 mm (US J/10) | 1 hook |
| Notions | 1 Wooden toggle button (approx. 1.2 in / 3 cm wide), Tapestry needle, Stitch markers, Thin craft foam sheet (0.25 in / 0.6 cm thick) cut to match panel size | As needed |
Yarn Suggestions
| Brand | Yarn Line | Skein Yardage | Notes |
|---|---|---|---|
| Lion Brand | Wool-Ease Thick & Quick | 106 yds / 97 m per skein | Excellent stitch definition, provides sturdy warmth |
| Bernat | Softee Chunky | 108 yds / 99 m per skein | Soft acrylic with reliable thickness |
| Hobbii | Ribbon | 131 yds / 120 m per skein | Creates a very structured, rigid fabric |
⚠️ Note: Avoid novelty furry, eyelash, or super-stretchy novelty yarns. They obscure the stitch pattern and fail to provide the firm structural support needed to protect a laptop.
Gauge
- Moss Stitch: 13 sts x 14 rows = 4 in / 10 cm using a 6.0 mm hook with held-together or variegated striping technique.
Abbreviations
- ch: chain
- sl st: slip stitch
- sc: single crochet
- st(s): stitch(es)
- sp(s): space(s)
- sk: skip
- RS: right side
- WS: wrong side
- Yo: yarn over
UK terms equivalent: sc = dc.
Special Stitches Explained
- Moss Stitch (Granite Stitch): Worked over an even number of chains. [Sc in indicated st/ch-sp, ch 1, sk 1 st] repeated across. On subsequent rows, work the sc into the ch-1 space of the previous row, and ch 1 over the sc of the previous row.
- Color Alternation: Hold Yarn A and Yarn B together as a marled strand, OR alternate single rows/rounds of each color as shown in the close-up photo. For the textured speckled look in the reference image, work holding one strand of Cream and one strand of Buttercup Yellow together throughout.
Pattern Instructions
- Note 1: The sleeve is constructed by making two identical flat panels (Front/Back combined with the fold-over flap) or one long folded panel. Here, we crochet two matching panels and seam them on three sides.
- Note 2: Hold one strand of Yarn A (Cream) and one strand of Yarn B (Buttercup Yellow) together as one working yarn throughout the entire project to achieve the marled texture.
- Note 3: Turning chain-1 does not count as a stitch.
Section 1: Main Panels (Make 2 – Identical for Front and Back with Flap)
Foundation (13-inch): Using a 6.0 mm hook and holding Yarn A and Yarn B together, ch 44.
Foundation (15-inch): Using a 6.0 mm hook and holding Yarn A and Yarn B together, ch 50.
* Row 1 (RS): Sc in 4th ch from hook (the skipped chs count as ch-1 and sk 1), *ch 1, sk 1 ch, sc in next ch*; repeat from * across, turn. *(42 sc and ch-1 sps for 13-inch / 48 sc and ch-1 sps for 15-inch)*
* Row 2 (WS): Ch 1, sc in first sc, *ch 1, sk ch-1 sp, sc in next sc*; repeat from * across, working the final sc into the turning chain space, turn. *(42 sc and ch-1 sps for 13-inch / 48 sc and ch-1 sps for 15-inch)*
* Rows 3 to 46 (for 13-inch): Repeat Row 2 until you complete 46 rows total, giving a piece measuring approximately 19 in (48 cm) tall. (42 sc and ch-1 sps)
* Rows 3 to 50 (for 15-inch): Repeat Row 2 until you complete 50 rows total, giving a piece measuring approximately 21 in (53 cm) tall. (48 sc and ch-1 sps)
* Fasten off, leaving a 24-inch tail for assembly on one panel.
✅ Checkpoint: You now have two identical tall rectangular panels. Fold the bottom up by 10 inches (for 13″) or 11 inches (for 15″) to form the pocket, leaving the remaining top section to fold down as the flap.
Section 2: Button Loop & Assembly
- Attach the Button: On the front side of the upper flap (centered, about 1.5 inches down from the top raw edge), securely sew the wooden toggle button using your tapestry needle and leftover yarn strands.
- Create the Closure Loop: On the center edge of the flap, join yarn with a sl st, chain 8 to 10 chains (test length around your button), and sl st back into the same stitch to form a secure loop. Fasten off and weave in ends.
- Seaming the Panels: Place the two panels together with WS facing inward (and your craft foam sheet sandwiched between them). Using the long tail and working through both outer layers simultaneously, whipstitch or slip stitch up the left side, across the bottom base, and up the right side of the main pocket portion only. Leave the flap unseamed.
- Final Border: Work a round of sc evenly around the raw edges of the flap to give it a clean, finished border, then fasten off.
Size Customization Tips
- Adjusting Width: The foundation chain must be an even number. Each 2-chain increase or decrease adjusts the overall width by approximately 0.5 inches (1.3 cm).
- Adjusting Height: Simply work more or fewer rows of the moss stitch before folding the panel to fit your specific device dimensions.
Care Instructions
Spot clean gently with a damp cloth and mild soap. If machine washing is necessary, place the sleeve inside a mesh laundry bag, wash on a delicate wool cycle in cool water, and lay flat to dry completely away from direct heat to protect the internal foam padding.
Frequently Asked Questions
Can I use a single strand of yarn instead of holding two together?
Yes! If you prefer a lighter weight sleeve, you can use a single strand of bulky yarn (or two strands of worsted weight held together), but you will need to adjust your hook size to maintain a dense, firm fabric gauge.
How do I modify this for a tablet or smaller laptop?
Wrap your foundation chain directly around the device with about 0.5 inches of ease, ensuring your total chain count is an even number. Then follow the pattern instructions until the height matches your device.
Can I skip the foam layer?
You can skip the foam if you prefer a softer, slouchier pouch, but the foam sheet is strongly recommended to provide the padded structure shown in the photos.
Happy Crocheting!
I hope you love making and using your new padded laptop sleeve! Save this pattern to your Pinterest board for your next cosy weekend project, and leave a comment below to share what color combination you chose.
📄 Your free PDF pattern
⏳ Preparing your free PDF… 30s
Like this one? Save it for later.