Plump Turkey Gnome Crochet Shelf Sitter Free Thanksgiving Pattern
Reader Favorites










Velvet Bow Back Crochet Holiday Party Top Free Christmas Pattern

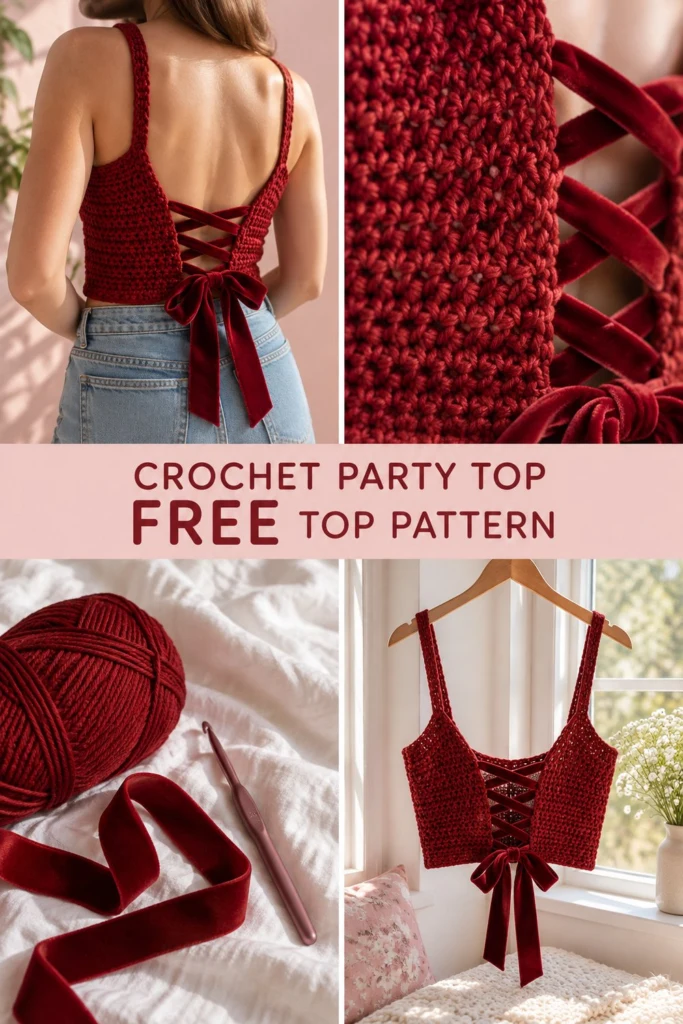
Holiday celebrations call for a statement piece that turns heads from every angle, and this deep burgundy crochet party top does exactly that. Styled with a classic fitted front, delicate ribbed shoulder straps, and a dramatic low-cut back laced with plush velvet ribbon, it delivers festive elegance with a handcrafted touch. Whether paired with high-waisted denim for a casual Christmas gathering or styled with a silk skirt for New Year’s Eve, this project comes together surprisingly fast.
Velvet Bow Back Crochet Holiday Party Top Free Christmas Pattern
Quick Facts
- Skill level: Intermediate
- Finished size: Women’s XS (S, M, L, XL, 2XL) to fit chest 28″ to 50″ (71 cm to 127 cm)
- Yarn: Worsted weight (Category 4) acrylic or wool blend yarn in Deep Burgundy
- Hook: 5.0 mm (US H-8) crochet hook (or size needed to obtain gauge)
- Stitches used: Chain (ch), single crochet (sc), half double crochet (hdc), half double crochet 2 together (hdc2tog), back loop only (BLO)
- Time to make: 5 to 8 hours (depending on size)
Detailed customization advice and size adjustments are included further down in the guide.
What Makes This Crochet Party Top Special
- Dramatic Velvet Ribbon Back: Built-in eyelet edges allow luxurious 1.5-inch velvet ribbon to criss-cross down the back, cinching the waist and finishing in a dramatic statement bow.
- Fitted Half Double Crochet Texture: Work in solid half double crochet rows to create a thick, opaque fabric that holds its shape comfortably without requiring a lining.
- Slim Ribbed Straps: Simple back-loop single crochet straps offer lightweight support while keeping all attention on the open-back detailing.
- Seamless Waist-Up Construction: The lower body panel is worked flat in one continuous piece before splitting into neat upper back wings and shaped bust cups.
Skill Level
This project is rated Intermediate. You should be comfortable with:
– Reading pattern brackets for multiple sizes.
– Working simple decreases (hdc2tog).
– Working into row ends for border placement.
– Seaming straps neatly with a yarn needle.
If you know basic crochet stitches and want to practice gentle garment shaping, this pattern is an ideal step-up project!
Finished Measurements
The top is designed with approximately 2 to 4 inches (5 to 10 cm) of negative ease across the bust, as the open back lacing allows for adjustable fit and flexibility.
| Size | Fits Bust Measurement | Finished Top Width (Hem to Hem)* | Center Front Length | Underarm to Bottom Hem |
|---|---|---|---|---|
| XS | 28–30 in / 71–76 cm | 24 in / 61 cm | 9.5 in / 24 cm | 7.5 in / 19 cm |
| S | 32–34 in / 81–86 cm | 28 in / 71 cm | 10 in / 25.5 cm | 8 in / 20.5 cm |
| M | 36–38 in / 91–96 cm | 32 in / 81 cm | 10.5 in / 26.5 cm | 8.5 in / 21.5 cm |
| L | 40–42 in / 102–107 cm | 36 in / 91 cm | 11 in / 28 cm | 9 in / 23 cm |
| XL | 44–46 in / 112–117 cm | 40 in / 102 cm | 11.5 in / 29 cm | 9.5 in / 24 cm |
| 2XL | 48–50 in / 122–127 cm | 44 in / 112 cm | 12 in / 30.5 cm | 10 in / 25.5 cm |
*Note: Finished Top Width excludes the back lacing gap, which measures approximately 4–6 inches (10–15 cm) wide when laced.
Materials You Will Need
| Item | Specification | Quantity |
|---|---|---|
| Main Yarn | Worsted Weight (#4 Medium), Deep Burgundy | 250 (290, 340, 400, 460, 530) yds / 230 (265, 310, 365, 420, 485) m |
| Velvet Ribbon | 1.5 in (3.8 cm) wide, Deep Burgundy velvet ribbon | 2.5 yards (90 in / 230 cm) |
| Crochet Hook | 5.0 mm (US H-8) aluminum or ergonomic hook | 1 hook |
| Tapestry Needle | Large eye yarn needle for weaving in ends | 1 needle |
| Stitch Markers | Locking plastic stitch markers | 4 markers |
| Scissors | Sharp craft scissors | 1 pair |
Yarn Suggestions
| Yarn Brand & Line | Fiber Content | Skein Weight / Yardage | Notes |
|---|---|---|---|
| Lion Brand Heartland | 100% Acrylic | 5 oz (142 g) / 251 yds (230 m) | Soft, subtle sheen; colorway Black Cherry matches photo perfectly. |
| Caron Simply Soft | 100% Acrylic | 6 oz (170 g) / 315 yds (288 m) | Excellent drape and deep rich shine; colorway Burgundy. |
| Premier Yarns Everyday Worsted | 100% Anti-Pilling Acrylic | 3.5 oz (100 g) / 203 yds (186 m) | Durable, crisp stitch definition; colorway Burgundy. |
⚠️ Note: Avoid lightweight DK yarns or stiff 100% unwashed cotton yarns for this project. Stiff cotton will not cling smoothly to the waist, while DK weight yarn will make the fabric too sheer.
Gauge
Work a test swatch in main half double crochet stitch using the 5.0 mm hook:
– 14 sts x 11 rows = 4 in x 4 in (10 cm x 10 cm)
💡 Designer Tip: If your swatch has fewer than 14 stitches in 4 inches, move down to a 4.5 mm hook. If your swatch has more than 14 stitches, move up to a 5.5 mm hook.
Abbreviations
| Abbreviation | Full Term (US Crochet Terms) |
|---|---|
| ch | Chain |
| sc | Single crochet |
| hdc | Half double crochet |
| hdc2tog | Half double crochet 2 together (decrease) |
| BLO | Back loop only |
| st(s) | Stitch(es) |
| sl st | Slip stitch |
| sk | Skip |
| rep | Repeat |
| RS | Right side |
| WS | Wrong side |
UK translation: sc = double crochet (dc); hdc = half treble crochet (htr); dc = treble crochet (tr).
Special Stitches Explained
Half Double Crochet Two Together (hdc2tog)
- Yarn over, insert hook into next st, yarn over and pull up a loop (3 loops on hook).
- Yarn over, insert hook into following st, yarn over and pull up a loop (5 loops on hook).
- Yarn over and pull through all 5 loops on hook. (1 st decreased)
Pattern Instructions
Section 1: Main Body Panel (Worked Bottom-Up in One Piece)
The main body is worked in turned rows from the bottom hem up to the underarms. Instructions are given for size XS (with S, M, L, XL, 2XL in parentheses).
Ch 86 (100, 114, 128, 142, 156) with Deep Burgundy yarn.
Row 1 (RS): Hdc in 3rd ch from hook (the 2 skipped chains do not count as a st) and in each ch across (84 (98, 112, 126, 140, 154) hdc).
Row 2 (WS): Ch 2 (does not count as st throughout), turn, hdc in each st across (84 (98, 112, 126, 140, 154) hdc).
Rows 3 to 14 (14, 16, 16, 18, 18): Rep Row 2 (84 (98, 112, 126, 140, 154) hdc).
✅ Checkpoint: Measure your panel width. It should measure approximately 24″ (28″, 32″, 36″, 40″, 44″) wide, representing the waist coverage from back left to back right.
Section 2: Upper Back & Front Section Splits
In this section, you will divide the main panel into three distinct sections: Left Back Wing, Front Bust, and Right Back Wing.
2A: Left Back Wing
Worked over the first 18 (21, 24, 27, 30, 33) sts of the main body.
Row 15 (RS): Ch 2, turn, hdc2tog across first 2 sts (back edge slant), hdc in next 16 (19, 22, 25, 28, 31) sts; leave remaining sts unworked (17 (20, 23, 26, 29, 32) hdc).
Row 16 (WS): Ch 2, turn, hdc in next 15 (18, 21, 24, 27, 30) sts, hdc2tog across last 2 sts (16 (19, 22, 25, 28, 31) hdc).
Row 17: Ch 2, turn, hdc2tog, hdc in each st to end (15 (18, 21, 24, 27, 30) hdc).
Row 18: Ch 2, turn, hdc in each st to last 2 sts, hdc2tog (14 (17, 20, 23, 26, 29) hdc).
Row 19: Ch 2, turn, hdc2tog, hdc in each st to end (13 (16, 19, 22, 25, 28) hdc).
Row 20: Ch 2, turn, hdc in each st to last 2 sts, hdc2tog (12 (15, 18, 21, 24, 27) hdc).
(For Sizes M, L, XL, 2XL Only):
Row 21 (21, 21-22, 21-24): Continue decreasing 1 st at the outer back edge every row until – (-, 16, 18, 20, 22) hdc remain.
Fasten off yarn for Left Back Wing.
2B: Front Bust Section
Skip 4 (5, 6, 7, 8, 9) sts after the Left Back Wing for the left underarm opening. Rejoin yarn with sl st in the next st.
Row 15 (RS): Ch 2, hdc in same st and in next 39 (45, 51, 57, 63, 69) sts; leave remaining sts unworked (40 (46, 52, 58, 64, 70) hdc).
Rows 16 to 18 (18, 20, 20, 22, 22): Ch 2, turn, hdc in each st across (40 (46, 52, 58, 64, 70) hdc).
Left Bust Cup Shaping:
Row 19 (19, 21, 21, 23, 23): Ch 2, turn, hdc in first 16 (19, 21, 24, 26, 29) sts; leave center sts unworked (16 (19, 21, 24, 26, 29) hdc).
Row 20 (20, 22, 22, 24, 24): Ch 2, turn, hdc2tog (neckline drop), hdc to end (15 (18, 20, 23, 25, 28) hdc).
Row 21 (21, 23, 23, 25, 25): Ch 2, turn, hdc to last 2 sts, hdc2tog (14 (17, 19, 22, 24, 27) hdc).
Row 22 (22, 24, 24, 26, 26): Ch 2, turn, hdc2tog, hdc to end (13 (16, 18, 21, 23, 26) hdc).
Row 23 (23, 25, 25, 27, 27): Ch 2, turn, hdc to last 2 sts, hdc2tog (12 (15, 17, 20, 22, 25) hdc).
Fasten off Left Bust Cup.
Right Bust Cup Shaping:
Skip center 8 (8, 10, 10, 12, 12) sts along Row 18 (18, 20, 20, 22, 22) for center front neckline drop. Rejoin yarn in next st.
Row 19 (19, 21, 21, 23, 23): Ch 2, hdc in same st and in remaining 15 (18, 20, 23, 25, 28) sts (16 (19, 21, 24, 26, 29) hdc).
Row 20 (20, 22, 22, 24, 24): Ch 2, turn, hdc to last 2 sts, hdc2tog (neckline drop) (15 (18, 20, 23, 25, 28) hdc).
Row 21 (21, 23, 23, 25, 25): Ch 2, turn, hdc2tog, hdc to end (14 (17, 19, 22, 24, 27) hdc).
Row 22 (22, 24, 24, 26, 26): Ch 2, turn, hdc to last 2 sts, hdc2tog (13 (16, 18, 21, 23, 26) hdc).
Row 23 (23, 25, 25, 27, 27): Ch 2, turn, hdc2tog, hdc to end (12 (15, 17, 20, 22, 25) hdc).
Fasten off Right Bust Cup.
2C: Right Back Wing
Skip 4 (5, 6, 7, 8, 9) sts after the front section for right underarm opening. Rejoin yarn in next st.
Row 15 (RS): Ch 2, hdc in same st and in each st to last 2 sts, hdc2tog (17 (20, 23, 26, 29, 32) hdc).
Row 16 (WS): Ch 2, turn, hdc2tog, hdc to end (16 (19, 22, 25, 28, 31) hdc).
Rows 17 to 20 (20, 24, 24, 26, 26): Continue decreasing 1 st at the back opening edge every row (12 (15, 16, 18, 20, 22) hdc).
Fasten off.
Section 3: Shoulder Straps (Make 2)
The straps are worked in ribbed back loop single crochet for vertical flexibility.
Ch 5.
Row 1: Sc in 2nd ch from hook and in each ch across, turn (4 sc).
Row 2: Ch 1, turn, sc BLO in each st across (4 sc).
Rows 3 to 42 (44, 48, 52, 56, 60): Rep Row 2 (4 sc).
Fasten off, leaving a 12-inch (30 cm) tail on each strap for assembly.
Section 4: Back Eyelet Border
Join yarn at the bottom corner of the Left Back slanted opening to create clean lacing holes.
Rnd 1 (RS): Ch 1, work sc evenly up the slanted back edge: work (1 sc in next row-end, ch 1, sk 1 row-end) repeatedly up to top corner of Left Back Wing (6 (7, 8, 9, 10, 11) ch-1 eyelet spaces per side). Sc in top corner. Fasten off.
Repeat along the Right Back slanted edge from top corner down to bottom hem.
✅ Checkpoint: You should have an equal count of neat eyelet openings along both back edges.
Assembly
- Attach Straps: Lay garment flat with RS facing up. Using yarn needle and long tails, neatly sew one end of each strap to top outer peaks of the Front Bust Cups.
- Sew the opposite ends of the straps to the top corners of the Left and Right Back Wings.
- Weave in all loose yarn ends securely on the WS.
       Front Bust
     /            \
   /   Cup    Cup   \
  |     \      /     |
  |      \____/      |
  |                  |
 Left              Right
 Back              Back
 Wing              Wing
   \                /
    \  [EYELETS]   /
     \            /
      \__________/
Finishing & Ribbon Lacing
- Block Top: Lightly steam-block the completed body panel to flatten edges and open the eyelet holes.
- Lace Velvet Ribbon:
- Take the 1.5-inch burgundy velvet ribbon.
- Starting at the top eyelets on the back opening, insert ribbon ends from front to back through left and right top eyelets.
- Criss-cross ribbon downward through eyelets, keeping ribbon flat.
- At bottom hem eyelets, pull ends even and tie into a large, plush decorative bow. Trim ribbon ends diagonally to prevent fraying.
Size Customization Tips
- Bust Depth Adjustment: If you need deeper cup coverage, add 2 extra rows of straight HDC to the Front Section before starting neckline decreases.
- Adjusting Back Opening Width: To make the back coverage fuller (smaller gap), work 2 extra rows on the Lower Main Body before splitting for back wings, or work fewer decrease rows on the wings.
- Strap Length: Test top fit before sewing strap backs. Add or subtract rows from the 4-sc strap to achieve your ideal bust drop height.
Care Instructions
- Body Garment: Hand wash in cold water using mild liquid wool detergent. Do not wring or twist. Roll in a clean towel to remove excess moisture and dry flat.
- Velvet Ribbon: Untie and remove velvet ribbon before washing. Spot clean ribbon only; iron on low synthetic setting on back side if creased.
FAQ
Can I substitute velvet ribbon with a crocheted chain cord?
Yes! If you prefer an all-yarn look, chain a 100-inch (254 cm) length of yarn using a double strand, sc back down the chain, and use it to lace up the back.
Do I need to wear a bra with this top?
Because the half double crochet stitch creates a dense, opaque fabric, many find it comfortable to wear without a bra. Alternatively, silicon adhesive cups or a low-back converter bra pair perfectly.
How do I prevent the velvet ribbon from slipping untied?
Velvet ribbon has natural friction texture, but tying a neat double knot at the base of the bow loops before forming the bow loops will keep it secure all night!
Happy Crocheting!
You have completed your Velvet Bow Back Crochet Holiday Party Top! Save this pattern to your favorite Pinterest boards for gift season, and leave a comment below sharing what yarn color you chose for your holiday outfit.
📄 Your free PDF pattern
⏳ Preparing your free PDF… 30s
Like this one? Save it for later.