Plump Turkey Gnome Crochet Shelf Sitter Free Thanksgiving Pattern
Reader Favorites










Little Turkey Crochet Baby Hat Free Thanksgiving Pattern

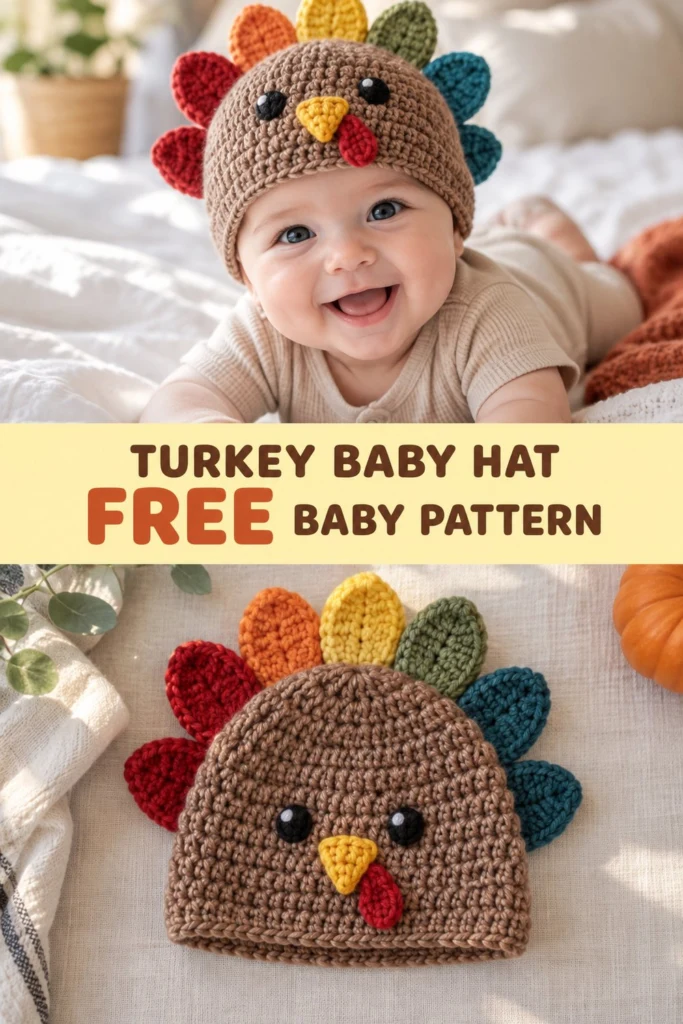
Celebrate your little one’s very first Thanksgiving with this adorable crochet turkey baby hat. Featuring a soft textured crown, colorful fan of feathers, cute triangular beak, and soft stitched eye details, this handmade beanie makes the ultimate holiday photo prop. It works up quickly using simple half double crochet stitches, making it an enjoyable weekend project before the big feast.
Little Turkey Crochet Baby Hat Free Thanksgiving Pattern
Quick Facts
- Skill level: Easy / Intermediate
- Finished size: Newborn (0–3 Months), 3–6 Months, 6–12 Months
- Yarn: Worsted weight (Category 4) cotton or acrylic yarn in 8 colors (Warm Brown, Yellow, Red, Black, White, Crimson, Rust, Orange, Olive Green, Teal)
- Hook: 5.0 mm (US H-8) crochet hook (or size needed to obtain gauge)
- Stitches used: Magic Ring (MR), chain (ch), single crochet (sc), half double crochet (hdc), double crochet (dc), single crochet 2 together (sc2tog), slip stitch (sl st)
- Time to make: 2 to 3 hours
Sizing customization notes and stitch adjustment guidelines are included further down in this pattern.
What Makes This Little Turkey Baby Hat Special
This baby thanksgiving hat blends seasonal whimsy with practical, baby-friendly design. The body of the hat is worked from the crown down using half double crochet, creating a cozy stretch that stays securely on tiny heads.
Each feather is crafted as an individual leaf-shaped applique in warm autumn hues—crimson, rust, orange, yellow, olive green, and teal—then stitched around the back crown to create a vibrant turkey tail. By embroidering the eye details onto flat crochet circles rather than using plastic safety eyes, this beanie remains 100% soft and safe for newborns and infants.
Skill Level
- Working in continuous and joined rounds
- Working on both sides of a foundation chain (for feathers and wattle)
- Basic shape decreasing (
sc2tog) - Simple whip-stitch assembly and embroidery
If you are familiar with basic beanie construction, this beginner-friendly crochet turkey hat project will be a breeze!
Finished Measurements
| Size | Age Range | Head Circumference | Hat Depth / Height | Crown Diameter |
|---|---|---|---|---|
| Newborn | 0–3 Months | 13.0–14.0 in (33–35.5 cm) | 5.5 in (14.0 cm) | 4.25 in (10.8 cm) |
| 3–6M | 3–6 Months | 14.5–15.5 in (37–39.5 cm) | 6.0 in (15.2 cm) | 4.75 in (12.0 cm) |
| 6–12M | 6–12 Months | 16.0–17.0 in (40.5–43 cm) | 6.5 in (16.5 cm) | 5.25 in (13.3 cm) |
Materials You Will Need
| Material / Item | Details & Specifications | Quantity / Amount |
|---|---|---|
| Main Yarn (Warm Brown) | Medium Worsted (#4), Soft Cotton or Acrylic | 65 (80, 95) yds / 60 (73, 87) m |
| Beak Yarn (Bright Yellow) | Medium Worsted (#4) | 5 yds / 4.5 m |
| Wattle Yarn (Red) | Medium Worsted (#4) | 5 yds / 4.5 m |
| Eye Yarn (Black) | Medium Worsted (#4) | 5 yds / 4.5 m |
| Highlight Yarn (White) | Medium Worsted (#4) or embroidery floss | 1 yd / 1 m |
| Feather Yarns (7 colors) | Crimson Red, Rust Red, Orange, Yellow, Olive Green, Teal, Dark Blue | 8 yds / 7.5 m PER color |
| Crochet Hook | 5.0 mm (US H-8) aluminum or ergonomic hook | 1 hook |
| Tapestry Needle | Blunt-ended yarn needle for assembly | 1 needle |
| Stitch Markers | Locking stitch markers | 2 to 4 markers |
| Measuring Tape | Soft flexible tape measure | 1 tape |
Yarn Suggestions
| Yarn Brand & Line | Fiber Content | Skein Weight / Yardage | Notes & Suitability |
|---|---|---|---|
| Paintbox Yarns Cotton Aran | 100% Cotton | 50 g / 93 yds (85 m) | Soft matte finish, vibrant fall palette, excellent stitch definition. |
| Lion Brand 24/7 Cotton | 100% Mercerized Cotton | 100 g / 186 yds (170 m) | Durable, low fuzz, easy to wash for babies. |
| Caron Simply Soft | 100% Acrylic | 170 g / 315 yds (288 m) | Ultra-soft against sensitive baby skin with gentle sheen. |
⚠️ Note: Avoid using scratchy wools or loosely plied novelty yarns for this newborn turkey hat, as fuzzy fibers may irritate an infant’s skin or mouth. Stick to smooth, washable cotton or soft acrylic blends.
Gauge
| Stitch Pattern | Gauge Count | Dimensions |
|---|---|---|
| Half Double Crochet (hdc) | 14 sts x 10 rnds | 4 x 4 in (10 x 10 cm) |
| Flat Circle Crown (Rnds 1–4) | 32 hdc | 3.5 in (8.9 cm) diameter |
Abbreviations
| Abbreviation | Standard Term (US) |
|---|---|
| ch | Chain stitch |
| sc | Single crochet |
| hdc | Half double crochet |
| dc | Double crochet |
| sc2tog | Single crochet 2 together (decrease) |
| sl st | Slip stitch |
| st(s) | Stitch(es) |
| rnd(s) | Round(s) |
| row(s) | Row(s) |
| MR | Magic Ring |
| FO | Fasten off |
UK: sc = dc, hdc = htr, dc = tr.
Special Stitches Explained
- Magic Ring (MR): Wrap yarn around your fingers to form a loop. Insert hook, draw up a loop, chain specified turning chains, and work required stitches directly into the adjustable loop. Pull tail tight to close center hole completely.
- Single Crochet 2 Together (sc2tog): Insert hook into next stitch, yarn over, draw up a loop (2 loops on hook). Insert hook into following stitch, yarn over, draw up a loop (3 loops on hook). Yarn over and pull through all 3 loops on hook (1 stitch decreased).
Pattern Instructions
Pattern Notes
- Beanie crown is worked top-down in joined rounds. Joining slip stitch and initial ch-2 do NOT count as a stitch throughout. Always make your first stitch of the round in the same stitch as the join.
- Feathers and wattle are worked around both sides of a center foundation chain.
- All sizes use the same feather, beak, and wattle pattern.
Section 1: Main Beanie (Warm Brown Yarn)
Size: Newborn (0–3M)
- Rnd 1: In MR, ch 2, work 8 hdc, sl st to first hdc (8 hdc).
- Rnd 2: Ch 2, 2 hdc in each st around, sl st to first hdc (16 hdc).
- Rnd 3: Ch 2, (1 hdc in next st, 2 hdc in next st) x 8, sl st to first hdc (24 hdc).
- Rnd 4: Ch 2, (1 hdc in next 2 sts, 2 hdc in next st) x 8, sl st to first hdc (32 hdc).
- Rnd 5: Ch 2, (1 hdc in next 7 sts, 2 hdc in next st) x 4, sl st to first hdc (36 hdc).
- Rnds 6–12 (7 rnds): Ch 2, 1 hdc in each st around, sl st to first hdc (36 hdc).
- Rnd 13: Ch 1, 1 sc in each st around, sl st to first sc (36 sc).
Fasten off and weave in starting tail securely.
Size: 3–6 Months
- Rnd 1: In MR, ch 2, work 8 hdc, sl st to first hdc (8 hdc).
- Rnd 2: Ch 2, 2 hdc in each st around, sl st to first hdc (16 hdc).
- Rnd 3: Ch 2, (1 hdc in next st, 2 hdc in next st) x 8, sl st to first hdc (24 hdc).
- Rnd 4: Ch 2, (1 hdc in next 2 sts, 2 hdc in next st) x 8, sl st to first hdc (32 hdc).
- Rnd 5: Ch 2, (1 hdc in next 3 sts, 2 hdc in next st) x 8, sl st to first hdc (40 hdc).
- Rnds 6–13 (8 rnds): Ch 2, 1 hdc in each st around, sl st to first hdc (40 hdc).
- Rnd 14: Ch 1, 1 sc in each st around, sl st to first sc (40 sc).
Fasten off and weave in starting tail securely.
Size: 6–12 Months
- Rnd 1: In MR, ch 2, work 8 hdc, sl st to first hdc (8 hdc).
- Rnd 2: Ch 2, 2 hdc in each st around, sl st to first hdc (16 hdc).
- Rnd 3: Ch 2, (1 hdc in next st, 2 hdc in next st) x 8, sl st to first hdc (24 hdc).
- Rnd 4: Ch 2, (1 hdc in next 2 sts, 2 hdc in next st) x 8, sl st to first hdc (32 hdc).
- Rnd 5: Ch 2, (1 hdc in next 3 sts, 2 hdc in next st) x 8, sl st to first hdc (40 hdc).
- Rnd 6: Ch 2, (1 hdc in next 9 sts, 2 hdc in next st) x 4, sl st to first hdc (44 hdc).
- Rnds 7–14 (8 rnds): Ch 2, 1 hdc in each st around, sl st to first hdc (44 hdc).
- Rnd 15: Ch 1, 1 sc in each st around, sl st to first sc (44 sc).
Fasten off and weave in starting tail securely.
✅ Checkpoint: Measure your crown flat diameter after Round 5. Newborn should measure approximately 4.25 in (10.8 cm); 3–6M should measure 4.75 in (12.0 cm).
Section 2: Turkey Beak (Bright Yellow Yarn, Make 1)
Worked in flat turned rows.
– Ch 5.
– Row 1: Sc in 2nd ch from hook and in each of the next 3 ch, turn (4 sc).
– Row 2: Ch 1, sc2tog twice, turn (2 sc).
– Row 3: Ch 1, sc2tog (1 sc).
Fasten off, leaving a 10 in (25 cm) tail for sewing.
Section 3: Wattle (Red Yarn, Make 1)
Worked around a foundation chain.
– Ch 5.
– Rnd 1: Sc in 2nd ch from hook, 1 hdc in next 2 ch, 3 hdc in last ch; rotate piece to work along bottom loop of foundation chain: 1 hdc in next 2 ch, 1 sc in last ch, sl st to first sc (9 sts).
Fasten off, leaving a 10 in (25 cm) tail for sewing.
Section 4: Eye Patches (Black & White Yarn, Make 2)
Worked in continuous rounds.
– Rnd 1 (Black): In MR, ch 1, work 6 sc into ring, sl st to first sc (6 sc).
Fasten off, leaving an 8 in (20 cm) tail for sewing.
Using white yarn and a tapestry needle, embroider 1 small vertical straight stitch across the right edge of each black circle to create an eye reflection highlight.
Section 5: Feathers (Make 7 Feathers total)
Make 1 feather in each color: Crimson Red, Rust Red, Orange, Yellow, Olive Green, Teal, Dark Blue.
Worked around a foundation chain.
– Ch 8.
– Rnd 1: Sc in 2nd ch from hook, 1 hdc in next ch, 1 dc in next 3 ch, 1 hdc in next ch, (2 sc, ch 1, 2 sc) into the last ch; rotate piece to work along opposite side of foundation chain: 1 hdc in next ch, 1 dc in next 3 ch, 1 hdc in next ch, 1 sc in last ch, sl st to first sc (16 sts + 1 ch-1 sp).
Fasten off, leaving a 10 in (25 cm) tail for sewing.
Assembly
💡 Designer Tip: Use stitch markers to pin the feathers in a smooth fan shape across the back of the hat before stitching anything down permanently.
- Attaching Feathers:
- Arrange the 7 feathers side by side in a semi-circular arc along the upper back half of the hat (spanning approximately Rnds 3 to 7).
- Color Order (Left to Right when facing the back): Crimson Red, Rust Red, Orange, Yellow, Olive Green, Teal, Dark Blue.
- Overlap lower sides of adjacent feathers slightly (about 1–2 sts overlap) so there are no gaps.
-
Using the long yarn tails and a tapestry needle, stitch the bottom half of each feather securely to the main hat body, keeping the feather tips free and upright.
-
Attaching Facial Features (Front of Hat):
- Eyes: Position the black eye patches on the front of the hat between Rnds 7 and 9, spaced approximately 4 stitches apart. Whip-stitch around edges.
- Beak: Position the yellow beak centered between the eyes, pointing downward (top edge along Rnd 8, tip touching Rnd 11). Stitch flat along all three sides.
- Wattle: Position the red wattle underneath the beak, tucked slightly under the right side of the beak. Stitch securely in place.
Finishing
- Weave all loose ends thoroughly on the inside of the beanie using a tapestry needle.
- Lightly steam-block the feathers flat if needed using a hand steamer (do not touch acrylic yarn directly with an iron).
Size Customization Tips
- Adjusting Circumference: The main beanie increases by 4 to 8 stitches per increase round. At a gauge of 3.5 sts per inch, every 4 stitches added or subtracted alters the beanie circumference by approximately 1.15 in (2.9 cm).
- Adjusting Height: To make a slouchier hat or lengthen the beanie, add 1 or 2 extra plain hdc rounds before working the final single crochet edge round.
- Preemie / Micro Size: Use a 4.0 mm (US G-6) hook with DK weight yarn to scale the pattern down to fit premature infants.
Care Instructions
- Hand wash in cold water with mild baby detergent.
- Do not wring or twist. Lay flat on a dry towel to air dry.
- Re-shape feathers flat while damp.
FAQ
Can I embroider eyes directly onto the hat instead of making separate black patches?
Yes! You can use black yarn to embroider satin-stitch circles directly onto the beanie face between Rnds 7 and 9, then add a small white stitch for the glare.
Is this pattern suitable for complete beginners?
Yes, as long as you know basic stitches (sc, hdc, dc) and working in rounds. The assembly is simple and straight-forward.
Can I make this crochet turkey hat for toddlers or adults?
Absolutely! Simply continue the crown increase rounds up to 48 hdc (Toddler: 18 in) or 56–60 hdc (Adult: 21–22 in) using the standard rule of adding 8 hdc per increase round, then add 2 extra feathers to cover the wider back area.
Happy Crocheting!
You are all set to create an unforgettable Thanksgiving accessory! Save this project pin to your Pinterest crochet boards and share your finished creation with your crafting friends. Happy Thanksgiving and happy crocheting!
📄 Your free PDF pattern
⏳ Preparing your free PDF… 30s
Like this one? Save it for later.