Plump Turkey Gnome Crochet Shelf Sitter Free Thanksgiving Pattern
Reader Favorites










Harvest Stripe Crochet Seat Cushion Free Thanksgiving Pattern

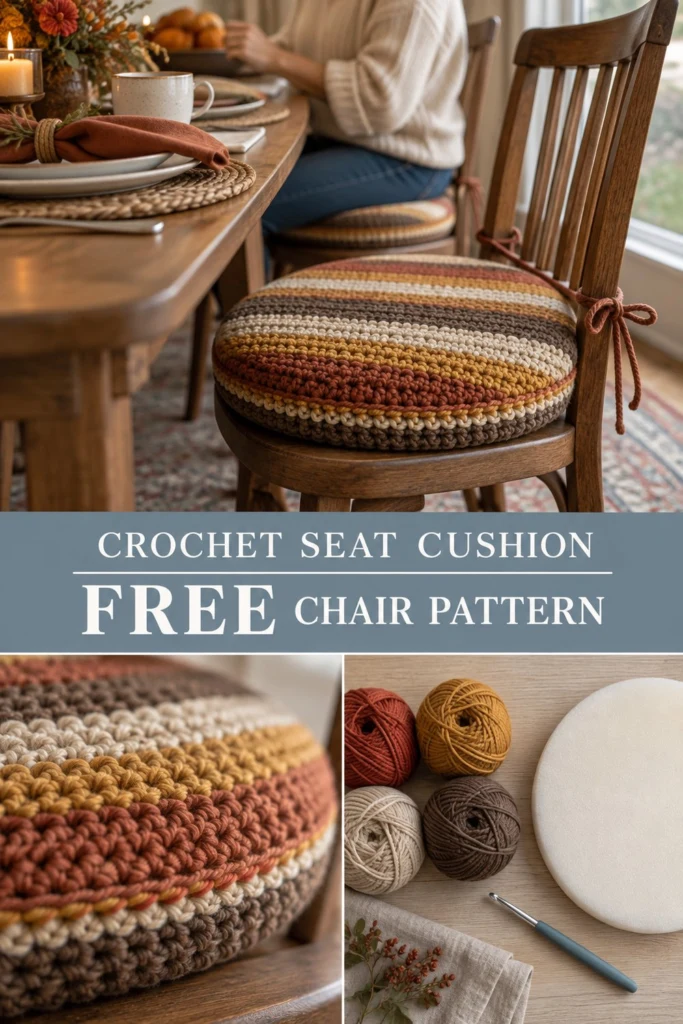
Bring warm, inviting autumn charm to your dining room with this plush Thanksgiving seat cushion. Crafted in rich earth tones—Rust, Mustard, Oatmeal, and Walnut—this heavy-textured seat pad pairs cozy rustic style with practical dining chair comfort. Whether you are hosting a festive Thanksgiving feast or updating your kitchen decor for the fall season, this straightforward project works up quickly using sturdy bulky yarn and basic round increases.
Harvest Stripe Crochet Seat Cushion Free Thanksgiving Pattern
Quick Facts
- Skill level: Easy / Advanced Beginner
- Finished size: 14 inches (35.5 cm) diameter x 1.5 inches (4 cm) thick
- Yarn: Category 5 Bulky Weight (Wool or Acrylic/Cotton blend)
- Hook: 6.0 mm (US J-10)
- Stitches used: Magic Ring (MR), Single Crochet (sc), Increase (inc), Slip Stitch (sl st)
- Time to make: 4 to 6 hours
Detailed instructions for customizing the cushion size to fit different dining chairs are included further down in the guide.
What Makes This Seat Cushion Special
- Durable Double-Sided Construction: Two flat crochet circles enclose a high-density round foam pad, providing ergonomic comfort that holds its shape through long holiday dinners.
- Seamless Striped Palette: Broad 3-round color bands in classic autumn hues create a striking geometric accent that highlights vintage wooden dining chairs.
- Integrated Chair Ties: Sturdy crochet ties attached to the back corners keep your cushion securely anchored to chair back spindles without slipping or shifting.
- Beginner-Friendly Geometry: Simple flat-circle mathematics make stitch counting easy and allow effortless size adjustments for custom furniture dimensions.
Skill Level
This project is suitable for an Easy / Advanced Beginner crocheter. You should be familiar with:
* Working in continuous or joined spiral rounds.
* Basic single crochet increases.
* Changing yarn colors cleanly at the end of a round.
* Seaming two flat pieces together with a single crochet edge.
If you know how to make a basic flat circle, you can easily complete this seat pad in a single afternoon.
Finished Measurements
| Dimension | Inches | Centimeters |
|---|---|---|
| Diameter | 14.0 in | 35.5 cm |
| Thickness / Height | 1.5 in | 4.0 cm |
| Tie Length | 14.0 in | 35.5 cm |
Materials You Will Need
| Material / Item | Details & Specifications | Quantity |
|---|---|---|
| Yarn Color A | Walnut Brown (Bulky Weight #5) | 140 yds (128 m) / 120 g |
| Yarn Color B | Oatmeal / Cream (Bulky Weight #5) | 70 yds (64 m) / 60 g |
| Yarn Color C | Rust / Terracotta (Bulky Weight #5) | 70 yds (64 m) / 60 g |
| Yarn Color D | Mustard / Harvest Gold (Bulky Weight #5) | 50 yds (46 m) / 45 g |
| Crochet Hook | 6.0 mm (US J-10) or size needed for gauge | 1 hook |
| Foam Insert | High-density round chair foam (14″ diameter x 1.5″ depth) | 1 cushion pad |
| Stitch Marker | Locking stitch marker | 1 marker |
| Tapestry Needle | Large eye yarn needle for weaving ends | 1 needle |
| Scissors | Heavy-duty craft scissors | 1 pair |
Yarn Suggestions
| Yarn Brand & Line | Fiber Content | Skein Weight / Yardage | Notes |
|---|---|---|---|
| Hue & Me by Lion Brand | 80% Acrylic, 20% Wool | 137 yds (125 m) / 125 g | Sturdy texture, perfect autumnal palette. |
| Paintbox Yarns Simply Chunky | 100% Acrylic | 149 yds (136 m) / 100 g | Soft, washable, wide selection of shades. |
| Premier Yarns Basix Chunky | 100% Premium Acrylic | 131 yds (120 m) / 100 g | Excellent stitch definition, Budget-friendly. |
⚠️ Note: Avoid lightweight DK or fingering yarns, as well as ultra-slippery silk blends. A sturdy bulky-weight acrylic or wool-blend yarn provides the structured stitch density required to cover foam inserts cleanly without pulling or sagging under daily use.
Gauge
| Stitch / Test Area | Measurement (Imperial) | Measurement (Metric) |
|---|---|---|
| 11 single crochet sts x 12 rnds | 4 in x 4 in | 10 cm x 10 cm |
| Rnds 1 to 6 of Flat Circle | 4.0 in diameter | 10.0 cm diameter |
Abbreviations
| Abbreviation | Full Term (US Crochet Terminology) |
|---|---|
| ch | Chain |
| st(s) | Stitch(es) |
| sl st | Slip stitch |
| sc | Single crochet |
| inc | Single crochet increase (2 sc in the same st) |
| MR | Magic Ring / Magic Circle |
| Rnd(s) | Round(s) |
| FO | Fasten off |
UK Conversion: sc = double crochet (dc); hdc = half treble crochet (htr); dc = treble crochet (tr).
Special Stitches Explained
1. Magic Ring (MR)
Wrap yarn twice around your index and middle fingers. Insert hook under the first strand and catch the second strand, pulling up a loop. Chain 1, then work the indicated number of single crochet stitches directly into the ring loop. Pull the tail end firmly to close the central opening completely.
2. Single Crochet Increase (inc)
Work 2 single crochet stitches into the exact same stitch from the previous round. This adds 1 stitch to your round total while keeping the fabric lying completely flat.
3. Clean Color Change
On the final single crochet of a color round, insert hook into stitch, yarn over, and pull up a loop (2 loops on hook). Drop the old color, yarn over with the new color, and pull through both loops on the hook to complete the stitch. Continue into the next round with the new color.
Pattern Instructions
Pattern Notes
- Top and Bottom panels are worked in seamless continuous rounds (spirals). Do not join rounds with a slip stitch unless explicitly instructed. Place a locking stitch marker in the first stitch of each round and move it up as you work.
- Both panels are worked as flat circles adding 6 stitches per round (+6 sc rate).
- Color changes take place at the start of the indicated round.
Section 1: Top Circle (Striped Cover)
Make 1.
Using Walnut Brown yarn and 6.0 mm hook:
Rnd 1: Work 6 sc into a MR. (6 sc)
Rnd 2: inc in each st around. (12 sc)
Rnd 3: (1 sc, inc) x 6. (18 sc)
Change to Oatmeal yarn on the last stitch of Rnd 3. Cut Walnut yarn leaving a 4-inch tail.
Rnd 4: (2 sc, inc) x 6. (24 sc)
Rnd 5: (3 sc, inc) x 6. (30 sc)
Rnd 6: (4 sc, inc) x 6. (36 sc)
Change to Rust yarn on the last stitch of Rnd 6. Cut Oatmeal yarn.
Rnd 7: (5 sc, inc) x 6. (42 sc)
Rnd 8: (6 sc, inc) x 6. (48 sc)
Rnd 9: (7 sc, inc) x 6. (54 sc)
Change to Mustard yarn on the last stitch of Rnd 9. Cut Rust yarn.
Rnd 10: (8 sc, inc) x 6. (60 sc)
Rnd 11: (9 sc, inc) x 6. (66 sc)
Rnd 12: (10 sc, inc) x 6. (72 sc)
Change to Oatmeal yarn on the last stitch of Rnd 12. Cut Mustard yarn.
Rnd 13: (11 sc, inc) x 6. (78 sc)
Rnd 14: (12 sc, inc) x 6. (84 sc)
Rnd 15: (13 sc, inc) x 6. (90 sc)
Change to Rust yarn on the last stitch of Rnd 15. Cut Oatmeal yarn.
Rnd 16: (14 sc, inc) x 6. (96 sc)
Rnd 17: (15 sc, inc) x 6. (102 sc)
Rnd 18: (16 sc, inc) x 6. (108 sc)
Change to Walnut Brown yarn on the last stitch of Rnd 18. Cut Rust yarn.
Rnd 19: (17 sc, inc) x 6. (114 sc)
Rnd 20: (18 sc, inc) x 6. (120 sc)
Rnd 21: (19 sc, inc) x 6. (126 sc)
Sl st to next st, fasten off Walnut Brown yarn, leaving a short tail. Weave in all color-change yarn tails securely on the back side of the circle.
✅ Checkpoint: Measure your completed Top Circle flat on a table. It should measure 14 inches (35.5 cm) across and have exactly 126 stitches along the outer edge.
Section 2: Bottom Circle (Solid Cover)
Make 1.
Using Walnut Brown yarn and 6.0 mm hook:
Rnd 1: Work 6 sc into a MR. (6 sc)
Rnd 2: inc in each st around. (12 sc)
Rnd 3: (1 sc, inc) x 6. (18 sc)
Rnd 4: (2 sc, inc) x 6. (24 sc)
Rnd 5: (3 sc, inc) x 6. (30 sc)
Rnd 6: (4 sc, inc) x 6. (36 sc)
Rnd 7: (5 sc, inc) x 6. (42 sc)
Rnd 8: (6 sc, inc) x 6. (48 sc)
Rnd 9: (7 sc, inc) x 6. (54 sc)
Rnd 10: (8 sc, inc) x 6. (60 sc)
Rnd 11: (9 sc, inc) x 6. (66 sc)
Rnd 12: (10 sc, inc) x 6. (72 sc)
Rnd 13: (11 sc, inc) x 6. (78 sc)
Rnd 14: (12 sc, inc) x 6. (84 sc)
Rnd 15: (13 sc, inc) x 6. (90 sc)
Rnd 16: (14 sc, inc) x 6. (96 sc)
Rnd 17: (15 sc, inc) x 6. (102 sc)
Rnd 18: (16 sc, inc) x 6. (108 sc)
Rnd 19: (17 sc, inc) x 6. (114 sc)
Rnd 20: (18 sc, inc) x 6. (120 sc)
Rnd 21: (19 sc, inc) x 6. (126 sc)
Sl st to next st. Do not cut yarn. Keep working yarn attached for assembly.
Section 3: Chair Ties
Make 4.
Using Rust yarn (or Walnut Brown yarn) and 6.0 mm hook:
Leave an 8-inch (20 cm) tail before making your slip knot.
Row 1: Ch 51, sc in 2nd ch from hook and in each ch across. (50 sc)
Fasten off leaving an 8-inch (20 cm) tail for attaching to the cushion seam. Repeat for all 4 ties.
💡 Designer Tip: If your dining chair back posts are thicker than average, add 10 to 15 chains to Row 1 of each tie to ensure you can tie a full, fluffy decorative bow.
Assembly
- Align Panels: Lay the Top Circle (right side up) directly over the Bottom Circle (wrong side facing inside). Ensure both outer edges match stitch for stitch.
- Begin Joining Seam: Rejoin working yarn from Bottom Circle (Walnut Brown). Working through both layers (top and bottom stitch loops simultaneously), sc into each stitch around the perimeter.
- Insert Foam Cushion: Continue single crocheting around approximately 3/4 of the cushion circumference (around 90 stitches). Slide the 14-inch round foam pad between the two crochet circles.
- Close Seam: Pull the crochet cover snugly over the foam edges. Continue sc through both layers across the remaining 36 stitches to seal the foam pad completely inside.
- Join Edge: Sl st to the first sc of the seam. (126 sc total in seam). Fasten off and weave in end.
✅ Checkpoint: The crochet cover should fit snugly around the foam insert without stretching out of shape or sagging along the side seam.
- Attach Chair Ties: Place the cushion on your dining chair seat. Identify the back edge of the cushion that aligns with the chair spindles. Attach two ties together on the left back corner (spaced about 1.5 inches / 4 cm apart) and two ties on the right back corner using your yarn needle and the 8-inch tails. Knot firmly on the interior seam line and weave ends inside the cushion.
Finishing
- Thread Weaving: Use your tapestry needle to pull all loose yarn tails inside the core of the cushion alongside the foam insert.
- Surface Shaping: Gently massage the stuffed cushion edges outward with your fingers to center the foam core perfectly inside the crochet cover.
Size Customization Tips
Need to fit a larger or smaller chair seat? Adjusting the cushion diameter is simple because every round adds exactly 6 stitches and expands the diameter by approximately 0.66 inches (1.7 cm).
- For a 12-inch (30.5 cm) Chair Cushion: Stop at Rnd 18 (108 sc) on both Top and Bottom panels.
- For a 15-inch (38 cm) Chair Cushion: Add 2 more increase rounds:
- Rnd 22: (20 sc, inc) x 6 (132 sc)
- Rnd 23: (21 sc, inc) x 6 (138 sc)
- For Square Seats: To make a square cushion panel using this gauge, chain 39 sts and work 42 rows of single crochet (14″ x 14″ square), then join two square panels around square chair foam.
Care Instructions
- Spot Cleaning: Small spills during holiday dinners can be spot-cleaned immediately using warm water and mild liquid soap. Gently dab the stained area with a clean towel; do not scrub vigorously.
- Washing Instructions: Unseam one side of the cushion using a yarn needle if full laundering is required, remove the foam core, and hand wash the crochet cover in cold water. Lay flat to air dry on a towel to prevent stretching.
FAQ
Can I use worsted weight (#4) yarn instead of bulky yarn?
Yes! You can easily substitute worsted weight yarn by holding two strands of worsted yarn together throughout the pattern using your 6.0 mm hook. This doubles the strand thickness to equal Category 5 Bulky weight while creating a heathered vintage effect.
How do I stop my flat circle from curling into a bowl or wavering at the edges?
If your flat circle begins cupping upward into a bowl, your gauge is too tight—switch to a 6.5 mm hook. If the edges begin ruffling or wavering, your stitches are too loose or you are adding too many increases—ensure you are strictly placing 6 increases per round spaced evenly apart.
Are these seat cushions safe for smooth wooden dining chairs?
To prevent cushions from sliding on polished hardwoods or lacquer surfaces, place a thin sheet of non-slip rubber drawer liner cut into a 12-inch circle directly between the chair seat and the bottom crochet panel.
Happy Crocheting!
You now have a rustic, cozy seat cushion ready to bring warmth and seasonal cheer to your Thanksgiving table setting!
Don’t forget to Save this pattern to your Pinterest Thanksgiving or Crochet Board so you can easily reference it again for future kitchen updates. We would love to see your finished dining room setup—share your finished cushions using your favorite autumn colorways!
📄 Your free PDF pattern
⏳ Preparing your free PDF… 30s
Like this one? Save it for later.