Plump Turkey Gnome Crochet Shelf Sitter Free Thanksgiving Pattern
Reader Favorites










Poinsettia Granny Square Crochet Motif Free Christmas Pattern

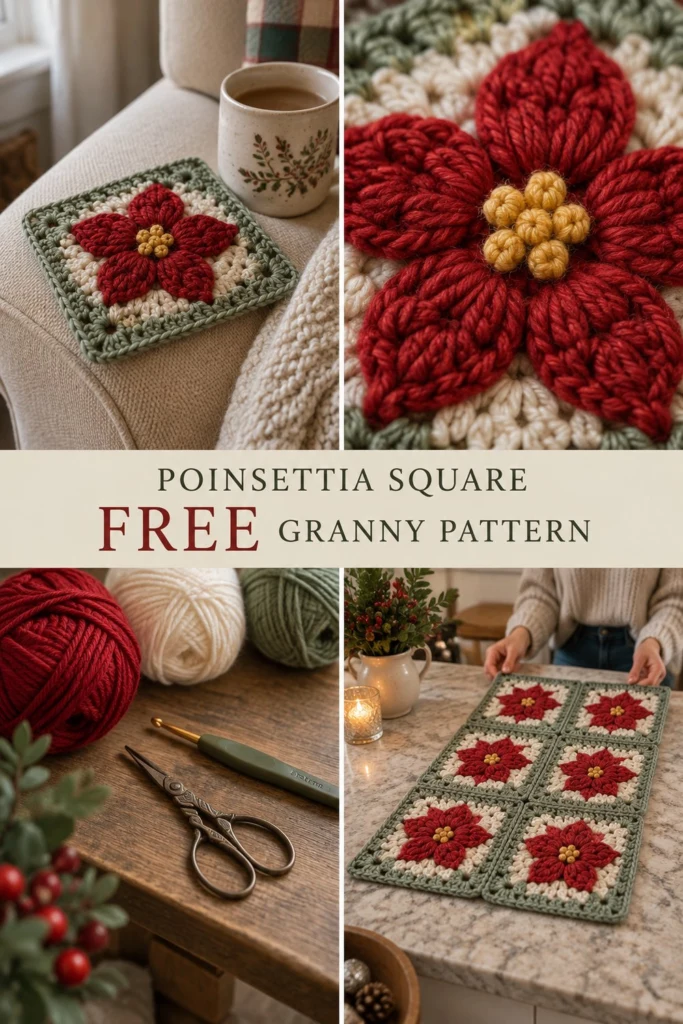
Bring holiday warmth into your home with this charming poinsettia granny square motif. Featuring textured red petals around a cluster of golden center berries, framed by a soft cream backdrop and a neat sage green border, this festive piece converts easily into table runners, holiday cushions, or cozy Christmas throws. Whether you are creating a single coaster or joining multiple blocks for a larger project, each square works up quickly and adds a timeless handmade touch to your seasonal decor.
Poinsettia Granny Square Crochet Motif Free Christmas Pattern
Quick Facts
- Skill level: Intermediate
- Finished size: 8 x 8 in (20 x 20 cm) per square; 16 x 24 in (40 x 60 cm) for the 6-square table runner shown
- Yarn: Worsted weight (Category 4) in Mustard Gold, Crimson Red, Cream, and Sage Green
- Hook: 5.0 mm (US H-8)
- Stitches used: magic ring (MR), chain (ch), slip stitch (sl st), single crochet (sc), half double crochet (hdc), double crochet (dc), 4-dc cluster stitch, 5-hdc puff stitch
- Time to make: Approximately 40 minutes per square
Looking to make a larger throw blanket or individual mug rugs? Size customization tips are included further down in this guide.
What Makes This Poinsettia Granny Square Special
This pattern merges dimensional floral texture with traditional granny square construction:
- Golden Berry Center: Compact 5-hdc puff stitches in bright Mustard Gold form a cluster of raised berries that pop off the surface.
- Five Crimson Petals: Elongated 4-dc cluster stitches in Crimson Red fan outward to create a classic five-point poinsettia silhouette.
- Smooth Circle-to-Square Transition: Cream double and half-double crochet stitches fill the spaces between petals, converting the round flower into a crisp four-corner square.
- Evergreen Sage Frame: Two rounds of Sage Green border each motif, giving the square a clean finish and making seaming effortless.
Skill Level
This project is rated Intermediate.
- Required skills: Working in joined rounds, changing colors between rounds, working puff and cluster stitches, and basic flat slip-stitch or needle seaming.
- Reassurance: The floral center follows clear step-by-step repeats, and explicit stitch counts for every round ensure your square stays flat and square.
Finished Measurements
| Item | Width | Length |
|---|---|---|
| Single Poinsettia Granny Square | 8 in / 20 cm | 8 in / 20 cm |
| Table Runner (2 x 3 Layout, 6 Squares) | 16 in / 40 cm | 24 in / 60 cm |
Materials You Will Need
| Color / Notion | Purpose | Weight / Type | Quantity (for 6-Square Runner) |
|---|---|---|---|
| Mustard Gold | Flower center (berries) | Worsted (Category 4) | 15 yd / 14 m |
| Crimson Red | Poinsettia petals | Worsted (Category 4) | 60 yd / 55 m |
| Cream | Background square | Worsted (Category 4) | 120 yd / 110 m |
| Sage Green | Outer frame & seaming | Worsted (Category 4) | 140 yd / 128 m |
| Crochet Hook | Main hook | Ergonomic / Aluminum | 5.0 mm (US H-8) |
| Tapestry Needle | Weaving ends & seaming | Blunt tip | 1 needle |
| Scissors | Cutting yarn | Small craft scissors | 1 pair |
| Stitch Markers | Marking corners | Locking plastic | 4 markers |
Yarn Suggestions
| Yarn Brand & Line | Fiber Content | Yardage per Skein | Notes |
|---|---|---|---|
| Lion Brand Wool-Ease | 80% Acrylic, 20% Wool | 197 yd (180 m) / 85 g | Crisp stitch definition, cozy look, classic holiday colors. |
| Paintbox Yarns Simply Aran | 100% Acrylic | 201 yd (184 m) / 100 g | Soft texture, budget-friendly, smooth stitch output. |
| Bernat Super Value | 100% Acrylic | 426 yd (389 m) / 197 g | Durable yarn suitable for high-use table runners and blankets. |
⚠️ Note: Avoid using loosely spun single-ply roving or slippery silk yarns for this motif. The puff berries and cluster petals need a sturdy, plied yarn to hold their rounded form.
Gauge
| Gauge Test | Dimensions |
|---|---|
| Double Crochet (dc) Gauge | 14 sts x 8 rows = 4 x 4 in (10 x 10 cm) |
| Flower Center (Rnds 1–3) | 4 in (10 cm) diameter across flower petals |
Abbreviations
| Abbreviation | Full Term (US Terms) |
|---|---|
| ch | chain |
| sl st | slip stitch |
| sc | single crochet |
| hdc | half double crochet |
| dc | double crochet |
| st(s) | stitch(es) |
| sp(s) | space(s) |
| rnd(s) | round(s) |
| MR | magic ring |
| YO | yarn over |
UK Conversion: sc = dc, hdc = htr, dc = tr.
Special Stitches Explained
1. 5-Hdc Puff Stitch (Puff)
YO, insert hook into magic ring, YO and pull up a loop (3 loops on hook). [YO, insert hook into same ring, YO and pull up a loop] 4 times total (11 loops on hook). YO and pull through all 11 loops. Ch 1 to close and lock the puff stitch.
2. 4-Dc Cluster Stitch (Cluster)
YO, insert hook into designated space, YO and pull up a loop, YO and pull through 2 loops (2 loops remain on hook). [YO, insert hook into same space, YO and pull up a loop, YO and pull through 2 loops] 3 times total (5 loops remain on hook). YO and pull through all 5 loops on hook.
Pattern Instructions
Pattern Notes
- All rounds are joined with a sl st to the first stitch of the round.
- Turning chains do not count as a stitch unless specified.
- Fasten off colors securely between color transitions.
Section 1: Poinsettia Granny Square (Make 6)
Center Berries (Mustard Gold)
Rnd 1: With Mustard Gold, make a MR. Ch 1 (does not count as st), work [1 Puff, ch 1] 5 times into the ring. Pull tail tight to close ring. Join with sl st to top of first Puff. Fasten off Mustard Gold. (10 sts)
💡 Designer Tip: Keep your loop height uniform when pulling up loops for the 5-hdc puff stitches. This makes the center berries stand out evenly.
Poinsettia Petals (Crimson Red)
Rnd 2: Join Crimson Red with a sl st in any ch-1 sp from Rnd 1. Work (1 Cluster, ch 3) in each of the 5 ch-1 sps around. Join with sl st to top of first Cluster. Fasten off Crimson Red. (20 sts)
✅ Checkpoint: You should now have 5 bright red petals with 5 ch-3 loops behind them.
Squaring the Flower (Cream)
Rnd 3: Join Cream with a sl st in any ch-3 sp behind a petal.
– Corner 1: (Ch 3 [counts as dc], 2 dc, ch 2, 3 dc) in 1st ch-3 sp.
– Side 1: 2 hdc in next petal cluster, 3 hdc in next ch-3 sp, 2 hdc in next petal cluster.
– Corner 2: (3 dc, ch 2, 3 dc) in next ch-3 sp.
– Side 2: 2 hdc in next petal cluster, 3 hdc in next ch-3 sp, 2 hdc in next petal cluster.
– Corner 3: (3 dc, ch 2, 3 dc) in next petal cluster.
– Side 3: 3 hdc in next ch-3 sp, 2 hdc in next petal cluster, 2 hdc in next ch-3 sp.
– Corner 4: (3 dc, ch 2, 3 dc) in next petal cluster.
– Side 4: 2 hdc in next ch-3 sp, 3 hdc in next petal cluster, 2 hdc in final space.
Join with sl st to top of starting ch-3. (56 sts)
Rnd 4: Sl st to corner ch-2 sp. Ch 3 (counts as dc), (1 dc, ch 2, 2 dc) in corner sp. *1 dc in each of the 13 sts across side, (2 dc, ch 2, 2 dc) in corner sp*; repeat from * to * 2 more times, 1 dc in each of the 13 sts across final side. Join with sl st to top of starting ch-3. Fasten off Cream. *(72 sts)*
Outer Border (Sage Green)
Rnd 5: Join Sage Green in any corner ch-2 sp. Ch 3 (counts as dc), (1 dc, ch 2, 2 dc) in corner sp. *1 dc in each of the 17 sts across side, (2 dc, ch 2, 2 dc) in corner sp*; repeat from * to * 2 more times, 1 dc in each of the 17 sts across final side. Join with sl st to top of starting ch-3. *(88 sts)*
Rnd 6: Ch 2 (counts as hdc), hdc in next st. *(2 hdc, ch 2, 2 hdc) in corner sp, 1 hdc in each of the 21 dc across side*; repeat from * to * 3 times total, ending with 1 hdc in each remaining st across final side. Join with sl st to top of starting ch-2. Fasten off Sage Green, leaving a 6 in (15 cm) tail. *(104 sts)*
✅ Checkpoint: Each individual square measures 8 x 8 in (20 x 20 cm) with 25 hdc per outer side (including corner hdc sts) and 4 corner ch-2 spaces.
Section 2: Runner Assembly & Layout
- Grid Layout: Place 6 completed poinsettia granny square motifs in a grid measuring 2 squares wide by 3 squares long (16 x 24 in / 40 x 60 cm). Ensure all floral centers face right side up.
- Seaming: Thread a tapestry needle with Sage Green yarn. Join squares along outer loops using a whipstitch or mattress stitch:
- Join horizontal seams across the width first.
- Join vertical seams along the length second.
Section 3: Outer Runner Border
After assembling all 6 motifs, add a single framing round around the full runner:
Runner Border Rnd 1: Join Sage Green in any outer corner ch-2 sp of the assembled runner. Ch 2 (counts as hdc), (1 hdc, ch 2, 2 hdc) in corner sp.
– Work 1 hdc in each hdc st around the perimeter of the runner (250 edge sts total).
– Work (2 hdc, ch 2, 2 hdc) in each of the outer 4 main corners of the runner.
Join with sl st to top of starting ch-2. Fasten off Sage Green. (270 sts)
Finishing
- Weave Ends: Using a tapestry needle, weave all remaining tails into matching color sections on the back of the fabric.
- Blocking: Pin the individual squares or completed runner to shape on a blocking board. Apply steam lightly with a garment steamer or steam iron held 2 inches away. Allow to air dry completely.
Size Customization Tips
- Single Coaster (5.5 in / 14 cm): Fasten off after Rnd 4 (Cream) and add 1 round of single crochet in Sage Green around the edge.
- Holiday Pillow (16 x 16 in / 40 x 40 cm): Make 4 squares (2 x 2 grid) for the front panel. Repeat for a plain square back panel, then sc the edges together around a pillow form.
- Christmas Throw Blanket (40 x 48 in / 100 x 120 cm): Make 30 squares (5 wide by 6 long). You will need approximately 650 yd (595 m) of Cream and 750 yd (685 m) of Sage Green yarn.
Care Instructions
- Washing: Hand wash gently in cold water using mild detergent.
- Drying: Do not wring. Press excess moisture out between towels, lay flat, and reshape to dry.
- Storage: Fold flat with natural cedar or lavender inserts during the off-season.
FAQ
Can I make this christmas crochet motif using DK yarn instead of worsted?
Yes! Working with DK weight yarn and a 4.0 mm hook creates smaller, delicate motifs measuring about 6.5 inches (16.5 cm), perfect for place settings or festive bunting.
Why do my corners curl slightly after Round 3?
Height transitions between double crochet corners and half-double crochet edges can create slight tension variances. Rounds 4 through 6 balance this out, and light steam blocking flattens the motif completely.
How do I substitute a join-as-you-go method?
Replace Rnd 6 on adjacent squares with a join-as-you-go single crochet or slip-stitch join in the outer loops to connect motifs while working the final round.
Happy Crocheting!
Enjoy crafting this classic holiday heirloom! Save this free crochet pattern to your Christmas board on Pinterest, and share your finished color combinations with your fellow makers.
📄 Your free PDF pattern
⏳ Preparing your free PDF… 30s
Like this one? Save it for later.