Plump Turkey Gnome Crochet Shelf Sitter Free Thanksgiving Pattern
Reader Favorites










Knit Look Crochet Waistcoat Stitch Tutorial Free Crochet Pattern

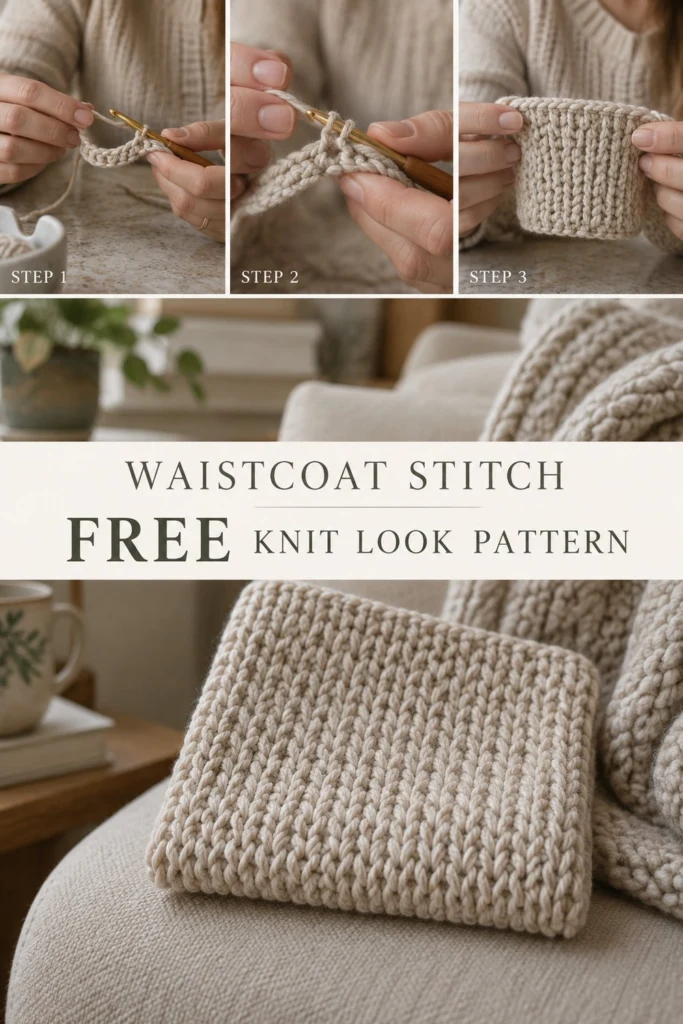
If you love the classic, cozy look of knitted stockinette stitch but prefer working with a crochet hook, the waistcoat stitch is your new best friend. Also known as split single crochet or center single crochet, this versatile technique creates dense, perfectly aligned columns of tiny “V” stitches that closely mimic traditional knit fabric. In this comprehensive step-by-step tutorial, you will master the waistcoat stitch by creating a thick, squishy practice panel that can be used as a coaster, hot pad, or decorative pot holder.
Knit Look Crochet Waistcoat Stitch Tutorial Free Crochet Pattern
Quick Facts
- Skill level: Easy / Advanced Beginner
- Finished size: 8 in x 8 in (20 cm x 20 cm) practice panel
- Yarn: Bulky weight (Category 5) yarn in Oatmeal Beige (approx. 75 yds / 69 m)
- Hook: 6.5 mm (US K-10.5) crochet hook (or one size larger than recommended on yarn label)
- Stitches used: Chain (ch), single crochet (sc), waistcoat stitch (ws), slip stitch (sl st)
- Time to make: 1 to 2 hours
💡 Designer Tip: Detailed customization guidance and instructions for expanding this stitch into larger projects (like cowls, blankets, and sweaters) are included further down in this guide.
What Makes This Waistcoat Stitch Practice Panel Special
The waistcoat stitch relies on a subtle tweak to basic single crochet placement: instead of inserting your hook under the top two loops of the stitch below, you push the hook straight through the center of the “V” posts on the front of the stitch. This structural shift produces a thick, low-stretch fabric with outstanding warmth and structure.
- Knit Stockinette Look: The dense V-shaped columns line up vertically, creating a smooth finish that looks like classic knit fabric (as shown in Step 3 and the main photo).
- Thick & Insulating Structure: Because the stitches nest tightly within each other, the resulting fabric is extra plush and durable, ideal for hot pads, potholders, winter cowls, and structured bags.
- Minimal Gapping: The solid texture prevents wind and chill from passing through, making it fantastic for cold-weather accessories.
Skill Level
This project is suitable for an Advanced Beginner. Prior familiarity with standard single crochet is helpful.
- Working basic chain stitches
- Working single crochet in foundation chains
- Identifying the front vertical “V” legs of a single crochet stitch
- Maintaining loose, relaxed tension (crucial for waistcoat stitch!)
No advanced shaping or complex counting is required!
Finished Measurements
| Measurement | Inches | Centimeters |
|---|---|---|
| Width | 8.0 in | 20.0 cm |
| Height | 8.0 in | 20.0 cm |
| Thickness | 0.35 in | 0.9 cm |
Materials You Will Need
| Material | Details | Quantity |
|---|---|---|
| Main Yarn | Bulky Weight (Category 5), 100% Wool or Acrylic Blend in Oatmeal Beige | 75 yds / 69 m (approx. 70 g) |
| Crochet Hook | 6.5 mm (US K-10.5) wooden or aluminum hook | 1 hook |
| Tapestry Needle | Large eye bent yarn needle | 1 needle |
| Measuring Tape | Flexible tape measure | 1 tape |
| Scissors | Small yarn snips | 1 pair |
| Stitch Markers | Locking stitch markers | 2 markers |
Yarn Suggestions
| Brand & Yarn Line | Fiber Content | Skein Weight / Yardage | Notes |
|---|---|---|---|
| Lion Brand Hue + Me | 80% Acrylic, 20% Wool | 125 g / 137 yds (125 m) | Excellent stitch definition, firm structure |
| Paintbox Yarns Simply Bulky | 100% Acrylic | 100 g / 109 yds (100 m) | Easy-care synthetic option with high sheen |
| Bernat Wool-Up Bulky | 80% Acrylic, 20% Wool | 100 g / 110 yds (100 m) | Soft twist yarn that highlights the V columns |
⚠️ Note: Avoid loosely plied or roving yarns that split easily when inserting the hook through the middle of the stitch. A smooth, round yarn with crisp ply definition produces the neatest knit-look columns.
Gauge
| Measurement | Stitch Pattern | Count |
|---|---|---|
| 4 in x 4 in (10 cm x 10 cm) | Waistcoat Stitch (ws) with 6.5 mm hook | 11 sts x 13 rows |
Abbreviations
| Abbreviation | Full Name (US Terminology) |
|---|---|
| ch | chain |
| st(s) | stitch(es) |
| sc | single crochet |
| ws | waistcoat stitch (split single crochet) |
| sl st | slip stitch |
| rep | repeat |
| rnd(s) | round(s) |
| yo | yarn over |
UK Conversion: US single crochet (sc) = UK double crochet (dc).
Special Stitches Explained
1. Waistcoat Stitch (ws) / Split Single Crochet (csc)
The waistcoat stitch is worked identical to a single crochet, except for hook placement:
- Look at the front face of the single crochet stitch from the row/round below. Identify the two vertical legs forming a “V”.
- Insert your hook directly into the middle of those two vertical legs, driving the hook through to the back of the fabric so it emerges beneath the back horizontal loop and between the back legs.
- Yarn over and pull up a loop to the full height of the current row (keep this loop loose!).
- Yarn over again and draw through both loops on your hook to complete the stitch.
💡 Designer Tip: If it feels difficult to insert your hook into the center of the V, your tension is too tight! Use a hook size 1.0 mm to 1.5 mm larger than yarn label recommendations, and draw up your loops higher than usual.
Pattern Instructions
Short Pattern Notes
- The practice swatch is worked in joined rounds to create a seamless square tube (or flat panel), which keeps all “V” stitches facing forward for a clean knit stockinette appearance (as demonstrated in Step 1 through Step 3).
- Ch 1 at the beginning of a round does not count as a stitch throughout.
- Always join rounds with a sl st to the first stitch of the round.
Section 1: Waistcoat Practice Panel (Oatmeal Beige, make 1)
Foundation Chain: Ch 22 in Oatmeal Beige. Taking care not to twist the chain, sl st into the 1st ch to form a loop.
Rnd 1: Ch 1, work 1 sc in each ch around. Sl st to 1st sc to join. (22 sc)
Rnd 2: Ch 1, work 1 ws in the center V of each sc around. Sl st to 1st ws to join. (22 ws)
✅ Checkpoint: Look closely at your stitches. Each stitch should have a hook inserted straight through the center front V (Step 2 in photo), rather than under the top V loops.
Rnds 3 to 24: Ch 1, work 1 ws in each st around. Sl st to 1st ws to join. (22 ws)
Rnd 25: Ch 1, sl st loosely in each st around to create a neat finishing edge. Sl st to 1st sl st to join. Fasten off leaving a 10 in (25 cm) tail for seaming. (22 sl st)
Assembly & Edge Joining
- Flatten the Tube: Lay the worked cylindrical swatch flat on a table so that the stitches line up vertically.
- Bottom Seam: Thread the starting tail onto a tapestry needle. Mattress stitch the bottom foundation chain edge closed flat.
- Top Seam: Thread the top yarn tail onto your tapestry needle and mattress stitch the top opening closed flat.
- Fasten off securely and weave in all remaining ends inside the double-layered panel.
Finishing
- Steam Blocking: Lay the finished panel flat. Gently steam with an iron held 2 inches away (do not touch yarn directly if using acrylic). Pin to 8 in x 8 in (20 cm x 20 cm) square and let dry completely.
Three Projects Ideal for Waistcoat Stitch
- Winter Cowls & Ear Warmers: Worked in continuous rounds, waistcoat stitch creates a windproof, thick texture that keeps out the cold.
- Pot Holders & Hot Pads: The thick double-walled structure protects hands and countertops from heat.
- Tote Bags & Backpacks: Because waistcoat stitch has almost zero vertical stretch, it prevents bag bottoms from sagging.
Two Common Beginner Mistakes (and How to Fix Them)
- Tension Too Tight: Trying to force the hook into the center V when tension is tight is frustrating. Fix: Always pull your loop up to the full height of the row before completing the stitch, and use a larger hook size.
- Inserting Behind the V: Inserting the hook under the horizontal bar instead of directly between the two vertical front legs destroys the knit V alignment. Fix: Look closely at Step 2 in the photo—the hook must split the two vertical threads of the front “V”.
Size Customization Tips
- Width Adjustment: Foundation chain must be any integer count of chains. Every 1.1 chains added or subtracted adjusts width by approx 0.4 in (1 cm) at this gauge.
- Height Adjustment: Add or subtract rounds. Every 3 rounds equal approx 0.9 in (2.3 cm) of finished height.
Care Instructions
- Wool Blends: Hand wash in cold water with mild wool detergent. Do not wring or twist.
- Dry: Press between dry towels to remove excess water, lay flat to dry on a blocking mat.
- Ironing: Steam only; never press hot metal directly onto synthetic or wool fibers.
FAQ
Why does my waistcoat stitch slant to one side?
When worked in continuous spiral rounds, single crochet stitches naturally slant slightly to the right (for right-handers). Joining rounds with a sl st and ch 1 at the end of each round keeps columns straight.
Can I work the waistcoat stitch flat in turned rows?
Yes, but when you turn your work, you must insert your hook through the back of the V from the wrong side. Working in the round is much easier for beginners because the front of the V always faces you.
Can I use a thinner yarn like DK or Worsted?
Absolutely! Adjust your hook size accordingly (e.g., 5.0 mm hook for worsted weight). Your stitch count will increase to achieve an 8-inch swatch size.
Happy Crocheting!
You’ve successfully mastered the classic waistcoat stitch! Save this tutorial to your favorite crochet board on Pinterest so you can reference the step-by-step photos whenever you start your next knit-look sweater, bag, or cowl project. Drop a comment below showing off your swatch and the yarn color you picked!
📄 Your free PDF pattern
⏳ Preparing your free PDF… 30s
Like this one? Save it for later.