Plump Turkey Gnome Crochet Shelf Sitter Free Thanksgiving Pattern
Reader Favorites











Daisy Chain Granny Crochet Blanket Free Crochet Pattern

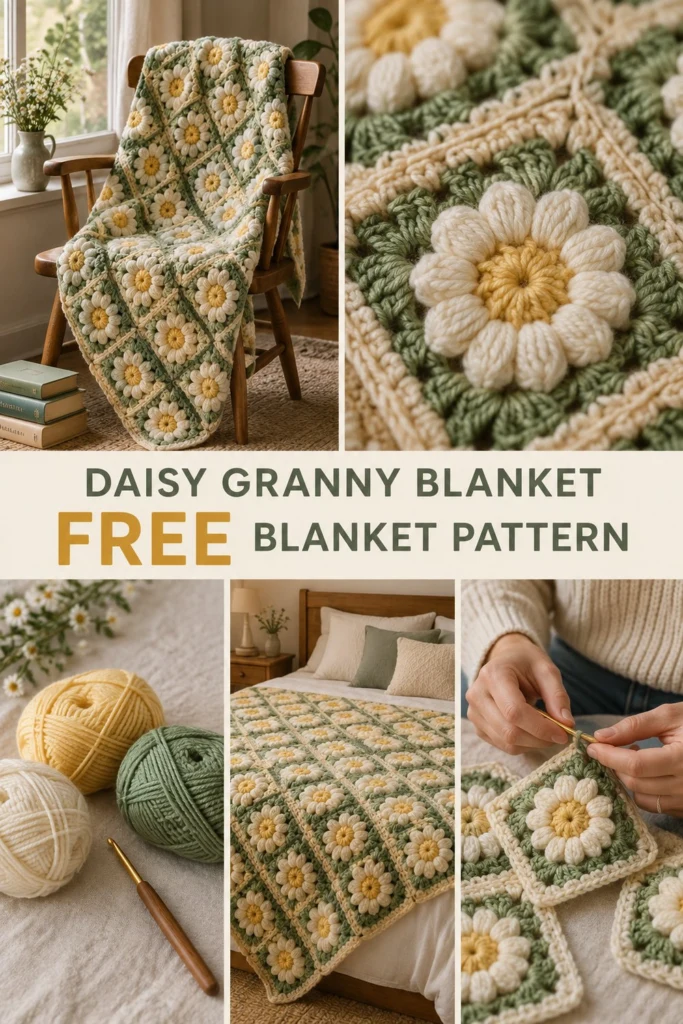
Nothing brightens up a room quite like fresh daisies, and this blanket captures that sunny feeling in soft, comforting yarn. By arranging simple puff-stitch flower squares into marching diagonal chains, the finished throw looks intricate while relying on straightforward joining techniques.
Daisy Chain Granny Crochet Blanket Free Crochet Pattern
Quick Facts
- Skill level: Intermediate
- Finished size: 48 inches (122 cm) wide by 60 inches (152 cm) long
- Yarn: Worsted weight (Category 4) in Soft Green, Cream, and Butter
- Hook: 5.0 mm (US H/8) crochet hook
- Stitches used: Ch, sl st, sc, hdc, dc, puff stitch, join-as-you-go
- Time to make: Approximately 35 to 40 hours
Size adaptation tips are included further down the page.
What Makes This Daisy Blanket Special
The magic of this design lies entirely in the layout. Instead of traditional rows of granny squares, every square features a textured puff-stitch daisy framed in soft green and cream. By joining the squares as you work the final round, you eliminate the tedious task of sewing hundreds of seams at the end. The color palette of butter, cream, and soft green keeps the piece fresh, modern, and inviting.
Skill Level
- Working in the round and in joined squares
- Executing puff stitches and clusters
- Basic join-as-you-go technique
- Reading a crochet chart or layout schematic
Don’t worry if you haven’t tried join-as-you-go before—each step is broken down clearly below!
Finished Measurements
| Measurement | Inches | Centimeters |
|---|---|---|
| Width | 48 in | 122 cm |
| Length | 60 in | 152 cm |
| Single Square | 6 in x 6 in | 15 cm x 15 cm |
Materials You Will Need
| Material | Color | Amount (Yards / Meters) |
|---|---|---|
| Worsted Weight Yarn (approx. 200g skeins) | Soft Green | 1,200 yds / 1,097 m |
| Worsted Weight Yarn | Cream | 1,000 yds / 914 m |
| Worsted Weight Yarn | Butter | 400 yds / 366 m |
| Crochet Hook | 5.0 mm (US H/8) | — |
| Notions | Tapestry needle, scissors, stitch markers | — |
Yarn Suggestions
| Yarn Line | Weight | Skein Yardage | Notes |
|---|---|---|---|
| Caron Simply Soft | Worsted (4) | 315 yds / 288 m | Excellent stitch definition, gentle sheen |
| Lion Brand Vanna’s Choice | Worsted (4) | 170 yds / 156 m | Great structure for textured squares |
| Paintbox Yarns Simply Aran | Worsted (4) | 201 yds / 184 m | Wide range of exact match colors |
⚠️ Note: Avoid novelty yarns or fuzzy mohair blends for this pattern. The puff stitches and color changes require clear stitch definition to maintain the crisp daisy shape.
Gauge
- Single Square: 1 square = 6 inches (15 cm) square measured across the center after blocking.
- Gauge check: The first 2 rounds of the Daisy Square should measure 2 inches (5 cm) across.
Abbreviations
- ch: chain
- sl st: slip stitch
- sc: single crochet
- hdc: half double crochet
- dc: double crochet
- puff: puff stitch (see Special Stitches)
- sp: space
- st(s): stitch(es)
- sk: skip
- rep: repeat
- rnd(s): round(s)
- RS: right side
- WS: wrong side
- yo: yarn over
UK: sc = dc, hdc = htr, dc = tr.
Special Stitches Explained
- Puff Stitch (puff): [Yo, insert hook in indicated st/sp, yo and pull up a tall loop] 4 times in the same st/sp (9 loops on hook), yo and draw through all 9 loops, ch 1 to close.
Pattern Instructions
Pattern Notes
- Rounds are joined with a slip stitch unless otherwise noted.
- Turning chains do not count as stitches unless specifically stated.
- Use stitch markers in corner spaces during the final joining round to keep your alignment straight.
Section 1: Daisy Squares (Make 80)
Round 1 (Butter):
Start with a magic ring. Ch 2 (does not count as st), work 12 puff stitches into the ring. Join with a sl st to the top of the first puff. Fasten off Butter. (12 puffs)
Round 2 (Cream):
Join Cream in any ch-1 space above a puff stitch. Ch 3 (counts as 1 dc), work 1 dc in same ch-1 sp. Work 2 dc in each ch-1 sp around. Join with a sl st to top of starting ch-3. (24 dc)
Round 3 (Soft Green):
Ch 1, sc in same st. Work 1 sc in next st, work 1 hdc in each of next 2 sts. *(1 dc, ch 2, 1 dc) in next st for corner. Work 1 hdc in each of next 2 sts, work 1 sc in each of next 2 sts, work 1 hdc in each of next 2 sts.* Repeat from * to * twice more, then (1 dc, ch 2, 1 dc) in next st, 1 hdc in next 2 sts. Join with a sl st to first sc. Fasten off Soft Green. *(36 sts)*
Round 4 (Cream – Joining or Final Border):
Note: For your first square, work this round completely. For all subsequent squares, join them to neighboring squares on this round using the Join-As-You-Go method.
Join Cream in any ch-2 corner sp. Ch 3 (counts as 1 dc), (2 dc, ch 2, 3 dc) in same corner sp. *(Sk 3 sts, 3 dc in next st) twice, sk 3 sts, (3 dc, ch 2, 3 dc) in ch-2 corner sp.* Repeat from * to * twice more, (sk 3 sts, 3 dc in next st) twice, sk 3 sts. Join with a sl st to top of starting ch-3. Fasten off Cream, leaving a 6-inch tail to weave in. *(36 sts)*
✅ Checkpoint: You should have 80 completed 6-inch squares. Block them lightly with steam before assembly for crisp edges.
Section 2: Assembly (Join-As-You-Go)
Arrange your 80 squares on a flat surface in an 8-by-10 grid. Rotate them so the daisy diagonals march continuously from the top-left to the bottom-right corner, exactly as shown in the photo.
When working Round 4 of any square that touches an already-completed square, replace the ch-2 corners and side ch-1 spaces with a slip stitch into the corresponding ch-2 space or between clusters of the adjacent square.
- Complete the first row of 8 squares independently using standard Round 4 instructions.
- For squares in rows 2 through 10, work the first half of Round 4, then replace the corner ch-2 with a sl st into the matching corner of the adjacent square above/beside it. Replace each 3-dc cluster space with a sl st around the corresponding space of the neighboring square.
- Continue until all 80 squares are firmly joined into a single 48 x 60-inch blanket body.
Section 3: Finishing
Border Round 1 (Soft Green):
Join Soft Green in any corner ch-2 space. Ch 1, work (1 sc, ch 2, 1 sc) in the same corner sp. Work 1 sc in each st and across each cluster space evenly down the side, working (1 sc, ch 2, 1 sc) in each corner. Join with a sl st to first sc. (580 sc)
Border Round 2 (Cream):
Join Cream in any corner ch-2 space. Ch 3 (counts as 1 dc), work (2 dc, ch 2, 3 dc) in same corner sp. Work 1 dc in each sc around, working (3 dc, ch 2, 3 dc) in each corner ch-2 space. Join with a sl st to top of starting ch-3. Fasten off Cream. (600 dc)
Border Round 3 (Soft Green):
Join Soft Green in any corner ch-2 space. Ch 1, work 3 sc in same corner sp. Work 1 sc in each dc around, working 3 sc in each corner ch-2 space. Join with a sl st to first sc. Fasten off Soft Green. (620 sc)
Weave in all remaining yarn tails securely on the wrong side using your tapestry needle. Give the finished blanket a final gentle steam block to relax the stitches.
Size Customization Tips
- To make it smaller: Reduce your grid from 8×10 to 6×8 squares for a lovely baby blanket or lap throw. Each square adds or subtracts exactly 6 inches in width or length.
- To make it larger: Add additional squares to the grid in increments of 6 inches per square. Make sure to adjust your Soft Green and Cream yarn amounts accordingly if you expand beyond 80 squares.
Care Instructions
- Machine wash gentle cycle in cool water with mild detergent.
- Do not bleach or iron directly on puff stitches.
- Tumble dry on low heat or lay flat to dry in the shade to preserve the wool/acrylic blend shape.
FAQ
Can I use cotton yarn instead of acrylic or wool blends?
Yes! Cotton yarn works wonderfully and gives the daisies wonderful stitch definition, though cotton will make the final blanket noticeably heavier and drape differently.
How do I adjust the blanket if I want a different color scheme?
Feel free to substitute the Butter center for any bright floral shade like sunny yellow, soft pink, or muted orange. Just keep the Cream frame and Soft Green background consistent to maintain the classic daisy look.
Is this blanket suitable for absolute beginners?
While the individual squares use basic stitches, the join-as-you-go technique and assembly layout require confident intermediate skills. Beginners are encouraged to practice joining two squares before committing to the full throw.
Happy Crocheting!
I hope you enjoy stitching up this cheerful daisy throw as much as I loved designing it for you. Be sure to save this pin on Pinterest to your favorite crochet boards, and leave a comment below to share what color combinations you decided to use!
📄 Your free PDF pattern
⏳ Preparing your free PDF… 30s
Like this one? Save it for later.