Plump Turkey Gnome Crochet Shelf Sitter Free Thanksgiving Pattern
Reader Favorites











Give Thanks Granny Triangle Crochet Banner Free Thanksgiving Pattern

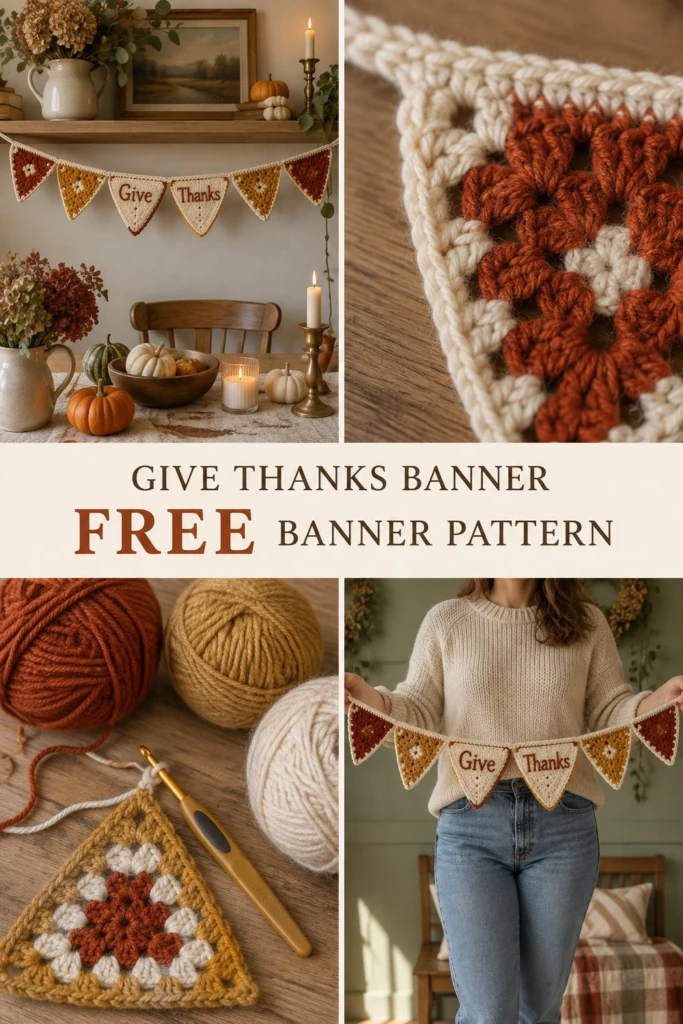
Bring a touch of cozy, handmade warmth to your holiday table with this charming thanksgiving decor crochet project. Granny triangles are just as quick and satisfying as classic granny squares, working up with one fewer corner to form a neat, geometric bunting. Strung together in rich seasonal shades of rust, gold, and cream, this Give Thanks crochet banner makes a wonderful focal point to hang above your dining table this fall.
Give Thanks Granny Triangle Crochet Banner Free Thanksgiving Pattern
Quick Facts
- Skill level: Easy
- Finished size: Approximately 160 cm (63 inches) long overall; each individual triangle measures 17 cm (6.5 inches) wide by 15 cm (6 inches) high.
- Yarn: Medium worsted weight (Category 4) acrylic or wool blend yarn in Rust, Gold, and Cream.
- Hook: 5.5 mm (US I/9) crochet hook.
- Stitches used: Chain (ch), slip stitch (sl st), single crochet (sc), double crochet (dc).
- Time to make: 4 to 6 hours.
Size customization tips are included further down in the pattern.
What Makes This Granny Triangle Bunting Special
Working identical motifs means you can easily chain your pieces together as you go or seam them to a sturdy cord later. The classic granny clusters provide great stitch definition and rustic texture, while the simple backstitch embroidery lets you spell out “Give Thanks” across the center triangles with clean, crisp lettering.
Skill Level
- Working in the round and turning to work rows
- Basic granny cluster construction
- Simple joining and finishing techniques
- Basic surface embroidery (backstitch)
Don’t worry if you are new to granny triangles—they use the exact same cluster techniques as traditional granny squares, making them approachable for confident beginners.
Finished Measurements
| Measurement | Inches | Centimeters |
|---|---|---|
| Single Triangle Width | 6.5 in | 17 cm |
| Single Triangle Height | 6.0 in | 15 cm |
| Total Banner Length (7 triangles + ties) | 63.0 in | 160 cm |
Materials You Will Need
| Material / Color | Yarn Weight / Type | Yardage / Meters |
|---|---|---|
| Rust | Worsted / Category 4 Acrylic | approx. 45 yds / 41 m |
| Gold | Worsted / Category 4 Acrylic | approx. 45 yds / 41 m |
| Cream | Worsted / Category 4 Acrylic | approx. 70 yds / 64 m |
| Dark Brown (for lettering) | Worsted / Category 4 Acrylic | approx. 15 yds / 14 m |
- Hook: 5.5 mm (US I/9) crochet hook
- Notions: Yarn needle for weaving ends and embroidery, scissors, tape measure, stitch markers
Yarn Suggestions
| Yarn Line | Skein Yardage | Notes |
|---|---|---|
| Lion Brand Vanna’s Choice | 170 yds / 156 m | Great stitch definition and rich holiday color palette. |
| Caron Simply Soft | 315 yds / 288 m | Beautiful sheen and soft drape for decorative banners. |
| Red Heart Super Saver | 364 yds / 333 m | Durable, economical, and holds its triangular shape well. |
⚠️ Note: Avoid extremely fuzzy novelty yarns or fine lace-weight yarns, as they obscure the clean geometry of the granny clusters and make the surface embroidery difficult to read.
Gauge
- Granny Triangle: Rnds 1 to 4 measure approximately 6.5 inches (17 cm) wide across the top edge and 6 inches (15 cm) from top center to bottom point using a 5.5 mm hook.
Abbreviations
- ch: chain
- dc: double crochet
- sl st: slip stitch
- sc: single crochet
- st(s): stitch(es)
- sp(s): space(s)
- sk: skip
- rnd: round
- [ ]: WORK instructions within brackets as directed
- ( ): stitch counts at the end of rounds
UK: sc = dc, hdc = htr, dc = tr.
Special Stitches Explained
- Granny Cluster: Work 3 dc in the same designated stitch or space.
- Corner Space (ch-2 sp): Work [3 dc, ch 2, 3 dc] in the indicated chain space to create a sharp 90-degree corner, or a tapered point on the triangle.
Pattern Instructions
Pattern Notes
- The banner consists of 7 individual granny triangles: 3 in Rust, 2 in Gold, and 2 in Cream.
- Turning chains at the start of rounds do not count as a stitch unless specifically stated.
- Color changes happen at the start of designated rounds as listed below.
Section 1: Rust Triangles (Make 3)
Using Rust yarn, create a magic ring (or ch 4, sl st to form a ring).
Rnd 1: Ch 3 (counts as first dc here and throughout), 2 dc in ring, ch 2, 3 dc in ring, ch 2, 3 dc in ring, ch 2, sl st to top of beg ch-3 to join. Fasten off Rust. (9 dc, 3 ch-2 sps)
Rnd 2: Join Cream yarn in any ch-2 corner sp. Ch 3, [2 dc, ch 2, 3 dc] in same ch-2 sp, ch 1, [3 dc, ch 2, 3 dc] in next ch-2 sp, ch 1, [3 dc, ch 2, 3 dc] in last ch-2 sp, ch 1, sl st to top of beg ch-3 to join. Fasten off Cream. (18 dc, 3 ch-2 sps, 3 ch-1 sps)
Rnd 3: Join Gold yarn in any ch-2 corner sp. Ch 3, [2 dc, ch 2, 3 dc] in same ch-2 sp, ch 1, working in next ch-1 sp work 3 dc, ch 1, [3 dc, ch 2, 3 dc] in next ch-2 corner sp, ch 1, working in next ch-1 sp work 3 dc, ch 1, [3 dc, ch 2, 3 dc] in last ch-2 corner sp, ch 1, working in next ch-1 sp work 3 dc, ch 1, sl st to top of beg ch-3 to join. Fasten off Gold. (27 dc, 3 ch-2 sps, 6 ch-1 sps)
Rnd 4: Join Rust yarn in any ch-2 corner sp. Ch 3, [2 dc, ch 2, 3 dc] in same ch-2 sp, [ch 1, 3 dc in next ch-1 sp] twice, ch 1, [3 dc, ch 2, 3 dc] in next ch-2 corner sp, [ch 1, 3 dc in next ch-1 sp] twice, ch 1, [3 dc, ch 2, 3 dc] in last ch-2 corner sp, [ch 1, 3 dc in next ch-1 sp] twice, ch 1, sl st to top of beg ch-3 to join. Fasten off Rust and weave in ends. (36 dc, 3 ch-2 sps, 9 ch-1 sps)
Section 2: Gold Triangles (Make 2)
Using Gold yarn, create a magic ring (or ch 4, sl st to form a ring).
Rnd 1: Ch 3, 2 dc in ring, ch 2, 3 dc in ring, ch 2, 3 dc in ring, ch 2, sl st to top of beg ch-3 to join. Fasten off Gold. (9 dc, 3 ch-2 sps)
Rnd 2: Join Cream yarn in any ch-2 corner sp. Ch 3, [2 dc, ch 2, 3 dc] in same ch-2 sp, ch 1, [3 dc, ch 2, 3 dc] in next ch-2 sp, ch 1, [3 dc, ch 2, 3 dc] in last ch-2 sp, ch 1, sl st to top of beg ch-3 to join. Fasten off Cream. (18 dc, 3 ch-2 sps, 3 ch-1 sps)
Rnd 3: Join Rust yarn in any ch-2 corner sp. Ch 3, [2 dc, ch 2, 3 dc] in same ch-2 sp, ch 1, working in next ch-1 sp work 3 dc, ch 1, [3 dc, ch 2, 3 dc] in next ch-2 corner sp, ch 1, working in next ch-1 sp work 3 dc, ch 1, [3 dc, ch 2, 3 dc] in last ch-2 corner sp, ch 1, working in next ch-1 sp work 3 dc, ch 1, sl st to top of beg ch-3 to join. Fasten off Rust. (27 dc, 3 ch-2 sps, 6 ch-1 sps)
Rnd 4: Join Gold yarn in any ch-2 corner sp. Ch 3, [2 dc, ch 2, 3 dc] in same ch-2 sp, [ch 1, 3 dc in next ch-1 sp] twice, ch 1, [3 dc, ch 2, 3 dc] in next ch-2 corner sp, [ch 1, 3 dc in next ch-1 sp] twice, ch 1, [3 dc, ch 2, 3 dc] in last ch-2 corner sp, [ch 1, 3 dc in next ch-1 sp] twice, ch 1, sl st to top of beg ch-3 to join. Fasten off Gold and weave in ends. (36 dc, 3 ch-2 sps, 9 ch-1 sps)
Section 3: Cream Triangles (Make 2)
Using Cream yarn, create a magic ring (or ch 4, sl st to form a ring).
Rnd 1: Ch 3, 2 dc in ring, ch 2, 3 dc in ring, ch 2, 3 dc in ring, ch 2, sl st to top of beg ch-3 to join. Fasten off Cream. (9 dc, 3 ch-2 sps)
Rnd 2: Join Rust yarn in any ch-2 corner sp. Ch 3, [2 dc, ch 2, 3 dc] in same ch-2 sp, ch 1, [3 dc, ch 2, 3 dc] in next ch-2 sp, ch 1, [3 dc, ch 2, 3 dc] in last ch-2 sp, ch 1, sl st to top of beg ch-3 to join. Fasten off Rust. (18 dc, 3 ch-2 sps, 3 ch-1 sps)
Rnd 3: Join Gold yarn in any ch-2 corner sp. Ch 3, [2 dc, ch 2, 3 dc] in same ch-2 sp, ch 1, working in next ch-1 sp work 3 dc, ch 1, [3 dc, ch 2, 3 dc] in next ch-2 corner sp, ch 1, working in next ch-1 sp work 3 dc, ch 1, [3 dc, ch 2, 3 dc] in last ch-2 corner sp, ch 1, working in next ch-1 sp work 3 dc, ch 1, sl st to top of beg ch-3 to join. Fasten off Gold. (27 dc, 3 ch-2 sps, 6 ch-1 sps)
Rnd 4: Join Cream yarn in any ch-2 corner sp. Ch 3, [2 dc, ch 2, 3 dc] in same ch-2 sp, [ch 1, 3 dc in next ch-1 sp] twice, ch 1, [3 dc, ch 2, 3 dc] in next ch-2 corner sp, [ch 1, 3 dc in next ch-1 sp] twice, ch 1, [3 dc, ch 2, 3 dc] in last ch-2 corner sp, [ch 1, 3 dc in next ch-1 sp] twice, ch 1, sl st to top of beg ch-3 to join. Fasten off Cream and weave in ends. (36 dc, 3 ch-2 sps, 9 ch-1 sps)
Section 4: Outer Edging & Cord Assembly
- Border Round: Join Cream yarn at the top right corner of any triangle, work 1 round of sc evenly down the right side slope, 3 sc in the bottom point, and 1 sc evenly up the left side slope. Fasten off, leaving a 6-inch tail for assembly. Repeat for all 7 triangles.
- Hanging Cord: Using Cream yarn, chain 120. Without twisting, place the top edge of the first triangle (Rust) against the chain and work sc through both the top edge of the triangle and the chain cord to attach it securely. Chain 5, attach the next triangle (Gold) in the same manner. Continue joining all 7 triangles in alternating color order (Rust, Gold, Cream, Rust, Cream, Gold, Rust) with 5 chains between each. Finish by chaining 120 at the end. Fasten off and weave in all ends.
✅ Checkpoint: Lay your assembled banner flat to ensure all 7 triangles hang evenly and are spaced correctly with 5 chains between each motif.
Section 5: Letter Embroidery
- Take the two Cream-centered triangles. Using Dark Brown yarn and a tapestry needle, gently backstitch the word “Give” onto the first Cream triangle and “Thanks” onto the second Cream triangle.
- Center each word within the solid upper portion of the triangle so the lettering is clear and legible from a distance. Secure and weave in your embroidery tails on the back.
Size Customization Tips
- Longer Banner: To fit a larger fireplace mantel or wide wall space, simply crochet 2 or 3 additional triangles following the color sequence and add 5 chains between each new motif.
- Smaller Bunting: Omit Rnd 4 from each triangle to create a petite mini bunting for smaller display areas or tiered trays.
Care Instructions
Gently hand wash your banner in cool water with mild wool wash. Lay flat on a clean towel and block gently into shape to dry. Do not tumble dry or iron directly over the embroidery.
FAQ
Can I use cotton yarn instead of acrylic?
Question: Can I use cotton yarn instead of acrylic?
Yes! Cotton yarn like Lily Sugar’n Cream works wonderfully and gives the granny triangles a crisp, structured finish with zero fuzziness.
How do I adjust the spacing between the triangles?
Question: How do I adjust the spacing between the triangles?
Simply increase or decrease the number of chain stitches between each triangle along the hanging cord to suit your hanging space.
Is this pattern suitable for complete beginners?
Question: Is this pattern suitable for complete beginners?
Absolutely. If you know how to make a magic ring, double crochet clusters, and single crochet, you can easily complete this project over a weekend.
Happy Crocheting!
I hope you enjoy making this festive Give Thanks banner to brighten your holiday home. Be sure to save this pattern to your Pinterest boards and leave a comment below sharing which autumn colors you chose for your project!
📄 Your free PDF pattern
⏳ Preparing your free PDF… 30s
Like this one? Save it for later.