Plump Turkey Gnome Crochet Shelf Sitter Free Thanksgiving Pattern
Reader Favorites











Sleepy Mouse Crochet Matchbox Bed Free Christmas Pattern

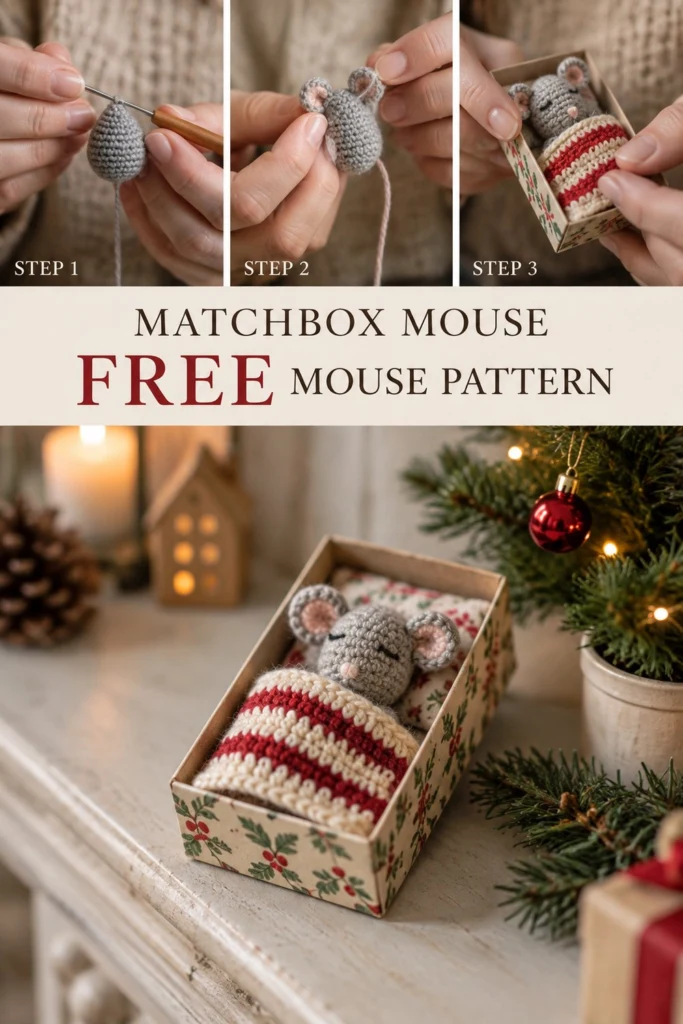
Twas the night before Christmas, and this little sleepy mouse is resting cozily in its matchbox bed, tucked under a striped wool blanket. It is a tiny, charming project that makes everyone who sees it stop and smile.
Sleepy Mouse Crochet Matchbox Bed Free Christmas Pattern
Quick Facts
- Skill level: Intermediate
- Finished size: Mouse is 2.5 inches (6.4 cm) long; matchbox bed is 3.5 inches (8.9 cm) long
- Yarn: Fingering weight wool scraps (Light #1)
- Hook: 2.25 mm (US B/1)
- Stitches used: ch, sc, inc, dec, sl st
- Time to make: 2 to 3 hours
Size customization tips are included further down in the guide.
What Makes This Matchbox Mouse Special
Working in continuous rounds gives the mouse a smooth, seamless body without visible ridges. The incremental increases (+6 per round) build a perfect teardrop shape for the snout and head, while embroidered sleeping eyes give it a peaceful, tucked-in expression. The mini blanket is worked in neat rows with alternating color stripes, and the pillow adds a cozy finishing touch inside a real decorated matchbox.
Skill Level
- Working in continuous spiral rounds without joining
- Basic shaping with increases and invisible decreases
- Changing colors cleanly across rows and rounds
- Simple embroidery on amigurumi
You will be stitching this up in no time with the step-by-step instructions below.
Finished Measurements
| Part | Width | Length / Height |
|---|---|---|
| Mouse Body | 1.0 inch (2.5 cm) | 2.5 inches (6.4 cm) |
| Mini Pillow | 1.5 inches (3.8 cm) | 1.25 inches (3.2 cm) |
| Mini Blanket | 2.0 inches (5.1 cm) | 2.75 inches (7.0 cm) |
Materials You Will Need
| Color | Yarn Type | Yards | Meters |
|---|---|---|---|
| Light Grey | Fingering weight (75% wool, 25% nylon) | 15 yds | 14 m |
| Pink | Fingering weight (75% wool, 25% nylon) | 3 yds | 3 m |
| White | Fingering weight (75% wool, 25% nylon) | 10 yds | 9 m |
| Dark Red | Fingering weight (75% wool, 25% nylon) | 10 yds | 9 m |
| Scraps (Floral fabric print) | Cotton fabric for pillow | Small scrap | Small scrap |
- Crochet hook: 2.25 mm (US B/1)
- Notions: Tapestry needle, stitch markers, polyester fiberfill stuffing, black embroidery floss, standard cardboard matchbox (decorated with holiday paper)
Yarn Suggestions
| Yarn Line | Weight | Notes |
|---|---|---|
| Schachenmayr Regia 4-ply | Fingering (#1) | Excellent stitch definition for tiny amigurumi |
| Drops Fabel | Fingering (#1) | Durable wool blend with wonderful color choices |
| Sock Yarn Scraps | Fingering (#1) | Perfect for using up leftovers |
⚠️ Note: Avoid bulky or fluffy yarns like mohair or chenille for the mouse body, as they obscure the tiny stitches and make shaping the snout difficult.
Gauge
- Amigurumi Gauge: Rnds 1 to 6 of the mouse head circle = 1.0 inch (2.5 cm) across using a 2.25 mm hook.
- Blanket Gauge: 8 sts x 8 rows = 1.0 inch (2.5 cm) in single crochet.
Abbreviations (US Terms)
- ch: chain
- sc: single crochet
- inc: single crochet increase (2 sc in the same st)
- dec: invisible single crochet decrease (insert hook into front loops of next 2 sts, yo, pull through, yo, pull through two loops)
- sl st: slip stitch
- st(s): stitch(es)
- Rnd: round
- Row: row
- FO: fasten off
- [ ]: repeat instructions between brackets as directed
UK: sc = dc, hdc = htr, dc = tr.
Special Stitches Explained
- Magic Ring: Wrap yarn around your index finger to form a loop. Insert hook into loop, yarn over, and pull up a loop. Ch 1 and work your starting stitches into the ring. Pull the tail to close.
- Invisible Decrease (dec): Insert hook into the front loop only of the first stitch, then immediately into the front loop of the second stitch. Yarn over and pull through both front loops, yarn over and pull through remaining two loops.
Pattern Instructions
Section 1: Mouse Head and Body (Light Grey, make 1)
The body is worked in continuous spiral rounds from the nose down to the base. Do not join rounds; use a stitch marker to track the start of each round.
- Rnd 1: In a magic ring, work 6 sc (6 sc)
- Rnd 2: [inc] x 6 (12 sc)
- Rnd 3: [1 sc, inc] x 6 (18 sc)
- Rnds 4 to 6: sc in each st around (18 sc)
- Rnd 7: [2 sc, inc] x 6 (24 sc)
- Rnds 8 to 14: sc in each st around (24 sc)
- Rnd 15: [2 sc, dec] x 6 (18 sc)
- Rnd 16: [1 sc, dec] x 6 (12 sc)
- Stuff firmly with polyester fiberfill now.
- Rnd 17: [dec] x 6 (6 sc)
- FO, leaving a long tail. Use a tapestry needle to weave the tail through the front loops of the final 6 sts and pull tight to close the base completely.
✅ Checkpoint: Your mouse body should measure 2.5 inches long with a neat, pointed snout and firmly stuffed rounded base.
Section 2: Ears (Light Grey and Pink, make 2)
- Rnd 1: With Light Grey, work 6 sc in a magic ring, sl st to join to first sc, FO leaving a long tail for sewing (6 sc).
- Finishing Ears: Using a length of Pink yarn and a tapestry needle, embroider a small satin stitch triangle in the center of each grey ear.
Section 3: Tail (Light Grey, make 1)
- Ch 25. Starting in the 2nd ch from hook, work 1 sl st in each ch across (24 sl st). FO, leaving a tail for sewing.
Section 4: Mini Blanket (White and Dark Red, make 1)
Worked in rows back and forth. Carry unused yarn loosely up the side edges when changing colors.
- Row 1: With Dark Red, ch 16. Starting in 2nd ch from hook, 1 sc in each ch across, turn (15 sc)
- Row 2: Ch 1, 1 sc in each st across, turn (15 sc)
- Rows 3 and 4: Switch to White, ch 1, 1 sc in each st across, turn (15 sc)
- Rows 5 and 6: Switch to Dark Red, ch 1, 1 sc in each st across, turn (15 sc)
- Rows 7 to 18: Continue alternating 2-row stripes of White and Dark Red (6 full stripe blocks total), ending with a Dark Red row. FO and weave in all loose ends (15 sc per row).
Section 5: Mini Pillow (Fabric and Stuffing, make 1)
- Cut two matching rectangles of floral cotton fabric measuring 1.5 inches by 1.25 inches.
- Place right sides together and sew around three sides using a small whipstitch.
- Turn right side out, stuff lightly with a pinch of fiberfill, and fold the raw edges inward. Whipstitch the final opening closed.
Assembly
- Ears: Sew the two ears securely to the top of the mouse head between Rnds 5 and 7, spaced about 4 stitches apart.
- Tail: Sew the tail securely to the center of the mouse’s bottom base (Rnd 17).
- Face Embroidery: Using black embroidery floss, stitch two small sleeping curved eyes with eyelashes on Rnds 4 and 5, and a tiny pink triangle nose right at the tip of the snout (Rnd 1).
- Bed Placement: Line the bottom of the decorated matchbox with the mini pillow. Place the sleepy mouse resting on the pillow, and fold the striped blanket snugly over its body.
Finishing
Weave in all remaining yarn tails securely inside the amigurumi body. Gently shape the ears and tuck the matchbox mouse into its final holiday bed display.
Size Customization Tips
- To make a larger mouse to fit a standard shoe box or larger gift box, switch to Worsted Weight (Weight #4) yarn and a 4.0 mm (US G/6) hook, working the same increase sequence.
- Each extra 6-st repeat in the body rounds adds approximately 0.4 inches to the body diameter.
Care Instructions
- Spot clean gently with a damp cloth and mild soap.
- Do not submerge in water to protect the cardboard matchbox bed and polyester stuffing shape.
FAQ
Can I use safety eyes instead of embroidery?
Yes, you can use tiny 4mm safety eyes if this mouse is intended as adult holiday decor. For babies or children under 3 years old, always embroider the sleeping eyes with soft floss to prevent any choking hazards.
How can I make the blanket wider?
Simply add multiples of 2 stitches to your starting chain for the blanket (for example, start with ch 20 instead of ch 16), then follow the exact same striped row instructions.
What kind of matchbox works best?
A standard kitchen matchbox (approx 2 inches by 3.5 inches) works perfectly. You can wrap the outer cover in festive holiday scrapbook paper or patterned gift wrap to match your Christmas decor.
Happy Crocheting!
I hope you enjoyed making this sweet matchbox mouse! Be sure to save this free crochet pattern on Pinterest to share with fellow makers, and leave a comment below telling me what color stripes you used for your cozy blanket.
📄 Your free PDF pattern
⏳ Preparing your free PDF… 30s
Like this one? Save it for later.