Plump Turkey Gnome Crochet Shelf Sitter Free Thanksgiving Pattern
Reader Favorites











Granny Hexagon Crochet Cardigan Free Crochet Pattern

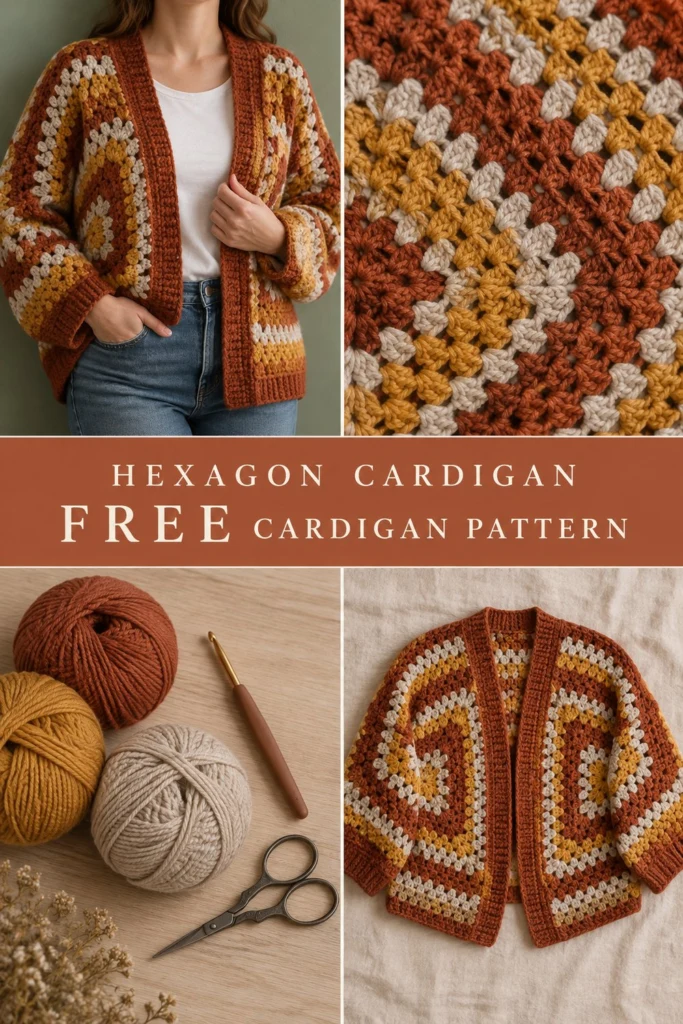
There is something pure magic about watching two simple granny hexagons fold into a cozy, slouchy cardigan. This pattern features rich autumnal stripes in warm rust, deep mustard, and creamy oatmeal, finished with a classic ribbed buttonless front collar and matching sleeve cuffs. Whether you are standard-size XS or 2XL, this step-by-step pattern will guide you through crocheting your own relaxed hexagon sweater.
Granny Hexagon Crochet Cardigan Free Crochet Pattern
Quick Facts
- Skill level: Easy / Advanced Beginner
- Finished size: Women’s XS (S, M, L, XL, 2XL) to fit bust 30″–52″ (76–132 cm) with 4″–6″ positive ease
- Yarn: Worsted weight / Medium (Category 4) in Rust, Mustard, and Oatmeal
- Hook: 5.5 mm (US I-9) crochet hook
- Stitches used: Chain (ch), Slip Stitch (sl st), Single Crochet (sc), Double Crochet (dc), Back Loop Only (BLO)
- Time to make: 12 to 16 hours
Detailed size customization tips are provided near the end of this pattern to help you achieve your exact desired fit.
What Makes This Granny Hexagon Cardigan Special
- Magic Geometric Construction: Each half of the cardigan begins as a flat 6-sided granny hexagon that naturally folds into an L-shape, instantly creating half of the back, front chest, and sleeve without complicated armhole shaping.
- Warm Harvest Palette: The distinct 3-color stripe repeat (Rust, Oatmeal, Mustard) creates a striking graphic geometric motif from the shoulder down to the hem.
- Structural Ribbed Borders: Deep single crochet back-loop-only ribbing in rich Rust finishes the collar, hem, and cuffs, giving the sweater a clean, store-bought edge and keeping the sleeves comfortably anchored at your wrists.
- Beginner-Friendly Stitching: If you know how to make a classic granny cluster (3 double crochet stitches in a space), you already possess all the skills required to complete this project.
Skill Level
This project is rated Easy / Advanced Beginner. You should be comfortable with:
– Working basic granny clusters (3 dc groups) in continuous rounds
– Changing colors at the start of a round
– Working stitches in back loops only (BLO) for ribbing
– Seaming edges together using a slip stitch or tapestry needle
If you can make a traditional granny square, you can make this cardigan with complete confidence!
Finished Measurements
| Size | Fits Bust/Chest | Finished Bust | Sleeve Length (Neck to Cuff) | Total Length |
|---|---|---|---|---|
| XS | 30″–32″ (76–81 cm) | 36″ (91.5 cm) | 24″ (61 cm) | 22″ (56 cm) |
| S | 34″–36″ (86–91.5 cm) | 40″ (101.5 cm) | 25″ (63.5 cm) | 23″ (58.5 cm) |
| M | 38″–40″ (96.5–101.5 cm) | 44″ (112 cm) | 26″ (66 cm) | 24″ (61 cm) |
| L | 42″–44″ (106.5–112 cm) | 48″ (122 cm) | 27″ (68.5 cm) | 25″ (63.5 cm) |
| XL | 46″–48″ (117–122 cm) | 52″ (132 cm) | 28″ (71 cm) | 26″ (66 cm) |
| 2XL | 50″–52″ (127–132 cm) | 56″ (142 cm) | 28.5″ (72.5 cm) | 27″ (68.5 cm) |
Note: Cardigan is designed with 4″ to 6″ (10–15 cm) of positive ease for a comfortable, oversized drape.
Materials You Will Need
| Material | Quantity / Specification |
|---|---|
| Color A (Rust) | 650 (720, 800, 890, 980, 1070) yds / 594 (658, 731, 814, 896, 978) m |
| Color B (Mustard) | 320 (360, 400, 450, 500, 550) yds / 293 (329, 366, 411, 457, 503) m |
| Color C (Oatmeal) | 300 (340, 380, 430, 480, 530) yds / 274 (311, 347, 393, 439, 485) m |
| Crochet Hook | Size 5.5 mm (US I-9) or size needed to obtain gauge |
| Tapestry Needle | Large blunt yarn needle for seaming and weaving ends |
| Stitch Markers | 4 locking stitch markers |
| Scissors | Standard craft scissors |
Yarn Suggestions
| Yarn Name | Fiber Content | Skein Details | Notes |
|---|---|---|---|
| Lion Brand Wool-Ease | 80% Acrylic, 20% Wool | 197 yds (180 m) / 3 oz (85 g) | Excellent warmth, great drape, holds rib shape beautifully. Colors: Spice, Mustard, Oatmeal. |
| Caron Simply Soft | 100% Acrylic | 315 yds (288 m) / 6 oz (170 g) | Soft sheen, fluid drape, machine washable. Colors: Persimmon, Gold, Off White. |
| Paintbox Yarns Simply Aran | 100% Acrylic | 201 yds (184 m) / 3.5 oz (100 g) | Crisp stitch definition, budget friendly. Colors: Copper, Mustard, Champagne White. |
⚠️ Note: Avoid lightweight DK yarns or stiff cotton rug yarns. This sweater relies on a soft worsted (Medium Category 4) yarn to allow the hexagon folds to lay flat along your arms without bulk.
Gauge
- Granny Cluster Stitch: 4 clusters (12 sts) and 7 rnds = 4″ x 4″ (10 cm x 10 cm) worked in granny cluster pattern using 5.5 mm hook.
- Ribbing (sc BLO): 16 sts and 16 rows = 4″ x 4″ (10 cm x 10 cm).
💡 Designer Tip: Take time to measure your hexagon after Round 5. It should measure approximately 6″ (15 cm) from corner to flat edge across. Adjust your hook size up or down if your hexagon turns out noticeably larger or smaller.
Abbreviations
This pattern uses standard US crochet terms.
| Abbreviation | Full Term |
|---|---|
| ch | Chain |
| sc | Single crochet |
| dc | Double crochet |
| sl st | Slip stitch |
| st(s) | Stitch(es) |
| sp(s) | Space(s) |
| rnd(s) | Round(s) |
| row(s) | Row(s) |
| BLO | Back loop only |
| sk | Skip |
| rem | Remaining |
UK Conversion Note: sc = dc (double crochet); dc = tr (treble crochet).
Special Stitches Explained
1. Magic Ring (Magic Circle)
Create a loop with your yarn, leaving a 4″ tail. Insert your hook into the loop, yarn over, pull up a loop, ch 1 to secure. Work specified stitches directly into the ring. Pull tail tight to close center opening.
2. Granny Cluster (3-dc group)
Work 3 double crochet stitches into the exact same chain space or stitch space.
3. Corner Cluster Group
Work (3 dc, ch 2, 3 dc) into a single corner space to form a turned 90-degree angle for the hexagon shape.
Pattern Instructions
Pattern Notes
- Hexagon Structure: Each hexagon has 6 distinct sides and 6 corner spaces. When laid flat, it looks like a flat geometric ring. When folded in half across opposite corners, it creates an “L” shape where one arm is the sleeve and the other arm forms half the front and back body panels.
- Turning Chains: Beginning ch-3 counts as 1 dc throughout.
- Color Sequence:
- Rnds 1–2: Color A (Rust)
- Rnd 3: Color C (Oatmeal)
- Rnd 4: Color B (Mustard)
- Rnd 5: Color A (Rust)
- Rnd 6: Color C (Oatmeal)
- Rnd 7: Color B (Mustard)
- Repeat Rnds 5–7 for remaining rounds.
Section 1: Granny Hexagons (Make 2)
Round 1 (Color A):
Make a magic ring. Ch 3 (counts as 1 dc), 2 dc into ring, ch 2, [3 dc into ring, ch 2] 5 times. Join with sl st to top of beg ch-3. Fasten off Color A. (6 clusters of 3 dc, 6 ch-2 corner sps = 18 dc)
Round 2 (Color A):
Attach Color A in any corner ch-2 sp. Ch 3, (2 dc, ch 2, 3 dc) in same corner sp (first corner made). Ch 1, [(3 dc, ch 2, 3 dc) in next corner ch-2 sp, ch 1] 5 times. Join with sl st to top of beg ch-3. Fasten off Color A. (12 clusters of 3 dc, 6 ch-2 corner sps, 6 ch-1 side sps = 36 dc)
Round 3 (Color C):
Attach Color C in any corner ch-2 sp. Ch 3, (2 dc, ch 2, 3 dc) in same sp. *Ch 1, 3 dc in next ch-1 sp, ch 1, (3 dc, ch 2, 3 dc) in next corner ch-2 sp; rep from * around, ending with ch 1, 3 dc in last ch-1 sp, ch 1. Join with sl st to top of beg ch-3. Fasten off Color C. *(18 clusters of 3 dc, 6 ch-2 corner sps, 12 ch-1 side sps = 54 dc)*
Round 4 (Color B):
Attach Color B in any corner ch-2 sp. Ch 3, (2 dc, ch 2, 3 dc) in same sp. *Ch 1, [3 dc in next ch-1 sp, ch 1] across to next corner, (3 dc, ch 2, 3 dc) in corner ch-2 sp; rep from * around, ending with ch 1, 3 dc in last ch-1 sp, ch 1. Join with sl st to top of beg ch-3. Fasten off Color B. *(24 clusters of 3 dc, 6 ch-2 corner sps, 18 ch-1 side sps = 72 dc)*
Round 5 (Color A):
Repeat Round 4 using Color A. (30 clusters of 3 dc, 6 ch-2 corner sps, 24 ch-1 side sps = 90 dc)
Round 6 (Color C):
Repeat Round 4 using Color C. (36 clusters of 3 dc, 6 ch-2 corner sps, 30 ch-1 side sps = 108 dc)
Round 7 (Color B):
Repeat Round 4 using Color B. (42 clusters of 3 dc, 6 ch-2 corner sps, 36 ch-1 side sps = 126 dc)
Rounds 8 to 15 [17, 19, 21, 23, 25]:
Continue repeating Round 4, maintaining the color rotation sequence (Color A, Color C, Color B), expanding each side by 1 additional granny cluster per round until you reach your target size count:
- Size XS: Complete through Round 15 (90 clusters of 3 dc = 270 dc)
- Size S: Complete through Round 17 (102 clusters of 3 dc = 306 dc)
- Size M: Complete through Round 19 (114 clusters of 3 dc = 342 dc)
- Size L: Complete through Round 21 (126 clusters of 3 dc = 378 dc)
- Size XL: Complete through Round 23 (138 clusters of 3 dc = 414 dc)
- Size 2XL: Complete through Round 25 (150 clusters of 3 dc = 450 dc)
Fasten off and weave in loose ends for both hexagons.
✅ Checkpoint: Fold one hexagon in half, matching opposite corners. It will form an L-shape automatically! The sleeve fold will run along the top edge, and the lower horizontal fold creates the body half.
Section 2: Assembly & Seaming
- Fold both hexagons into “L” shapes. Place them side-by-side on a flat work surface with the folded sleeve openings facing outward and the inner straight edges meeting in the center.
- Back Seam: Match the rear back edges of both panels. Using Color A (Rust) and your tapestry needle (or a crochet hook for slip stitch seaming), join the center back seam from the bottom hem up to the neck opening.
- Top Sleeve & Shoulder Seams: Fold the top edges of each sleeve together. Starting from the outer sleeve cuff edge, seam along the top shoulder/arm line all the way to the neck opening using Color A.
Section 3: Sleeve Extensions & Cuffs (Make 2)
Sleeve Extension Rows (Optional for extra sleeve length):
If you desire longer sleeves before adding the ribbing, attach Color A to the raw arm cuff edge.
– Rnd 1: Ch 3, 2 dc in same sp, ch 1, [3 dc in next ch-1 sp, ch 1] around sleeve opening. Join with sl st to top of ch-3. (30 (34, 38, 42, 46, 50) dc)
– Repeat Rnd 1 for 1–3 additional rounds if needed. Fasten off.
Ribbed Sleeve Cuffs:
Attach Color A (Rust) to the edge of the sleeve wrist opening.
- Foundation Chain: Ch 11.
- Row 1: Sc in 2nd ch from hook and in each ch across, sl st in next 2 sts along sleeve wrist edge, turn. (10 sc)
- Row 2: Sk the 2 sl sts, sc BLO in each of the 10 sc across, ch 1, turn. (10 sc)
- Row 3: Sc BLO in each of the 10 sc across, sl st in next 2 sts along sleeve edge, turn. (10 sc)
- Rows 4 to 26 (30, 34, 38, 42, 46): Repeat Rows 2–3 around the entire cuff opening.
- Fasten off, leaving an 8″ tail. Seam the foundation edge of the cuff to the last row using your tapestry needle. Repeat on second sleeve.
Section 4: Body Extensions & Ribbed Border
Bottom Body Extension Rows:
To lengthen the body without widening the sleeves, attach Color A to the bottom hem of the assembled cardigan.
– Row 1 (Rust): Working across the bottom edge from right front corner to left front corner: Ch 3, 2 dc in corner sp, *ch 1, 3 dc in next ch-1 sp; rep from * across bottom hem to corner. Turn. (45 (51, 57, 63, 69, 75) dc)
– Rows 2 to 4: Ch 3, 2 dc in first ch-sp, *ch 1, 3 dc in next ch-1 sp; rep from * across. Fasten off.
Main Collar and Front Ribbed Border:
Attach Color A (Rust) to the bottom right front corner edge of the cardigan.
- Foundation Chain: Ch 9.
- Row 1: Sc in 2nd ch from hook and in each ch across, sl st in next 2 sts along bottom cardigan edge, turn. (8 sc)
- Row 2: Sk the 2 sl sts, sc BLO in each of the 8 sc across, ch 1, turn. (8 sc)
- Row 3: Sc BLO in each of the 8 sc across, sl st in next 2 sts along cardigan edge, turn. (8 sc)
- Remaining Rows: Continue repeating Rows 2–3 all the way up the right front opening, around the back neck collar, down the left front opening, and along the lower bottom hem back to the starting corner.
- Fasten off. Seam the final row to the initial foundation chain using your yarn needle.
Section 5: Finishing
- Weave in all remaining loose yarn ends securely on the inside of the garment.
- Lightly steam-block the cardigan, taking care not to flatten the plush double crochet cluster texture. Allow to dry completely flat.
Size Customization Tips
- Adding Bust / Width: If the cardigan feels snug across the back, add 1 to 2 extra rounds to each hexagon before folding and seaming. Each additional round adds approximately 1.5″ (3.8 cm) of circumference to the sweater body.
- Adjusting Sleeve Length: If the arm length is ideal after seaming, skip the optional sleeve extension rounds and proceed directly to the ribbed cuffs.
- Adjusting Body Length: Add extra granny rows along the bottom hem in Section 4 before working the main ribbed border.
Care Instructions
- Machine Wash: Place cardigan in a mesh laundry bag. Wash on gentle cycle using cool water and mild detergent.
- Drying: Do not tumble dry. Lay cardigan flat on a dry towel to air dry to maintain shape and stretch.
FAQ
Can I make this cardigan using a single color instead of stripes?
Yes! A solid rust, cream, or mustard version highlights the unique geometric construction and drape of the granny hexagon stitch without changing color skeins.
How do I prevent the center of the hexagons from sagging?
Ensure your initial Magic Ring is pulled firmly closed during Round 1 and securely tied off with a knot on the wrong side before weaving in the end.
Can I add buttons or a zipper to the front?
Absolutely! The wide 8-stitch front ribbed border provides a sturdy surface for sewing wood buttons down the front opening.
Happy Crocheting!
Save this pattern to your favorite Pinterest crochet board and share your finished cardigan color combinations with our Hook & Hearth community!
📄 Your free PDF pattern
⏳ Preparing your free PDF… 30s
Like this one? Save it for later.