Plump Turkey Gnome Crochet Shelf Sitter Free Thanksgiving Pattern
Reader Favorites











Curly Loop Mini Crochet Wreath Ornament Free Christmas Pattern

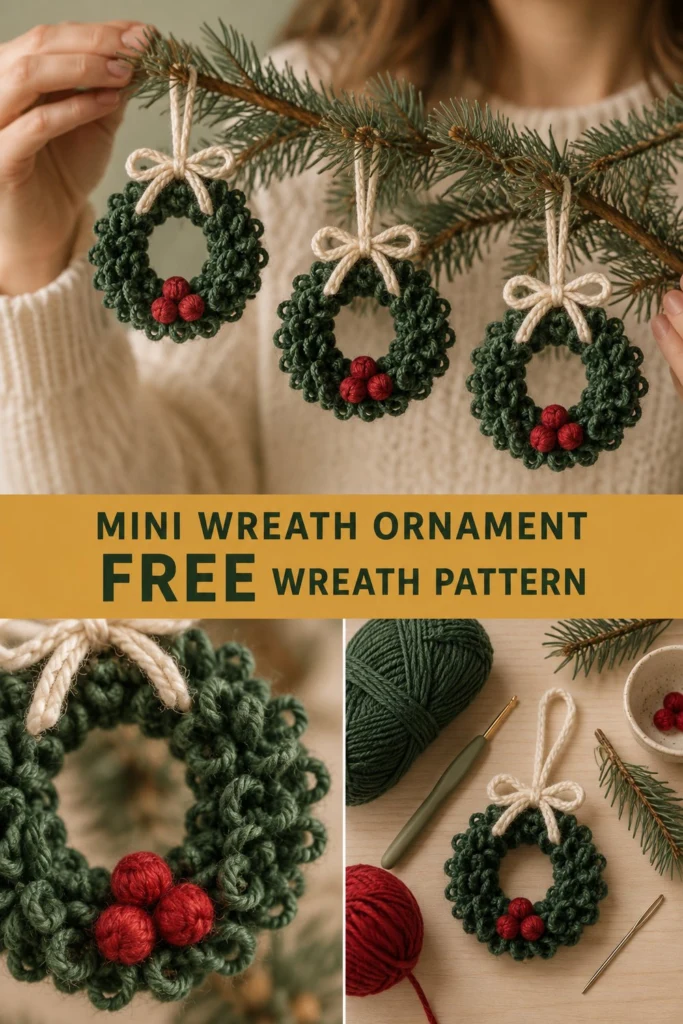
Bring festive handmade charm to your holiday home with this adorable mini crochet wreath ornament! Featuring a lush, tactile loop texture that mimics real evergreen pine branches, this quick project is topped with a rustic cream bow, a hanging cord, and three bright red holly berries. It is the perfect stash-buster for Christmas tree decor, festive garland, or handmade gift toppers.
Curly Loop Mini Crochet Wreath Ornament Free Christmas Pattern
Quick Facts
- Skill level: Easy / Advanced Beginner
- Finished size: Approximately 3.25 inches (8.25 cm) in diameter
- Yarn: Medium worsted weight (#4) 100% cotton yarn in Forest Green, Cream, and Red
- Hook: 3.5 mm (US E-4) crochet hook
- Stitches used: Magic Ring, chain (ch), single crochet (sc), increase (inc), decrease (dec), slip stitch (sl st)
- Time to make: 45 to 60 minutes per ornament
Size customization tips and adjustments are included further down in this guide.
What Makes This Mini Wreath Special
- Tactile Evergreen Texture: The dense curly loop round creates a realistic needle-like texture that holds its shape beautifully without sagging.
- Plump 3D Ring Structure: Built over a lightweight stuffed tube foundation, giving the wreath a full, professional appearance from every angle.
- Fast & Scrap-Friendly: Uses under 40 yards of yarn in total, making it ideal for clearing out leftover holiday cotton yarn.
- Versatile Holiday Decor: Looks stunning on Christmas tree branches, wrapped around napkin rings, attached to gift packages, or strung into a mantle garland.
Skill Level
This project is suitable for an Easy / Advanced Beginner crocheter. You should be comfortable with:
– Working in continuous spiral rounds.
– Basic amigurumi increases and decreases.
– Working simple chain loops into stitches.
– Basic assembly and seaming with a tapestry needle.
Reassurance: If you are new to loop textures, don’t worry—the loop round uses basic chains and slip stitches worked into standard single crochet stitches!
Finished Measurements
| Measurement | Inches | Centimeters |
|---|---|---|
| Outer Wreath Diameter | 3.25 in | 8.25 cm |
| Inner Opening Diameter | 1.25 in | 3.2 cm |
| Ring Thickness (Depth) | 1.00 in | 2.5 cm |
| Hanging Loop Length | 3.00 in | 7.5 cm |
Materials You Will Need
| Material | Details | Quantity / Yardage |
|---|---|---|
| Forest Green Yarn | Medium Worsted (#4), 100% Cotton | 25 yds / 23 m |
| Cream Yarn | Medium Worsted (#4), 100% Cotton | 8 yds / 7 m |
| Red Yarn | Medium Worsted (#4), 100% Cotton | 5 yds / 5 m |
| Crochet Hook | 3.5 mm (US E-4) ergonomic hook | 1 hook |
| Polyester Fiberfill | High-loft synthetic stuffing | Small pinch (~5 g) |
| Tapestry Needle | Blunt tip, large eye | 1 needle |
| Stitch Marker | Locking plastic marker | 1 marker |
| Scissors | Small craft scissors | 1 pair |
Yarn Suggestions
| Brand & Yarn Line | Weight | Skein Yardage | Notes |
|---|---|---|---|
| Lily Sugar’n Cream Cotton | #4 Medium Worsted | 120 yds / 110 m (2.5 oz) | Excellent stitch definition and firm structure for ornaments. |
| Paintbox Yarns Cotton Aran | #4 Medium Worsted | 93 yds / 85 m (1.75 oz) | Soft matte finish with vibrant holiday shades. |
| Rico Creative Cotton Aran | #4 Medium Worsted | 93 yds / 85 m (1.75 oz) | Sturdy cotton thread structure; holds loop texture tightly. |
⚠️ Note: Avoid using fuzzy acrylics or slippery chenille yarns for this project. Stiff matte cotton yarn provides the structure required to keep the curly loops standing crisp and upright.
Gauge
| Gauge Type | Measurement | Stitch Count |
|---|---|---|
| Single Crochet (sc) | 4 in x 4 in (10 cm x 10 cm) | 20 sts x 22 rows |
| Amigurumi Test Circle | Rnds 1–2 of Base Ring | 0.75 in (1.9 cm) wide |
Abbreviations
| Abbreviation | Full Term (US Crochet Terms) |
|---|---|
| ch | Chain |
| st / sts | Stitch / Stitches |
| sl st | Slip Stitch |
| sc | Single Crochet |
| inc | Increase (2 single crochet in the same stitch) |
| dec | Invisible Decrease (single crochet 2 together) |
| MR | Magic Ring |
| Rnd / Rnds | Round / Rounds |
| FO | Fasten Off |
UK Conversion Note: sc = dc (double crochet), inc = 2 dc in same st, dec = dc2tog.
Special Stitches Explained
1. Magic Ring (MR)
Create a loop around your fingers, insert hook into loop, yarn over and pull up a loop. Ch 1, then work the required number of single crochet stitches directly into the adjustable loop. Pull the tail tightly to close the center hole completely.
2. Invisible Decrease (dec)
Insert hook into the front loop only of the first stitch, then immediately insert hook into the front loop only of the second stitch. Yarn over, pull through both front loops, yarn over, pull through both loops on hook.
3. Curly Chain Loop
Insert hook into the designated stitch, work 1 sc. Ch 5, sl st into the front loop and front leg of the sc just made. This creates a secure, non-drooping curly loop directly attached to the stitch surface.
Pattern Instructions
Pattern Notes
- Work in continuous spiral rounds without joining at the end of each round unless specified.
- Use a stitch marker in the first stitch of each round to keep count.
- Stuff the base ring lightly as you progress so the tube remains flexible enough to bend into a circle.
Section 1: Wreath Base Ring (Forest Green, make 1)
Using Forest Green yarn and 3.5 mm hook.
- Rnd 1: 6 sc in MR (6 sc)
- Rnd 2: (inc) x 6 (12 sc)
- Rnds 3 to 28: sc in each st around (12 sc) (26 rounds total)
> 💡 Designer Tip: Lightly add polyester fiberfill stuffing after every 6 to 8 rounds. Do not over-stuff, or the tube will become too stiff to form a round wreath. - Rnd 29: (dec) x 6 (6 sc)
Fasten off, leaving a 12-inch (30 cm) tail for seaming.
Thread needle with yarn tail, weave through the front loops of the remaining 6 stitches, pull tight to close the end.
Forming the Ring: Bend the stuffed cylinder into a smooth circle. Bring Rnd 1 and Rnd 29 together. Using the yarn tail and your tapestry needle, whipstitch the two end caps together securely. Weave in the tail inside the stuffed ring base.
✅ Checkpoint: You should now have a smooth, circular donut ring measuring approximately 2.75 inches (7 cm) in outer diameter.
Section 2: Curly Loop Overlay (Forest Green)
Using Forest Green yarn and 3.5 mm hook.
Attach Forest Green yarn with a sl st around any surface stitch on the outer edge of the stuffed base ring.
- Rnd 1 (Loop Overlay): Work along the outer curve and surface stitches of the ring base: [1 sc, ch 5, sl st in front loop of sc just made] in each stitch around for 36 surface stitches (36 curly loops)
Fasten off, weave tail invisibly inside the wreath body.
Section 3: Red Berries (Red, make 3)
Using Red yarn and 3.5 mm hook.
- Rnd 1: 6 sc in MR (6 sc)
- Rnd 2: sc in each st around (6 sc)
- Rnd 3: (dec) x 3 (3 sc)
Fasten off, leaving a 6-inch (15 cm) tail. Tuck the yarn starting tail inside each berry for light internal padding. Weave the end tail through the remaining 3 stitches and pull snug to form a tiny round red sphere.
Section 4: Hanging Loop & Bow (Cream)
Using Cream yarn and 3.5 mm hook.
Hanging Loop:
- Ch 35. Fasten off, leaving a 6-inch (15 cm) tail for attachment. (35 ch)
Decorative Cream Bow:
- Ch 40. Fasten off both ends neatly. Tie the chain strand into a balanced 2-loop bow knot with 1.25-inch (3 cm) loops and short hanging tails. (40 ch)
Assembly Instructions
- Attaching the Red Berries:
- Position the 3 red berries in a tight triangular cluster at the bottom center of the wreath ring (opposite the top hanger position).
-
Using the 6-inch red yarn tails and a tapestry needle, stitch all three berries securely to the inner edge of the green wreath base between Rnds 14 and 16. Knot tails together at the back and pull ends inside the body.
-
Attaching the Hanging Loop:
- Fold the Ch 35 Cream hanging loop strand in half.
- Pass the looped fold around the top center of the wreath base ring (directly opposite the red berries). Pull the two loose yarn tails through the loop to form a lark’s head knot around the wreath ring.
-
Alternatively, use the tapestry needle to stitch both loose ends securely to the top edge of the wreath base.
-
Attaching the Cream Bow:
- Place the pre-tied Cream bow directly at the top center of the wreath, right at the base of the hanging loop.
- Using a small piece of cream yarn, stitch the knot of the bow firmly onto the wreath base. Secure tightly at the back and weave in loose ends.
Finishing
- Fluff the green chain loops outward using your fingers so they cover any exposed base stitches evenly.
- Trim any remaining yarn tails flush with the body.
- Lightly steam block the finished ornament with a garment steamer if needed (do not touch iron directly to yarn).
✅ Checkpoint: Your mini wreath ornament should measure ~3.25 inches (8.25 cm) across, featuring a lush green loop ring, a cream top bow, a sturdy hanging loop, and three bright red holly berries centered at the bottom.
Size Customization Tips
- Smaller Gift Tag Wreath (2.5 in / 6.5 cm): Use Fine Sport Weight (#2) or DK (#3) yarn with a 2.5 mm hook. Reduce base tube length to 22 rounds.
- Larger Door/Tree Ornament (4.5 in / 11.5 cm): Add 8 rounds to Section 1 (Rnds 3 to 36, 12 sc each round). Work 48 curly loops in Section 2. Increase berry count to 5 berries.
- Garland Setup: Make 10 to 12 wreaths in alternating shades of olive green and forest green. Thread them along a 6-foot (1.8 m) braided cream cotton rope!
Care Instructions
- Cleaning: Spot clean gently with cold water and mild liquid soap. Do not wring or twist.
- Drying: Reshape loops with fingers and lay flat on a clean towel to air dry completely.
- Storage: Store flat in a cool, dry ornament box during the off-season to prevent crushed loops.
FAQ
Can I make these berries out of felt balls instead of crocheting them?
Yes! You can substitute the crocheted berries with three 10 mm red wool felt pom-poms or wooden beads. Simply attach them to the wreath base using hot glue or by stitching through them with red thread.
How do I make the loops extra dense and fluffy?
Work 2 loop sequences (sc, ch 5, sl st) into every single stitch around the base ring instead of one! This doubles your loop count to 72 loops for an exceptionally plush pine look.
Is this ornament safe for homes with young children or pets?
Yes, provided all parts are stitched securely. For babies under 3 years old, omit small detachable parts like loose plastic beads. Ensure berries and bows are double-knotted with heavy-duty thread so they cannot be pulled free.
Happy Crocheting!
You’ve completed your Curly Loop Mini Crochet Wreath Ornament! These charming wreaths make delightful last-minute Christmas gifts, tree decorations, and festive package toppers.
Save this pattern to your holiday Pinterest boards and share your finished wreaths with fellow crafters!
📄 Your free PDF pattern
⏳ Preparing your free PDF… 30s
Like this one? Save it for later.