Plump Turkey Gnome Crochet Shelf Sitter Free Thanksgiving Pattern
Reader Favorites











Chunky Ribbed Crochet Sweater Vest Free Crochet Pattern

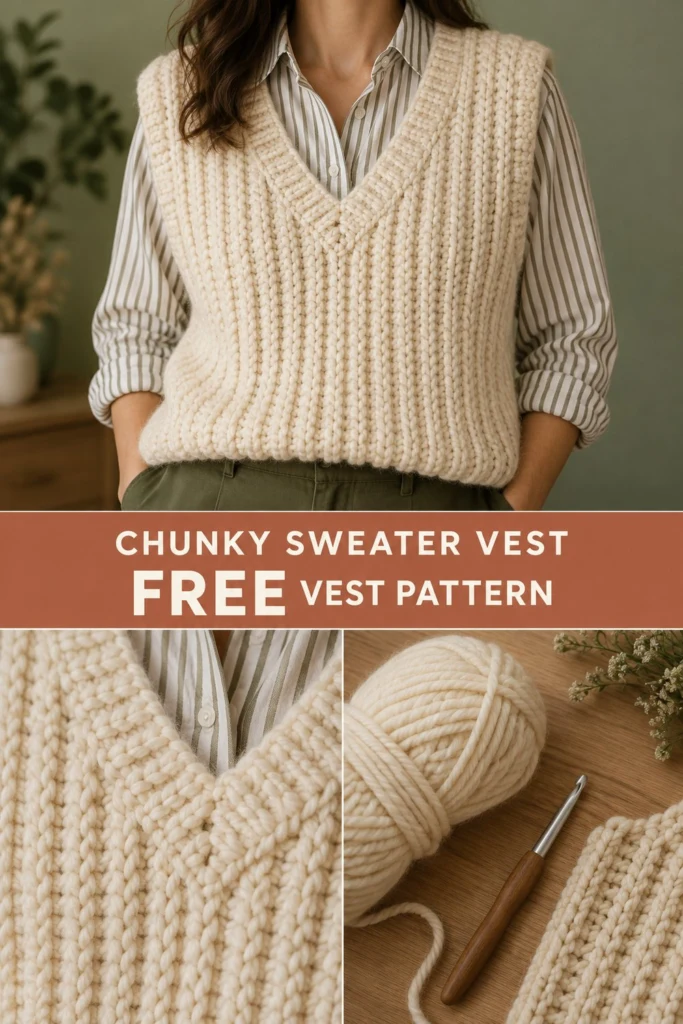
The sweater vest has quietly taken over every winter wardrobe, and this chunky ribbed version is the ultimate cold-weather layering piece. Worked in just two simple panels with a cozy V-neck and worked entirely in the back loop, it gives a stunning knit-look texture that pairs effortlessly over any collared shirt or tee.
Chunky Ribbed Crochet Sweater Vest Free Crochet Pattern
Quick Facts
- Skill level: Easy / Advanced Beginner
- Finished size: Sizes XS (S, M, L, XL, 2XL)
- Yarn: Lion Brand Wool-Ease Thick & Quick (Super Bulky, 80% Acrylic, 20% Wool, 106 yd / 97 m per 6 oz / 170 g ball) – Color: Fisherman
- Hook: 10 mm (US N/15) crochet hook
- Stitches used: Ch, sl st, sc, blo-sc (back loop only single crochet), sc2tog
- Time to make: 2 weekends
Size tips and custom ease adjustments are included further down.
What Makes This Chunky Crochet Vest Special
This free crochet pattern uses back loop single crochet worked in rows to create vertical ribs that stretch, drape, and mimic traditional knitwear without the hassle of knitting needles. The construction is refreshingly simple: two identical rectangular panels shaped at the shoulders and neckline, seamed at the sides and shoulders, and finished with a clean ribbed V-neck band.
Skill Level
- Basic crochet stitches (ch, sl st, sc)
- Working in the back loop only (blo)
- Working flat in turned rows
- Basic seaming and picking up stitches along an edge
Don’t worry if you are new to garments—this beginner crochet garment walks you through every stitch and seam!
Finished Measurements
Sizes are written for XS (S, M, L, XL, 2XL).
| Size | Bust/Chest (in) | Bust/Chest (cm) | Length (in) | Length (cm) | Yarn Balls Needed |
|---|---|---|---|---|---|
| XS | 32-34 | 81-86 | 21 | 53 | 4 |
| S | 36-38 | 91-96 | 21.5 | 55 | 5 |
| M | 40-42 | 102-107 | 22 | 56 | 5 |
| L | 44-46 | 112-117 | 23 | 58 | 6 |
| XL | 48-50 | 122-127 | 23.5 | 60 | 6 |
| 2XL | 52-54 | 132-137 | 24.5 | 62 | 7 |
Note: This vest is designed with 2 to 4 inches of positive ease for a relaxed, comfortable fit.
Materials You Will Need
| Material | Description | Details |
|---|---|---|
| Yarn | Lion Brand Wool-Ease Thick & Quick (Super Bulky, #6) | Color: Fisherman, 424 (530, 530, 636, 636, 742) yards / 387 (485, 485, 582, 582, 679) meters |
| Crochet Hook | 10 mm (US N/15) | Or size needed to obtain gauge |
| Notions | Tapestry needle | For weaving in ends and seaming |
| Notions | Stitch markers | 4 locking stitch markers |
| Notions | Measuring tape | For checking gauge and length |
Yarn Suggestions
- Lion Brand Wool-Ease Thick & Quick (Super Bulky, 106 yd / 97 m per ball) – The exact yarn used in the sample, offering incredible stitch definition and warmth.
- Bernat Softee Chunky (Super Bulky, held double, or substitute a true super bulky like Caron Chunky Cakes) – Great budget-friendly alternatives with a wide color range.
⚠️ Note: Avoid novelty yarns with fuzz, faux fur, or eyelash textures, as they will obscure the ribbed stitch definition that gives this vest its signature look.
Gauge
8 sts x 9 rows = 4 in / 10 cm in blo-sc using a 10 mm hook.
💡 Designer Tip: Chunky yarn can vary slightly in weight between dye lots. Always check your gauge on a 4×4 inch swatch before starting your panels to ensure your finished vest matches the measurements in the table.
Abbreviations
- ch: chain
- sl st: slip stitch
- sc: single crochet
- blo-sc: back loop only single crochet
- st(s): stitch(es)
- sk: skip
- t-ch: turning chain
- sc2tog: single crochet 2 stitches together (decrease)
- RS: right side
- WS: wrong side
- rep: repeat
UK terms equivalent: sc = dc, sl st = sl st.
Special Stitches Explained
- Back Loop Only Single Crochet (blo-sc): Insert hook under the back loop only of the indicated stitch, yarn over, pull up a loop, yarn over, and pull through both loops on the hook. This creates the ribbed ridges seen in the photos.
- Single Crochet Decrease (sc2tog): Insert hook into next st, yarn over and pull up a loop. Insert hook into following st, yarn over and pull up a loop. Yarn over and pull through all 3 loops on the hook.
Pattern Instructions
Pattern Notes
- The vest is made in two identical panels (Back and Front) worked flat from the bottom ribbing up to the shoulders, with neckline shaping on the Front panel.
- The turning chain (ch 1) at the start of a row does not count as a stitch unless specified.
- Use stitch markers to keep track of armhole shaping and shoulder seams.
Section 1: Back Panel (Fisherman, make 1)
Foundation: Ch 39 (43, 47, 51, 55, 59).
Row 1 (RS): Working in the back bumps of the foundation chain, sc in 2nd ch from hook and in each ch across, turn. (38, 42, 46, 50, 54, 58 sc)
Row 2 (WS): Ch 1, blo-sc in first st and in each st across, turn. (38, 42, 46, 50, 54, 58 blo-sc)
Rows 3 to 42 (43, 44, 46, 47, 49): Rep Row 2. Fasten off at the end of the last row, leaving a 12-inch tail for seaming.
Section 2: Front Panel (Fisherman, make 1)
Work Rows 1 through 32 (33, 34, 35, 36, 38) exactly as for the Back Panel.
(Note: Stop shaping at this row to begin the V-neck split.)
Row 33 (34, 35, 36, 37, 39) – Left Shoulder Split:
Ch 1, blo-sc in first 19 (21, 23, 25, 27, 29) sts, leave remaining sts unworked, turn. (19, 21, 23, 25, 27, 29 blo-sc)
Row 34 (35, 36, 37, 38, 40):
Ch 1, blo-sc across to the last 2 sts before the neckline edge, sc2tog over the final 2 sts to shape the V-neck, turn. (18, 20, 22, 24, 26, 28 blo-sc)
Rows 35 to 42 (36 to 43, 37 to 44, 38 to 46, 39 to 47, 41 to 49):
Continue repeating the decrease row at the neckline edge every alternate row while working straight on the outer edge, until you match the total row count of the Back panel. Fasten off.
Right Shoulder Split:
With RS facing, skip the center 0 sts and attach yarn to the unworked stitches on the opposite side of the V-neck.
Rep the left shoulder instructions in reverse (working the decrease at the beginning of the row for the neckline edge) to complete the right shoulder. Fasten off.
✅ Checkpoint: Both panels should now be complete. Lay them flat on a table with the right sides facing up to ensure the shoulder widths and lengths match before seaming.
Section 3: Assembly & Seaming
- Shoulder Seams: Place the Front panel over the Back panel with right sides together. Seam the outer 4 to 5 inches of each shoulder using the mattress stitch or a whipstitch with your yarn needle. Leave the center open for the head/neck opening.
- Side Seams: Align the side edges of the Front and Back panels. Seam from the bottom hem up towards the armpits, leaving the top 7 (7.5, 8, 8.5, 9, 9.5) inches open for the armholes. Secure all ends and weave them in.
Section 4: V-Neck Band & Finishing
Rnd 1: With RS facing, attach yarn at the center V-neck point. Ch 1, work sc evenly all around the V-neck collar opening, working an sc2tog at the exact bottom point of the V to keep it sharp, join with a sl st to the first sc.
Rnds 2 to 3: Ch 1, sc in each st around, maintaining the decrease at the center V point on every round, join with sl st. Fasten off and weave in all remaining ends.
Size Customization Tips
- To adjust length: Add or subtract rows in panels before starting the V-neck split. Each 2 rows add approximately 0.4 inches of length.
- To adjust width: Start your foundation chain with more or fewer stitches, ensuring your total starting chain is an even number.
Care Instructions
Hand wash gently in cool water with mild wool detergent. Do not wring or twist. Lay flat on a clean towel and reshape to original measurements while damp. Dry flat away from direct sunlight. Do not iron or tumble dry.
FAQ
Can I use a regular bulky (#5) yarn instead of super bulky (#6)?
Yes, but your gauge will be smaller, which means your vest will turn out smaller than the written measurements. You will need to add extra rows and starting stitches to compensate, or use a larger hook size.
How do I make the V-neck deeper or shallower?
To make a deeper V-neck, start your shoulder splits 2 to 4 rows earlier. To make it shallower, delay the split by 2 to 4 rows and decrease more gradually.
Is this pattern beginner-friendly?
Absolutely! If you know how to make a foundation chain, single crochet, and work in the back loops, you have all the skills needed to complete this stylish sweater vest.
Happy Crocheting!
I hope you love making and wearing your new chunky ribbed sweater vest! Be sure to save this pin on Pinterest to your favorite crochet boards, and leave a comment below letting me know what color yarn you chose for your project.
📄 Your free PDF pattern
⏳ Preparing your free PDF… 30s
Like this one? Save it for later.