Plump Turkey Gnome Crochet Shelf Sitter Free Thanksgiving Pattern
Reader Favorites











First Christmas Crochet Baby Cocoon Free Christmas Pattern

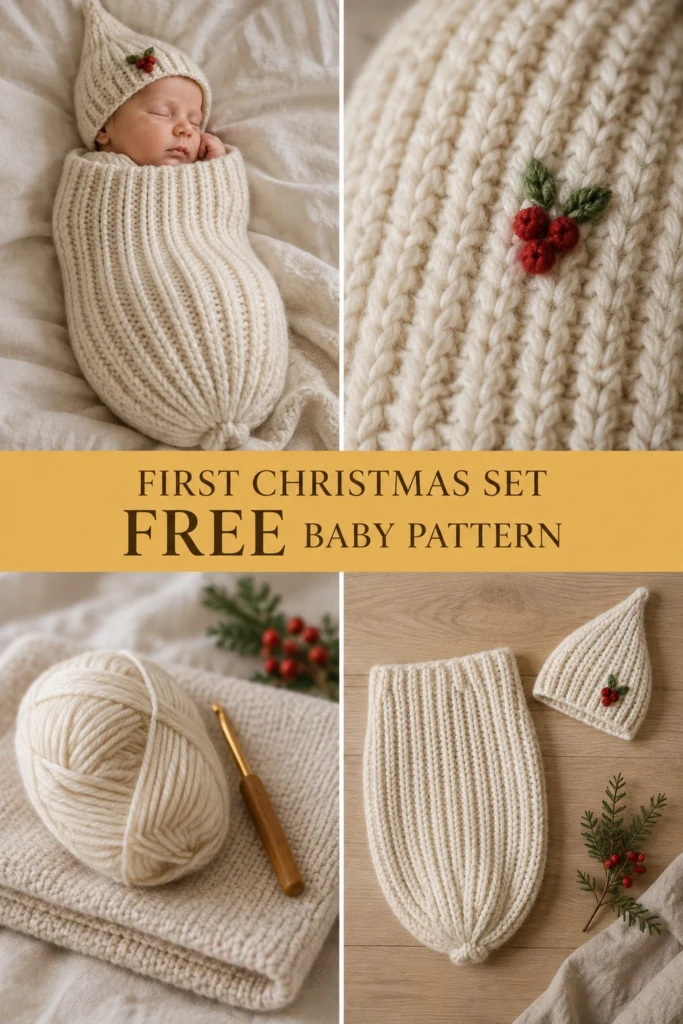
Welcome to the sweetest way to dress the smallest guest at your family holiday table this year! This cozy little set features a stretchy ribbed baby cocoon that keeps your newborn snug and secure without any fussy closures, paired with a matching pixie hat topped with a single handmade holly berry accent. Worked entirely in a soft, non-scratchy cream yarn with sweet crimson berries and green leaf embroidery, it creates an unforgettable keepsake for those precious first family photos.
First Christmas Crochet Baby Cocoon Free Christmas Pattern
Quick Facts
- Skill level: Intermediate
- Finished size: Newborn (0-3 Months)
- Yarn: Worsted weight (#4) soft acrylic or wool-blend yarn in Cream (Main Color), with small amounts of Crimson and Forest Green for the holly details
- Hook: US H/8 (5.0 mm) crochet hook
- Stitches used: ch, sl st, sc, hdc, blo, fpdc, bpdc (or working in the third loop of hdc for the ribbed texture shown)
- Time to make: 6 to 8 hours
Sizing tips and adjustments for larger babies are included further down in the guide.
What Makes This First Christmas Crochet Baby Cocoon Special
The secret to the stretchy, knit-look texture of this cocoon and hat lies in working through the third loop of half double crochet stitches (or alternating front and back post stitches), which creates deep vertical ribs that hug baby gently. The cocoon is gathered neatly at the foot with a cinched drawstring effect, while the pixie hat features a classic cone shape ending in a pointed tip. Three little textured bobble berries and two embroidered leaves sit neatly on both the hat and the upper front of the cocoon, adding a festive holiday touch without any loose buttons or hard plastic beads that could pose a safety hazard for a newborn.
Skill Level
- Working in rounds and rows
- Creating post stitches or third-loop working for ribbed texture
- Basic amigurumi-style bobble stitches for berries
- Simple surface embroidery for holly leaves
- Safely weaving in ends for baby garments
Don’t worry if you are new to ribbed textures; the repeating pattern is simple to memorize once you complete the first two foundation rounds.
Finished Measurements
| Size | Cocoon Length | Cocoon Width (Flat) | Hat Circumference | Hat Height |
|---|---|---|---|---|
| Newborn | 20 in / 51 cm | 9 in / 23 cm | 12 in / 30 cm | 7.5 in / 19 cm |
| 0-3 Months | 23 in / 58 cm | 10.5 in / 27 cm | 13.5 in / 34 cm | 8.5 in / 22 cm |
Materials You Will Need
| Item | Color Name | Yarn Weight / Type | Yards | Meters |
|---|---|---|---|---|
| Main Yarn (Cocoon & Hat) | Cream | #4 Worsted (Acrylic/Blend) | 450 yds | 410 m |
| Berry Accent | Crimson | #4 Worsted (Acrylic/Blend) | 15 yds | 14 m |
| Leaf Accent | Forest Green | #4 Worsted (Acrylic/Blend) | 15 yds | 14 m |
| Crochet Hook | US H/8 (5.0 mm) | Ergonomic Crochet Hook | — | — |
| Notions | Tapestry Needle | Yarn needle for weaving ends | — | — |
| Notions | Stitch Markers | Locking stitch markers (2) | — | — |
Yarn Suggestions
| Yarn Line | Skein Yardage | Notes |
|---|---|---|
| Caron Simply Soft | 315 yds / 288 m | Excellent drape, very soft against newborn skin, lovely subtle sheen |
| Lion Brand Basic Stitch Anti-Pilling | 185 yds / 170 m | Durable, machine washable, excellent stitch definition for ribbed textures |
| Paintbox Yarns Simply Aran | 201 yds / 184 m | Wide color range, very budget-friendly, soft acrylic fiber |
⚠️ Note: Avoid novelty yarns with eyelash textures, metallic threads, or heavy wools that may irritate sensitive newborn skin or shed fibers near the baby’s face.
Gauge
- Ribbed Stitch Pattern: 16 sts x 12 rows = 4 in / 10 cm using a 5.0 mm hook.
- Hat Crown: First 4 rounds = 3 in / 7.6 cm across.
Abbreviations
- beg: beginning
- blo: back loop only
- ch: chain
- dc: double crochet
- dec: decrease (hdc2tog or sc2tog)
- hdc: half double crochet
- inc: increase (work 2 sts in same st)
- rep: repeat
- rnd(s): round(s)
- row(s): row(s)
- sc: single crochet
- sl st: slip stitch
- st(s): stitch(es)
- yo: yarn over
UK conversion note: UK: sc = dc, hdc = htr, dc = tr.
Special Stitches Explained
- Third Loop Working (HDC Ribbing): When working in half double crochet, look at the back of the stitch just below the top two loops to find the third horizontal loop. Working your next hdc into this third loop pushes the top loops forward, creating a raised ribbed ridge.
- Bobble Stitch (Berry): [Yo, insert hook in st, yo, pull up loop, yo, pull through 2 loops] 4 times in the same stitch, yo, pull through all 5 loops on hook. Secure with a sl st.
- Embroidered Leaf: Use a tapestry needle and Forest Green yarn to work satin stitches or lazy daisy loops for the holly leaves directly onto the ribbed fabric.
Pattern Instructions
Pattern Notes:
– Unless otherwise specified, rounds are joined with a slip stitch to the first stitch, and the turning chain 1 or 2 does not count as a stitch.
– Use stitch markers to keep track of your round beginnings.
Section 1: Baby Cocoon (Cream, make 1)
Working from the top opening down to the foot.
Foundation Ch: Ch 64, join with sl st to form a ring, being careful not to twist the chain.
Rnd 1: Ch 2 (does not count as st here and throughout), hdc in each ch around, join with sl st to top of first hdc (64 hdc).
Rnds 2 to 50: Ch 2, working in the third loop for all hdc stitches to create vertical ribbing, hdc in each st around, join with sl st (64 hdc).
Rnd 51 (Cinch Round): Ch 1, *sc in next st, sc2tog over next 2 sts* rep from * to * around, join with sl st *(43 sc)*.
Rnd 52: Ch 1, *sc in next st, sc2tog over next 2 sts* rep from * to * around, join with sl st *(29 sc)*. Fasten off Cream, leaving a long 24 in / 60 cm tail.
✅ Checkpoint: Your cocoon should measure approximately 20 inches long and form a stretchy tube that tapers slightly at the bottom foot end.
Section 2: Pixie Hat (Cream, make 1)
Working from the bottom brim up to the pointed tip.
Foundation Ch: Ch 48, join with sl st to form a ring.
Rnd 1: Ch 2, hdc in each ch around, join with sl st (48 hdc).
Rnds 2 to 14: Ch 2, working in the third loop for ribbed texture, hdc in each st around, join with sl st (48 hdc).
Rnd 15 (Crown Shaping begins): Ch 2, *hdc in next 6 sts, hdc2tog* rep from * to * around, join with sl st *(42 hdc)*.
Rnds 16 & 17: Ch 2, working in third loop, hdc in each st around, join with sl st (42 hdc).
Rnd 18: Ch 2, *hdc in next 5 sts, hdc2tog* rep from * to * around, join with sl st *(36 hdc)*.
Rnds 19 & 20: Ch 2, working in third loop, hdc in each st around, join with sl st (36 hdc).
Rnd 21: Ch 2, *hdc in next 4 sts, hdc2tog* rep from * to * around, join with sl st *(30 hdc)*.
Rnds 22 & 23: Ch 2, working in third loop, hdc in each st around, join with sl st (30 hdc).
Rnd 24: Ch 2, *hdc in next 3 sts, hdc2tog* rep from * to * around, join with sl st *(24 hdc)*.
Rnds 25 & 26: Ch 2, working in third loop, hdc in each st around, join with sl st (24 hdc).
Rnd 27: Ch 2, *hdc in next 2 sts, hdc2tog* rep from * to * around, join with sl st *(18 hdc)*.
Rnds 28 & 29: Ch 2, working in third loop, hdc in each st around, join with sl st (18 hdc).
Rnd 30: Ch 2, *hdc in next st, hdc2tog* rep from * to * around, join with sl st *(12 hdc)*.
Rnds 31 & 32: Ch 2, hdc in each st around, join with sl st (12 hdc).
Rnd 33: Ch 2, *hdc2tog* rep from * to * around, join with sl st *(6 hdc)*. Fasten off Cream, leaving a 10 in / 25 cm tail.
Section 3: Holly Berry Clusters (Crimson & Forest Green, make 2 sets)
For the hat and the cocoon embellishment.
Berries (Make 3 Crimson bobbles per set):
With Crimson yarn, make a magic ring (or ch 3 and sl st to form ring). Work 3 bobble stitches directly into the ring, spacing them tightly together in a small cluster. Fasten off, leaving a 6 in / 15 cm tail for sewing.
Leaves (Make 2 Forest Green leaves per set):
With Forest Green yarn, ch 6.
Row 1: Working in back bumps of chain: sl st in 2nd ch from hook, sc in next ch, hdc in next ch, sc in next ch, sl st in last ch. Turn to work along opposite side of foundation chain: sl st in base of first st, sc in next ch, hdc in next ch, sc in next ch, sl st in last ch. Join with sl st and fasten off, leaving a 6 in / 15 cm tail.
Assembly
- Cocoon Foot Cinch: Thread the long Cream tail from Rnd 52 of the cocoon onto your tapestry needle. Weave the needle in and out through the stitches of the final round, pull tight to gather the bottom completely closed, secure with a strong knot, and weave in the remaining end.
- Hat Tip: Thread the top tail of the pixie hat, pull the final 6 stitches tightly closed, secure with a knot, and weave in ends inside the hat.
- Holly Appliques: Take one set of Crimson berries and two Forest Green leaves. Position them on the upper front of the cocoon (about 4 inches down from the top edge) and stitch them securely in place using the yarn tails, making sure stitches do not show through to the inside. Repeat the same placement on the lower front side of the pixie hat just above the ribbed brim.
Finishing
- Weave in all remaining loose yarn ends securely on the inside of both items.
- Gently hand wash your finished set in lukewarm water with mild baby detergent.
- Lay flat on a clean towel to dry, shaping the ribbed cocoon and pixie hat gently to measurements.
Size Customization Tips
To adjust the size for a larger baby (0-6 months), simply increase your starting foundation chain for both the cocoon and hat by increments of 4 stitches (e.g., start the cocoon with ch 72 instead of 64), and add 4 extra rows of height before beginning the decreases or cinching.
Care Instructions
- Hand wash cold or machine wash on a delicate wool cycle inside a mesh laundry bag.
- Use mild baby detergent.
- Do not bleach.
- Dry flat in shade to preserve the elasticity of the ribbed stitches.
- Do not iron.
FAQ
Can I use cotton yarn instead of acrylic?
Yes, you can use a soft cotton yarn in the same worsted weight (#4), but keep in mind that cotton has less stretch and bounce than acrylic or wool blends, so the ribbed texture will feel slightly firmer.
How do I ensure the stitches are safe for a newborn?
By embroidering the holly leaves and crocheting soft bobbles for the berries instead of using plastic buttons, beads, or safety eyes, you eliminate any choking hazards completely.
Can I make the pixie hat slouchier?
Absolutely! Simply add 5 to 8 more straight rounds of half double crochet before you begin the crown shaping decreases on Rnd 15.
Happy Crocheting!
I hope you enjoy making this festive holiday set for the newest addition to your family. If you loved this pattern, please save it to your Pinterest baby crochet board and leave a comment below letting me know what colors you chose for your baby’s first Christmas!
📄 Your free PDF pattern
⏳ Preparing your free PDF… 30s
Like this one? Save it for later.