Plump Turkey Gnome Crochet Shelf Sitter Free Thanksgiving Pattern
Reader Favorites









Little Turkey No Sew Crochet Place Card Holder Free Thanksgiving Pattern

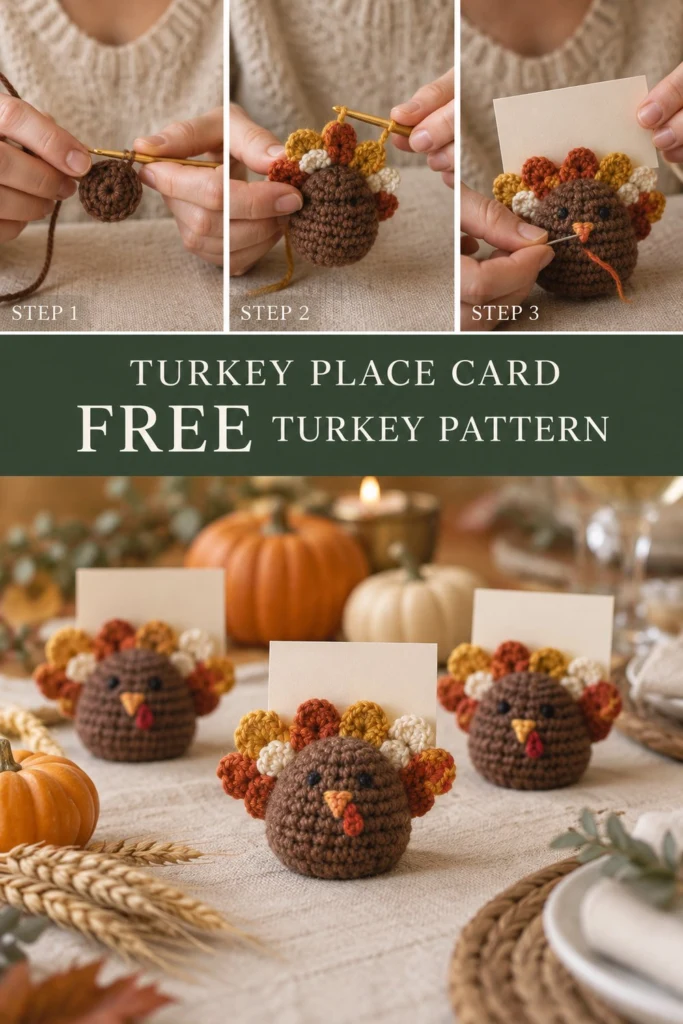
Bring warmth and handmade charm to your holiday feast with these adorable mini turkey place card holders! Designed with a flat, stable base and a textured feather fan across the back, each cute little bird holds a guest name card securely upright while adding festive color to your Thanksgiving table setting. Best of all, the entire body and feather trim are worked seamlessly with zero sewing of separate body parts required—just quick embroidery for the facial details.
Little Turkey No Sew Crochet Place Card Holder Free Thanksgiving Pattern
Quick Facts
- Skill level: Easy / Beginner-Friendly
- Finished size: 3 in (7.5 cm) height x 3.5 in (9 cm) width across feather fan
- Yarn: Worsted weight (Category 4) medium yarn in Chestnut Brown, Mustard Yellow, Rust Red, Cream, and Black
- Hook: 3.5 mm (US E-4) crochet hook
- Stitches used: Magic Ring (MR), Single Crochet (sc), Half Double Crochet (hdc), Increase (inc), Invisible Decrease (dec), Back Loop Only (BLO), Slip Stitch (sl st)
- Time to make: 20–25 minutes per turkey place card holder
Looking to make larger table centerpieces? Check out our size customization tips further down the page!
What Makes This Little Turkey Place Card Holder Special
This project is engineered specifically for busy holiday hosts who want maximum visual impact with minimal effort. Here is why you will love working up a flock of these for your Thanksgiving table crochet collection:
– No-Sew Seamless Body: The chestnut brown body is crocheted in one continuous 3D piece from bottom to top, meaning zero tedious assembly of head, body, or limbs.
– Built-In Place Card Slot: The natural fold between the upper head and the scalloped feather fan forms a sturdy groove that grips cardstock paper snugly without dropping it.
– Vibrant Scalloped Feathers: Worked directly into the front loops across the back of the body, the multi-colored feather fan features rich autumn tones of mustard yellow, rust red, and cream shell scallops.
– Flat Sit-Flat Base: A single round worked in the back loops only (BLO) creates a sharp, flat edge at the bottom so your place card holders stay firmly upright throughout dinner.
Skill Level
This project is suitable for a confident beginner. Required techniques include:
– Working in continuous spiral rounds (amigurumi style)
– Single crochet increases and invisible decreases
– Working into surface loops / leftover front loops
– Basic facial embroidery (straight stitches and French knots)
If you are new to amigurumi, don’t worry! Detailed round-by-round stitch counts and checkpoints are included to guide you every step of the way.
Finished Measurements
| Dimension | Inches | Centimeters |
|---|---|---|
| Total Height | 3.0 in | 7.5 cm |
| Body Width (Base) | 2.25 in | 5.5 cm |
| Feather Fan Span | 3.5 in | 9.0 cm |
| Depth (Front to Back) | 2.5 in | 6.5 cm |
Materials You Will Need
| Material / Item | Color / Detail | Yardage / Quantity |
|---|---|---|
| Main Body Yarn | Chestnut Brown (Worsted / Medium 4) | 25 yds / 23 m |
| Feather Accent Yarn A | Mustard Yellow (Worsted / Medium 4) | 5 yds / 5 m |
| Feather Accent Yarn B | Rust Red (Worsted / Medium 4) | 5 yds / 5 m |
| Feather Accent Yarn C | Cream (Worsted / Medium 4) | 5 yds / 5 m |
| Embroidery Detail Yarn | Black (Worsted or Embroidery Floss) | 1 yd / 1 m |
| Crochet Hook | 3.5 mm (US E-4) | 1 hook |
| Stuffing | Polyester Fiberfill | Approx. 0.5 oz / 15 g per turkey |
| Tapestry Needle | Yarn Needle / Blunt Point | 1 needle |
| Stitch Marker | Locking Stitch Marker | 1 marker |
| Blank Cards | Cardstock Place Cards (2 x 3.5 in) | 1 per guest |
Yarn Suggestions
| Yarn Brand & Line | Fiber Content | Skein Yardage / Weight | Notes |
|---|---|---|---|
| Lion Brand 24/7 Cotton | 100% Mercerized Cotton | 186 yds (170 m) / 3.5 oz (100 g) | Recommended. Excellent stitch definition and clean, crisp finish. |
| Red Heart Super Saver | 100% Acrylic | 364 yds (333 m) / 7 oz (198 g) | Budget-friendly option with a wide selection of rich autumn colors. |
| Lily Sugar ‘n Cream | 100% Cotton | 120 yds (109 m) / 2.5 oz (70 g) | Sturdy cotton holds body shape upright very well on smooth tables. |
⚠️ Note: Avoid using fuzzy, slick, or textured novelty yarns (such as chenille, velvet, or boucle) for this project. Clean worsted weight cotton or acrylic yarn is essential so the feather scallops hold their crisp arch shape and hold place cards firmly.
Gauge
- Single Crochet in continuous rounds (3.5 mm hook): 20 sts x 22 rnds = 4 x 4 in (10 x 10 cm).
- Circle Checkpoint: Rounds 1 to 5 of the flat base circle = 2.0 in (5.0 cm) across.
Note: Exact gauge is not critical for this project, but your tension should be tight enough so that polyester fiberfill stuffing does not peek through the stitches.
Abbreviations
| Symbol | Meaning (US Terminology) |
|---|---|
| ch | Chain |
| sl st | Slip Stitch |
| sc | Single Crochet |
| hdc | Half Double Crochet |
| inc | Single Crochet Increase (2 sc in same stitch) |
| dec | Invisible Single Crochet Decrease (sc2tog across FLO) |
| BLO | Back Loop Only |
| FLO | Front Loop Only |
| MR | Magic Ring / Magic Circle |
| st(s) | Stitch(es) |
| rnd(s) | Round(s) |
UK Conversion: sc = dc (double crochet), hdc = htr (half treble crochet), dec = dc2tog.
Special Stitches Explained
- Magic Ring (MR): Loop yarn around your fingers, insert hook into loop, yarn over, pull up a loop, ch 1. Work the required number of sc stitches directly into the adjustable loop, then pull the yarn tail tightly to close the center hole completely.
- Invisible Decrease (dec): Insert hook into the front loop only (FLO) of the first stitch, then immediately insert hook into the FLO of the second stitch (2 loops on hook plus working loop). Yarn over, pull through the two front loops, yarn over, pull through remaining 2 loops on hook.
- Back Loop Only (BLO): Insert hook under only the back strand (the strand farthest away from you) of the top “V” of the stitch.
- Feather Shell Scallop: Worked into a single stitch/loop: (1 sc, 2 hdc, 1 sc) all in the designated loop, creating a rounded arch feather petal.
Pattern Instructions
Notes
- The turkey body is worked in continuous spiral rounds from the bottom base up to the top of the head. Do not join rounds with a slip stitch or turn unless explicitly instructed.
- Place a locking stitch marker in the first stitch of every round and move it up as you work.
- The multi-colored feather fan is crocheted directly into the leftover surface front loops across the back half of Round 12.
Section 1: Turkey Body (Chestnut Brown)
Using Chestnut Brown yarn and a 3.5 mm hook:
- Rnd 1: 6 sc in Magic Ring (6 sc)
- Rnd 2: inc in each st around (12 sc)
- Rnd 3: (1 sc, inc) x 6 (18 sc)
- Rnd 4: (2 sc, inc) x 6 (24 sc)
- Rnd 5: (3 sc, inc) x 6 (30 sc)
✅ Checkpoint: Measure your flat circle after Rnd 5. It should measure approximately 2.0 inches (5 cm) across.
- Rnd 6: In BLO, sc in each st around (30 sc)
- Rnds 7–11: sc in each st around (30 sc for 5 rounds)
- Rnd 12: (3 sc, dec) x 6 (24 sc)
- Rnd 13: (2 sc, dec) x 6 (18 sc)
💡 Designer Tip: Now is the ideal time to add stuffing! Stuff the base firmly, ensuring the bottom surface remains flat so the turkey sits upright without wobbling.
- Rnd 14: (1 sc, dec) x 6 (12 sc)
- Add remaining stuffing to fill out the upper body head tightly.
- Rnd 15: dec x 6 (6 sc)
Fasten off Chestnut Brown yarn, leaving an 8-inch (20 cm) yarn tail. Thread tail onto a tapestry needle, weave through the front loops of all 6 remaining stitches, pull tightly to seal the top of the head, and weave in the end securely inside the body.
Section 2: Feather Fan (Accent Yarns)
Turn the body so the back faces you. Locate the leftover front loops created along Round 12 across the back half of the body (covering 13 stitches in an arch behind the head).
You will work 6 feather shell scallops across these 13 surface loops, switching colors to create a colorful plumage.
Join Rust Red yarn with a slip stitch into the first back surface loop on the far right of Rnd 12.
- Row 1: Work across 13 leftover surface front loops: sl st in loop 1 (Rust Red), (1 sc, 2 hdc, 1 sc) in loop 2 (change to Cream), sl st in loop 3, (1 sc, 2 hdc, 1 sc) in loop 4 (change to Mustard Yellow), sl st in loop 5, (1 sc, 2 hdc, 1 sc) in loop 6 (change to Rust Red), sl st in loop 7, (1 sc, 2 hdc, 1 sc) in loop 8 (change to Mustard Yellow), sl st in loop 9, (1 sc, 2 hdc, 1 sc) in loop 10 (change to Cream), sl st in loop 11, (1 sc, 2 hdc, 1 sc) in loop 12 (change to Rust Red), sl st in loop 13 (31 sts total: 7 sl st, 12 sc, 12 hdc)
Fasten off all colors. Tie yarn tails together in discreet knots at the back base of the feathers and weave all ends invisibly inside the body using your tapestry needle.
✅ Checkpoint: You should now have 6 distinct feather scallops forming a 31-stitch arch behind the head of the turkey.
Section 3: Facial Details
- Beak:
- Thread tapestry needle with 12 inches (30 cm) of Mustard Yellow yarn.
- Insert needle from back of head out to front between Rnds 10 and 11, centered on the front face.
-
Embroider a tiny downward triangle over 2 rounds (Rnds 10–12) by making 3 to 4 vertical straight stitches, coming to a point at the bottom. Fasten off inside body.
-
Snood / Wattle:
- Thread tapestry needle with 10 inches (25 cm) of Rust Red yarn.
-
Make a small stitch right next to the upper left side of the yellow beak, looping down 2 rounds past the bottom of the beak to create the red wattle droplet. Secure inside body.
-
Eyes:
- Thread tapestry needle with Black embroidery yarn or thread.
- Make 2 small French knots (or 2 tiny straight stitches over 1 st) between Rnds 10 and 11, spaced 4 stitches apart on either side of the beak.
⚠️ Safety Warning: If making these mini turkeys for homes with children under 3 years old, strictly use embroidered thread eyes instead of plastic safety eyes to eliminate choking hazards.
Assembly & Setup
No sewing of separate structural pieces is required!
- Give the top of the body behind the head a gentle pinch with your fingers to open the deep groove between the head and the feather fan.
- Slide a standard paper place card (2 x 3.5 in / 5 x 9 cm) vertically into the slit behind the head. The feather fan will support the back of the card, holding it upright for display on your dining table.
Size Customization Tips
Want to adjust the size of your easy thanksgiving crochet turkey project? Here is how to scale up or down accurately:
- Medium / Oversized Place Card (Worsted + 4.0 mm Hook):
- Increase base by one extra round:
Rnd 6: (4 sc, inc) x 6 (36 sc), then work 6 straight rounds of 36 sc. - Resulting size: approx. 4.0 in (10 cm) tall.
- Large Thanksgiving Table Centerpiece (Bulky Yarn Category 5 + 5.5 mm Hook):
- Use Bernat Velvet or Chenille bulky yarn.
- Follow pattern as written. Resulting size: approx. 6.5 in (16.5 cm) tall turkey centerpiece.
Care Instructions
- Cleaning: Spot clean gently using a damp cloth and mild liquid soap. Do not submerge completely in water or machine wash to prevent polyester fiberfill from bunching.
- Drying: Air dry flat at room temperature.
- Reshaping: If stored away with Thanksgiving decor, gently squeeze the stuffed base into a round shape and push the feather fan upward to restore flat sitting stability.
FAQ
Can I substitute cotton yarn for acrylic yarn?
Yes! Cotton yarn (such as Lion Brand 24/7 Cotton or Lily Sugar ‘n Cream) gives a slightly stiffer, firmer stitch structure which helps the place card holder sit extra steady on polished wood or glass tables. Acrylic yarn works wonderfully as well and offers a softer, matte finish.
How do I make sure the turkey doesn’t tip over with a place card inside?
Three key factors ensure stability: First, work Round 6 in the Back Loop Only (BLO) to create a crisp flat rim around the base. Second, stuff the bottom half of the body firmly. Third, make sure your place card paper is standard cardstock (60–80 lb weight) so it remains light.
How long does it take to make a set of 6 place card holders?
Because this free crochet pattern uses no-sew construction for the body and feathers, each turkey takes only about 20 to 25 minutes. A complete set of 6 place card holders can easily be completed in a single cozy evening!
Happy Crocheting!
We hope you enjoy crafting this charming mini turkey place card holder for your holiday gathering! If you love this project, be sure to pin it to your Thanksgiving Pinterest boards and leave a comment below sharing your color combinations. Happy Thanksgiving!
📄 Your free PDF pattern
⏳ Preparing your free PDF… 30s
Like this one? Save it for later.