Plump Turkey Gnome Crochet Shelf Sitter Free Thanksgiving Pattern
Reader Favorites










Classic Nutcracker Crochet Shelf Sitter Free Christmas Pattern

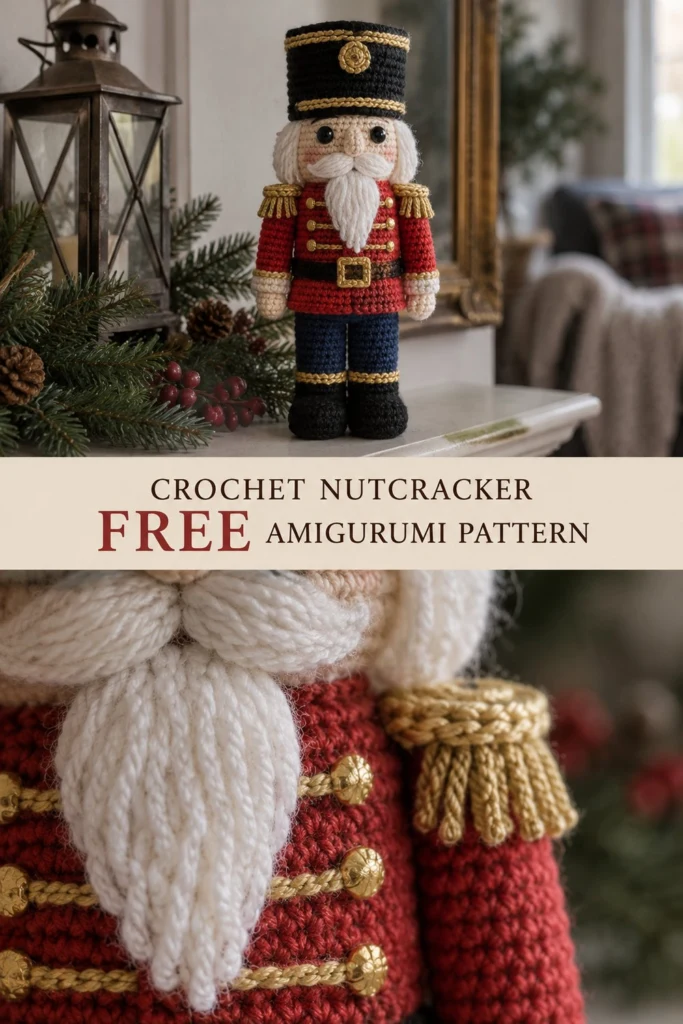
Bring timeless holiday magic onto your mantel with this handsome soldier guard. Built in continuous rounds with structural shaping, he stands tall on his own flat-weighted base without wobbling or leaning. This project blends classic Christmas red and navy tones with shiny gold embellishments, soft brushed hair, and a plush mustache.
Classic Nutcracker Crochet Shelf Sitter Free Christmas Pattern
Quick Facts
- Skill level: Intermediate
- Finished size: 8.7 inches / 22 cm tall (standing)
- Yarn: DK / Light Worsted Weight (Category 3) acrylic yarn
- Hook: 3.0 mm (US C-2 or D-3) crochet hook
- Stitches used: Magic ring, single crochet, increase, invisible decrease, back loop only, front loop only, half double crochet, double crochet, slip stitch
- Time to make: 6 to 8 hours
Custom size adjustments and scaling options are detailed in the size customization section below.
What Makes This Nutcracker Shelf Sitter Special
This nutcracker amigurumi pairs clean structural crochet techniques with decorative finishing touches visible in every detail of the finished design:
- Flat-Weighted Base: The boots begin with a flat circle and sharp transition round (BLO) that creates a solid, level footing so your soldier stays balanced on shelves, mantels, or windowsills.
- Seamless Body-to-Hat Construction: The legs join together and build straight up into the waist, belt, red jacket, neck, face, and tall black shako hat as a single sturdy continuous piece. This eliminates floppy necks and keeps the silhouette crisp.
- Layered Jacket Details: A dimensional jacket hem is worked into saved front loops, while gold embroidery lines, gold knot buttons, and fringed epaulets bring traditional military uniform detailing to life.
- Brushed Fiber Beard & Hair: Simple yarn loops are brushed with a wire comb to create soft, dense white facial hair that frames the face and sits perfectly under the shako brim.
Skill Level
To complete this project successfully, you should be comfortable with:
– Working in continuous spiral rounds without joining.
– Changing yarn colors cleanly at the end of a stitch.
– Working into back loops only (BLO) and front loops only (FLO).
– Basic amigurumi shaping (increases and invisible decreases).
– Simple surface embroidery (straight stitch and embroidery lines).
If you are comfortable with basic amigurumi assembly, this pattern provides step-by-step guidance for every round.
Finished Measurements
| Dimension | Inches | Centimeters |
|---|---|---|
| Total Height (Boots to Hat Top) | 8.7 in | 22.0 cm |
| Body Width (Shoulder to Shoulder) | 3.5 in | 9.0 cm |
| Base Width (Across Both Boots) | 3.1 in | 8.0 cm |
| Hat Height | 2.6 in | 6.5 cm |
Materials You Will Need
| Material Item | Color / Details | Quantity / Yardage |
|---|---|---|
| DK Weight Yarn | Black (Hat, Belt, Boots) | 65 yds / 60 m |
| DK Weight Yarn | Bright Red (Jacket, Arms) | 55 yds / 50 m |
| DK Weight Yarn | Navy Blue (Trousers) | 35 yds / 32 m |
| DK Weight Yarn | Light Peach (Skin/Face, Hands) | 25 yds / 23 m |
| DK Weight Yarn | Gold / Metallic Yellow (Trim, Buttons, Epaulets) | 20 yds / 18 m |
| DK Weight Yarn | White (Beard, Hair, Mustache) | 20 yds / 18 m |
| Crochet Hook | 3.0 mm (US C-2 or D-3) | 1 hook |
| Safety Eyes | 8 mm Black Plastic Eyes (or black embroidery thread) | 1 pair |
| Polyester Fiberfill | Premium stuffing | 2.5 oz / 70 g |
| Plastic Pellets / Weights | Small pouch or glass craft beads for base weighting | 1.5 oz / 40 g |
| Tapestry Needle | Yarn needle with blunt tip | 1 needle |
| Slicker Brush | Wire pet slicker brush (for brushing beard/hair) | 1 brush |
| Stitch Markers | Locking stitch markers | 2 to 3 markers |
Yarn Suggestions
| Brand & Yarn Line | Fiber Content | Skein Yardage | Notes |
|---|---|---|---|
| Paintbox Yarns Simply DK | 100% Premium Acrylic | 302 yds / 276 m | Excellent stitch definition, huge range of bright shade choices. |
| Rico Baby Classic DK | 50% Acrylic, 50% Polyamide | 180 yds / 165 m | Very smooth finish, tight twist prevents snagging during small sc work. |
| Stylecraft Special DK | 100% Acrylic | 322 yds / 295 m | Budget-friendly, durable, brushes out cleanly for white facial hair. |
⚠️ Note: Avoid loosely spun wools or fuzzy novelty yarns for the main body piece. Dense acrylic yarns with a tight twist hold the rigid shako hat shape best and keep stuffing concealed.
Gauge
Single Crochet Gauge (3.0 mm hook): 22 sts x 24 rnds = 4 x 4 in / 10 x 10 cm.
| Rnd Checkpoint | Measurement |
|---|---|
| Rnds 1 to 6 of Flat Circle (Leg Base) | 1.3 in / 3.3 cm diameter |
Abbreviations
| Abbreviation | Full Name / Description |
|---|---|
| ch | chain |
| sl st | slip stitch |
| sc | single crochet |
| hdc | half double crochet |
| dc | double crochet |
| inc | single crochet increase (2 sc in same stitch) |
| dec | invisible single crochet decrease (sc2tog through front loops) |
| BLO | back loop only |
| FLO | front loop only |
| st(s) | stitch(es) |
| rnd(s) | round(s) |
| rem | remaining |
UK Conversion: sc = dc, hdc = htr, dc = tr, sl st = sl st.
Special Stitches Explained
1. Magic Ring (MR)
Wrap yarn around your index finger twice. Insert hook into the ring, yarn over, pull up a loop, ch 1 (does not count as a stitch). Work designated number of sc into the ring. Pull tail tight to close the center hole completely.
2. Invisible Decrease (dec)
Insert hook into the front loop of the first stitch, then immediately insert hook into the front loop of the second stitch (2 loops on hook plus working loop). Yarn over, pull through both front loops, yarn over, pull through remaining 2 loops on hook.
3. Back Loop Only (BLO) / Front Loop Only (FLO)
Instead of inserting the hook under both loops of the top V stitch, insert only under the loop furthest from you (BLO) or closest to you (FLO).
Pattern Instructions
Pattern Notes
- Work in continuous spiral rounds without joining or turning unless specified.
- Use a stitch marker to mark the first stitch of every round; move it up each round.
- Stuff the pieces firmly as you go, especially the legs and torso, so your nutcracker stays upright on shelves.
Section 1: Legs & Boots (Make 2)
Start in Black yarn for the boots.
Rnd 1: 6 sc in Magic Ring (6 sc).
Rnd 2: inc in each st around (12 sc).
Rnd 3: (1 sc, inc) x 6 (18 sc).
Rnd 4: BLO sc in each st around (18 sc).
Rnd 5: sc in each st around (18 sc).
Rnd 6: 5 sc, 4 dec, 5 sc (14 sc).
Change to Gold yarn in the last loop of Rnd 6.
Rnd 7: FLO sc in each st around (14 sc).
Change to Navy Blue yarn in the last loop of Rnd 7.
Rnds 8 to 12 (5 rnds): sc in each st around (14 sc).
Fasten off Leg 1, leaving a short tail. Do not fasten off Leg 2—continue directly to Section 2.
✅ Checkpoint: Both legs should measure approximately 2.2 in / 5.5 cm from base to top edge. Insert a small circle of thin plastic card into each boot base and fill boots with weighted pellets before adding fiberfill.
Section 2: Joined Body, Head & Hat (Worked in 1 Piece)
With Navy Blue yarn still on Leg 2, chain 0 and join directly to the first stitch of Leg 1 with a single crochet.
Rnd 13: sc in 14 sts of Leg 1, sc in 14 sts of Leg 2 (28 sc).
Rnd 14: (6 sc, inc) x 4 (32 sc).
Rnds 15 to 16 (2 rnds): sc in each st around (32 sc).
Change to Black yarn (Belt).
Rnd 17: BLO sc in each st around (32 sc).
Rnd 18: sc in each st around (32 sc).
Change to Bright Red yarn (Jacket).
Rnd 19: BLO sc in each st around (32 sc).
Rnds 20 to 27 (8 rnds): sc in each st around (32 sc).
Rnd 28: (2 sc, dec) x 8 (24 sc).
Rnd 29: (1 sc, dec) x 8 (16 sc).
Change to Light Peach yarn (Neck & Head).
Rnd 30: BLO sc in each st around (16 sc).
Rnd 31: (1 sc, inc) x 8 (24 sc).
Rnd 32: (3 sc, inc) x 6 (30 sc).
Rnds 33 to 39 (7 rnds): sc in each st around (30 sc).
💡 Designer Tip: Insert 8 mm safety eyes between Rnds 35 and 36, spaced 6 stitches apart. (If making for children under 3 years old, embroider eyes using black yarn).
Change to Black yarn (Hat / Shako).
Rnd 40: BLO sc in each st around (30 sc).
Rnd 41: (4 sc, inc) x 6 (36 sc).
Rnds 42 to 51 (10 rnds): sc in each st around (36 sc).
Stuff body and head firmly with fiberfill before closing top of hat.
Rnd 52: BLO (4 sc, dec) x 6 (30 sc).
Rnd 53: (3 sc, dec) x 6 (24 sc).
Rnd 54: (2 sc, dec) x 6 (18 sc).
Rnd 55: (1 sc, dec) x 6 (12 sc).
Rnd 56: dec x 6 (6 sc).
Fasten off, cut yarn leaving a 6 in / 15 cm tail. Thread tapestry needle through front loops of remaining 6 sts, pull tight to close crown flat. Weave in end inside hat.
Section 3: Jacket Skirt Flange
Join Bright Red yarn into the saved front loops of Rnd 19 at the jacket waist.
Rnd 1: sc in each leftover front loop around (32 sc).
Rnd 2: sc in each st around (32 sc).
Fasten off with sl st, weave in tail on the inside of the skirt layer.
Section 4: Arms (Make 2)
Start in Light Peach yarn (Hands).
Rnd 1: 6 sc in Magic Ring (6 sc).
Rnd 2: (1 sc, inc) x 3 (9 sc).
Rnd 3: sc in each st around (9 sc).
Change to Gold yarn.
Rnd 4: FLO sc in each st around (9 sc).
Change to Bright Red yarn (Sleeves).
Rnd 5: BLO sc in each st around (9 sc).
Rnds 6 to 13 (8 rnds): sc in each st around (9 sc).
Stuff lower arm lightly; leave upper 3 rounds unstuffed. Flatten top edge and work 4 sc through both sides to close (4 sc). Fasten off, leaving a 10 in / 25 cm sewing tail.
Section 5: Epaulets (Make 2)
In Gold yarn.
Row 1: Ch 6, sc in 2nd ch from hook and in next 4 ch (5 sc).
Row 2: Ch 1, turn, sc in each st across (5 sc).
Fasten off, leaving an 8 in / 20 cm tail.
Epaulet Fringe: Cut 10 pieces of Gold yarn, each 2 in / 5 cm long. Fold yarn in half and attach 2 fringe strands into each of the 5 stitches along the outer edge of Row 2 using a crochet hook. Trim fringe evenly to 0.4 in / 1.0 cm length.
Section 6: Hat Emblem & Gold Trim Accent Strings
Hat Emblem
In Gold yarn.
Rnd 1: 6 sc in Magic Ring, sl st to first sc to join (6 sc).
Fasten off, leaving a 6 in / 15 cm sewing tail.
Hat Trim Chains (Make 2)
In Gold yarn.
Ch 36. Fasten off, leaving long tails for sewing.
Section 7: Facial Hair & Hair Extensions
Mustache (Make 1)
In White yarn.
Ch 11. Working along chain: sl st in 2nd ch from hook, sc in next ch, hdc in next ch, dc in next 2 ch, sl st in next ch, dc in next 2 ch, hdc in next ch, sc in next ch, sl st in last ch (10 sts).
Fasten off, leaving a sewing tail.
Beard (Make 1)
In White yarn.
Row 1: Ch 2, 2 sc in 2nd ch from hook (2 sc).
Row 2: Ch 1, turn, inc in each st across (4 sc).
Row 3: Ch 1, turn, inc, 2 sc, inc (6 sc).
Row 4: Ch 1, turn, sc in each st across (6 sc).
Row 5: Ch 1, turn, dec, 2 sc, dec (4 sc).
Row 6: Ch 1, turn, dec x 2 (2 sc).
Fasten off, leaving a 10 in / 25 cm tail. Gently comb with a wire slicker brush to create a fluffy texture.
Side Hair Pieces (Make 2)
In White yarn.
Row 1: Ch 7, sc in 2nd ch from hook and in next 5 ch (6 sc).
Rows 2 to 5 (4 rows): Ch 1, turn, sc in each st across (6 sc).
Fasten off, leaving sewing tails. Comb with wire brush to fluff up.
Assembly
- Attach Arms: Sew top flattened edge of each arm to the sides of the jacket between Rnds 27 and 28.
- Attach Epaulets: Position gold fringed epaulets over top shoulder joins (Rnd 28) and sew flat along Row 1. Allow fringe to hang over sleeve shoulders.
- Attach Facial Details:
- Sew the Beard centrally below the eyes, spanning Rnds 30 to 33.
- Position Mustache over the top edge of the beard, right below the safety eyes, and stitch through center and ends.
- Attach Side Hair Pieces to left and right sides of the head (Rnds 34 to 39), tucking top edges under the shako brim.
- Attach Hat Trim:
- Sew lower Gold Trim Chain around Rnd 40 (hat brim).
- Sew upper Gold Trim Chain around Rnd 52 (hat top edge).
- Center the circular Hat Emblem on front of the shako between Rnds 45 and 48; sew in place.
- Jacket & Belt Details:
- With Gold yarn and tapestry needle, embroider a rectangular belt buckle across Rnd 18 at front center.
- Embroider 3 horizontal gold braid lines across the chest (Rnds 21, 23, 25).
- Add small gold French knots or sew tiny gold beads at the ends of each braid line for military buttons.
- Apply a touch of pink blush makeup to the cheeks using a cotton swab.
Finishing
Weave in all remaining yarn ends securely inside the body cavity. Give the white beard and hair a final light brushing to smooth out fibers around the face. Ensure the weighted base sits flat so the figure stands unsupported.
Size Customization Tips
- Miniature Ornament (3.5 in / 9 cm): Use Fingering Weight / 4-ply yarn with a 2.0 mm hook. Follow the pattern exactly.
- Large Tabletop Figure (12 in / 30 cm): Use Worsted Weight (Category 4) yarn with a 3.75 mm (F) hook.
- Jumbo Plush Nutcracker (18 in / 45 cm): Use Chenille/Velvet Super Bulky yarn with a 6.0 mm (J) hook. Add extra polyfill weight inside boots to maintain balance.
Care Instructions
- Spot Clean Only: Use cool water and mild wool detergent on a clean cloth. Dab gently; do not submerge.
- Reshaping: Air dry thoroughly away from direct heat. Gently re-brush facial hair once fully dry.
FAQ
Can I make this nutcracker without plastic pellets in the base?
Yes. If you prefer not to use pellets, insert a rigid plastic or cardboard circle (cut to fit Rnd 3 of the boot) at the bottom of each foot, then stuff tightly with fiberfill. The flat plastic disc will keep the base level.
How do I get the white beard to look soft and fluffy like the picture?
Use 100% acrylic white yarn for the beard piece. Once crocheted, brush the surface repeatedly with a fine wire pet slicker brush. The metal tines will brush out the yarn strands into soft, cloud-like fleece.
Is this pattern suitable for babies and toddlers?
For children under 3 years old, omit safety eyes and gold beads. Embroider eyes using black cotton yarn and embroider buttons using gold thread to prevent any choking hazards.
Happy Crocheting!
Your classic nutcracker guard is ready to stand watch on your holiday mantel! Save this pattern to your Pinterest Christmas crochet boards, and share your finished color combinations with the Hook & Hearth community!
📄 Your free PDF pattern
⏳ Preparing your free PDF… 30s
Like this one? Save it for later.