Plump Turkey Gnome Crochet Shelf Sitter Free Thanksgiving Pattern
Reader Favorites










Jingle Bell Crochet Chair Back Cover Free Christmas Pattern

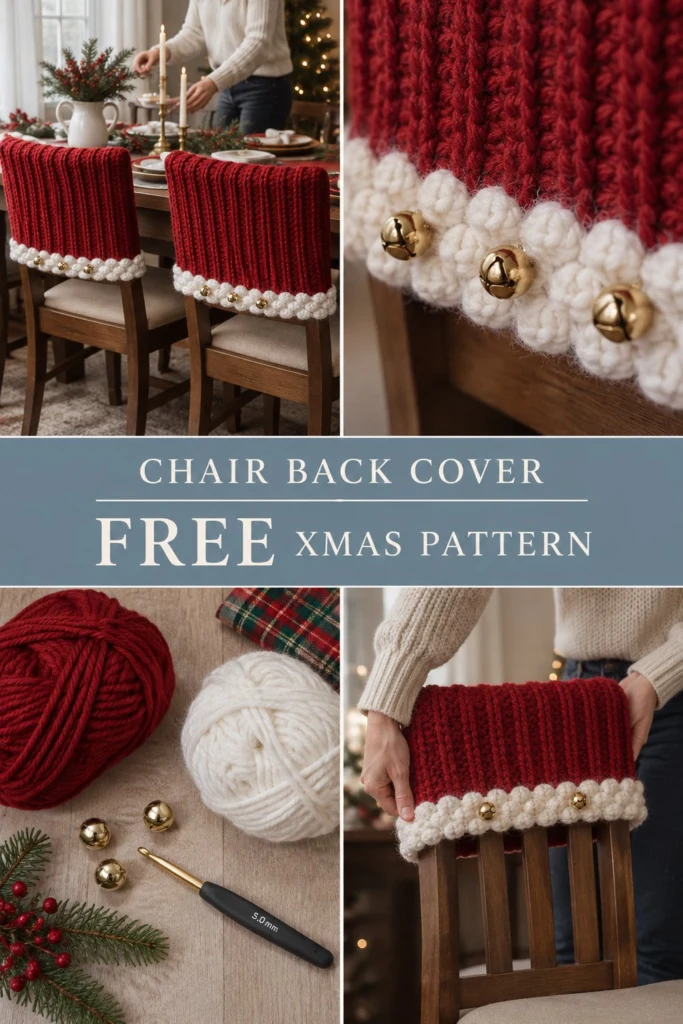
Transform your dining room into a cozy holiday feast with these hand-crocheted Santa-inspired chair back covers. Featuring deep crimson vertical ribbing, a plush off-white bobbly cuff, and charming gold jingle bells, these festive slipcovers bring joyful cheer and tactile warmth to every seat at the table. Easy to stitch up in an evening, they slip effortlessly over standard dining chair backs for an instant holiday room makeover.
Jingle Bell Crochet Chair Back Cover Free Christmas Pattern
Quick Facts
- Skill level: Easy / Advanced Beginner
- Finished size: Fits standard chair backs up to 16 in (40 cm) wide by 14 in (35 cm) tall
- Yarn: Bulky weight (Category 5) yarn in Crimson Red and Cream
- Hook: 5.0 mm (US H-8) ergonomic crochet hook
- Stitches used: Chain (ch), Single Crochet (sc), Half Double Crochet Back Loop Only (hdc BLO), 5-dc Bobble stitch
- Time to make: 2–3 hours per cover
💡 Designer Tip: Detailed size customization tips are included further down in this guide if your dining chairs have non-standard dimensions!
What Makes This Chair Cover Special
- Vertical Ribbed Texture: Working half double crochet into the back loops creates elastic vertical ribs that stretch snugly over wooden chair tops without sliding off.
- Plush Bobble Cuff: The contrasting off-white trim features staggered bobble stitches, adding rich tactile relief that resembles Santa’s coat trim.
- Interactive Jingle Bells: Shiny brass jingle bells attached along the front and back cuffs add visual sparkle and a gentle holiday chime whenever guests take their seats.
Skill Level
This project is ideal for an Easy / Advanced Beginner who knows basic stitches and is ready to try textured work.
– Working in foundation chains and back loops only (BLO)
– Basic row counting and edge working
– Executing a 5-double-crochet bobble stitch
– Basic flat seaming with a tapestry needle
Even if you have never crocheted home decor before, the straightforward rectangular construction makes this pattern accessible and fun!
Finished Measurements
| Measurement | Inches | Centimeters |
|---|---|---|
| Panel Width | 16.0 in | 40.6 cm |
| Red Ribbed Body Height | 12.0 in | 30.5 cm |
| Cream Bobble Cuff Height | 2.0 in | 5.0 cm |
| Total Cover Height | 14.0 in | 35.5 cm |
| Fits Chair Back Width | 15.0–17.0 in | 38.0–43.0 cm |
Materials You Will Need
| Material / Item | Specification | Quantity Required (Per Cover) |
|---|---|---|
| Crimson Red Yarn | Bulky Weight (Category 5), 100% Acrylic or Wool Blend | 180 yds / 165 m |
| Cream / Off-White Yarn | Bulky Weight (Category 5), 100% Acrylic or Wool Blend | 60 yds / 55 m |
| Crochet Hook | 5.0 mm (US H-8) aluminum/ergonomic hook | 1 hook |
| Jingle Bells | Gold / Brass metal bells, 0.75 in (20 mm) diameter | 6 bells |
| Tapestry Needle | Blunt-ended yarn needle with wide eye | 1 needle |
| Notions | Measuring tape, scissors, stitch markers | 1 set |
Yarn Suggestions
| Yarn Brand & Name | Weight | Skein Details | Designer Notes |
|---|---|---|---|
| Lion Brand Hue & Me | Bulky (#5) | 137 yds (125 m) / 125 g | Excellent stitch definition; rich matte finish perfect for rustic holiday decor. |
| Paintbox Yarns Simply Chunky | Bulky (#5) | 149 yds (136 m) / 100 g | Soft, washable 100% acrylic available in bright festive red and warm cream. |
| Bernat Softee Chunky | Bulky (#5) | 108 yds (99 m) / 100 g | Durable and thick; creates a cozy, plush fabric that holds shape well. |
⚠️ Note: Avoid light worsted or slippery mercerized cotton yarns for this project. Bulky category 5 yarns provide the necessary structure, stretch, and thickness to keep the cover standing crisp on your chair back.
Gauge
| Stitch Pattern | Stitch Count x Row Count | Dimensions |
|---|---|---|
| Hdc BLO Ribbing (Red) | 14 sts x 10 rows | 4 x 4 in (10 x 10 cm) |
| Sc / Bobble Pattern (Cream) | 14 sts x 10 rows | 4 x 4 in (10 x 10 cm) |
Abbreviations
| Abbreviation | Full Term (US Crochet Terms) |
|---|---|
| ch | chain stitch |
| sc | single crochet |
| hdc | half double crochet |
| BLO | back loop only |
| st(s) | stitch(es) |
| sl st | slip stitch |
| yo | yarn over |
| rep | repeat |
| RS / WS | Right Side / Wrong Side |
UK Conversion Note: UK dc = US sc; UK htr = US hdc; UK tr = US dc.
Special Stitches Explained
1. Half Double Crochet Back Loop Only (hdc BLO)
Insert your hook under only the back loop (the loop furthest away from you) of the indicated stitch. Yarn over, pull up a loop (3 loops on hook), yarn over, and pull through all 3 loops. Working into the back loop creates raised horizontal ridges across the surface.
2. 5-Double-Crochet Bobble Stitch (Bobble)
- Yarn over, insert hook into designated stitch, yarn over and pull up a loop (3 loops on hook).
- Yarn over, pull through first 2 loops on hook (2 loops remaining).
- Repeat steps 1–2 in the same stitch 4 more times (you will have 6 loops on hook).
- Yarn over and pull through all 6 loops to close the bobble.
- Push the bobble toward the Right Side (RS) of your work when working on a Wrong Side (WS) row.
Pattern Instructions
Pattern Notes
- The red ribbed main body is worked sideways in turned rows. The row count determines the width of the cover, while the chain length determines the height of the red section.
- The cream bobble cuff is worked directly along the lower row-ends of the red section.
- Turning chains do not count as a stitch throughout unless specifically noted.
Section 1: Front Panel (Make 1)
Red Ribbed Main Body
With Crimson Red yarn and a 5.0 mm hook, ch 43.
Row 1 (RS): Hdc in 3rd ch from hook (skipped 2 ch do not count as a st), hdc in each ch across (42 hdc). Turn.
Row 2 (WS): Ch 2 (does not count as st here and throughout), hdc BLO in each of the 42 sts across (42 hdc). Turn.
Rows 3–40: Ch 2, hdc BLO in each st across (42 hdc). Turn.
Do not fasten off red yarn yet. Check that your panel width measures approximately 16 in (40 cm). Fasten off red yarn and weave in end.
✅ Checkpoint: You should have 40 ribbed rows measuring 16 in (40 cm) wide by 12 in (30 cm) high.
Cream Bobble Cuff
Join Cream yarn with a sl st in the lower corner row-end along the bottom edge of the red panel (so you are working across the 40 row-ends).
Row 1 (RS): Ch 1, work 1 sc into each row-end across the bottom edge (40 sc). Turn.
Row 2 (WS): Ch 1, sc in first st, Bobble in next st, sc in next 3 sts 9 times, Bobble in next st, sc in last 2 sts (10 Bobbles, 30 sc = 40 sts). Turn.
Row 3 (RS): Ch 1, sc in each st across (40 sc). Turn.
Row 4 (WS): Ch 1, sc in first 3 sts, Bobble in next st, sc in next 3 sts 8 times, Bobble in next st, sc in last 4 sts (9 Bobbles, 31 sc = 40 sts). Turn.
Row 5 (RS): Ch 1, sc in each st across (40 sc). Fasten off, leaving a 12 in (30 cm) tail for finishing.
✅ Checkpoint: Your completed Front Panel should have 42 rows total in height (40 red ribbed rows + 5 cream cuff rows) and measure 16 x 14 in (40 x 35.5 cm).
Section 2: Back Panel (Make 1)
Repeat all steps for Section 1 (Front Panel) identically, creating a second panel with the red ribbed body and cream bobble cuff.
Assembly
- Blocking: Block both panels gently to ensure straight edges and square 16 x 14 in (40 x 35.5 cm) dimensions.
- Aligning Panels: Place Front Panel and Back Panel together with Right Sides facing inside and Wrong Sides facing out. Align top red edges and side edges.
- Seaming Top Edge: Using Crimson Red yarn and a tapestry needle (or mattress stitch), join the top 16 in (40 cm) edge across all 40 row-ends (40 sts joined).
- Seaming Side Edges:
- Join left side edge starting from top corner downward through red section row-ends, stopping right where the cream cuff begins (30 row-ends seamed).
- Join right side edge from top corner down to top of cream cuff (30 row-ends seamed).
- Leave the bottom Cream Bobble Cuff unseamed on both sides to ensure the cover easily slips over chair top rails.
💡 Designer Tip: If your dining chair backs taper outward toward the bottom, leave 2 additional inches unseamed along the lower red sides for extra flare!
- Attaching Jingle Bells:
- Turn the assembled cover Right Side out.
- Position 3 gold jingle bells evenly across the front cream cuff (attach to the centers of Bobble 3, Bobble 5, and Bobble 8 on Row 2).
- Position 3 gold jingle bells evenly across the back cream cuff.
- Using leftover red or cream yarn and a needle, stitch each jingle bell securely through the center of the selected bobble stitch. Fasten off securely on the inside.
Finishing
- Weave in all remaining yarn tails on the wrong side using your tapestry needle.
- Give the bobble stitches a light pop outward from the inside.
- Slip the cover over your dining chair back and smooth down for a snug fit.
Size Customization Tips
If your dining chairs differ from standard dimensions (16 in / 40 cm wide by 14 in / 35.5 cm high), use these easy math adjustments:
- Changing Chair Width: Each 2 rows of hdc BLO ribbing add approximately 0.8 in (2 cm) to total width.
- To add 2 in (5 cm) width: Add 5 extra rows to the red body (total 45 rows). Ensure your cream cuff initial sc count equals your new total row count.
- Changing Chair Height: Each 3 chains added to your initial foundation chain add approximately 0.85 in (2.2 cm) to the height of the red ribbed body.
- To add 2 in (5 cm) height: Start with ch 50 (yielding 49 hdc per row instead of 42).
Care Instructions
- Washing: Hand wash in cold water using a mild wool detergent. Do not wring or twist.
- Drying: Gently press out excess water between towels and lay flat to dry on a dry towel away from direct heat.
- Hardware Maintenance: Ensure jingle bells are dry immediately after washing to prevent tarnishing.
FAQ
Can I use worsted weight (#4) yarn instead of bulky yarn?
Yes! If using medium worsted weight yarn, use a 4.5 mm hook and hold two strands together to match gauge, or follow the Size Customization Tips to add extra rows and chains to reach 16 x 14 in dimensions.
How do I stop the chair back cover from slipping off smooth wooden chairs?
The natural elasticity of hdc BLO ribbing creates a tight grip. However, if your chair top is polished smooth, you can hand-sew a small strip of non-slip shelf liner or silicone rug gripper inside the top inner seam!
Is this pattern suitable for toddlers or homes with pets?
Yes, but ensure jingle bells are stitched down firmly with double-knotted yarn tails. For homes with very young toddlers (under 3 years), you can substitute embroidered gold stars or yellow crochet dots for the metal bells.
Happy Crocheting!
Your dining table is ready for festive holiday meals! Save this pattern to your favorite Christmas Crochet board on Pinterest, and share your finished chair covers with your family and friends.
      /\
     /  \
    /____\
     ||||
   [jingle]
📄 Your free PDF pattern
⏳ Preparing your free PDF… 30s
Like this one? Save it for later.