Plump Turkey Gnome Crochet Shelf Sitter Free Thanksgiving Pattern
Reader Favorites











Cable Front Crochet Boot Cuffs Free Winter Pattern

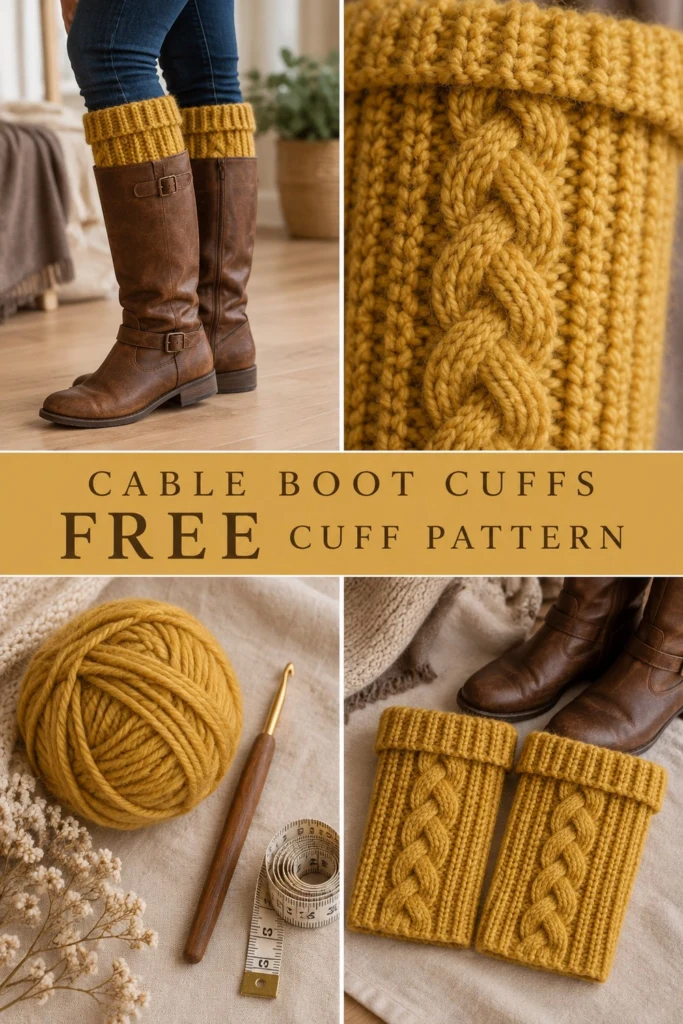
These cable front crochet boot cuffs add an instant layer of cozy texture to your favorite winter boots while taking under two hours to complete. A simple ribbed tube wraps around the calf, accented by a striking single post stitch cable running straight up the front.
Cable Front Crochet Boot Cuffs Free Winter Pattern
Quick Facts
- Skill level: Intermediate
- Finished size: 12 inches (30.5 cm) circumference, 7 inches (18 cm) height (folded)
- Yarn: Bulky weight (No. 5) yarn in Honey Mustard, approx. 120 yards (110 meters) per pair
- Hook: US K/10.5 (6.5 mm) crochet hook
- Stitches used: Ch, sl st, sc, hdc, Fpdc, Bpdc, tr, 4-dc front post cable
- Time to make: 1.5 to 2 hours per pair
Size customization tips for wider or narrower calves are included further down.
What Makes This Accessory Special
Working in the back loop only creates a stretchy, knit-look ribbed fabric that hugs your leg comfortably without sagging. The front cable panel uses front post stitches worked over skipped stitches to form a rich, 3D braided texture that mimics hand-knitted cables. Folding the top brim down over your boot shaft hides the joining seam and gives a polished, professional finish.
Skill Level
- Working in rows and continuous rounds
- Back loop only (BLO) stitching
- Front post treble crochet (Fptr) and post cable crossings
- Following a simple stitch repeat
💡 Designer Tip: Don’t pull your post stitches too tight, or the cable panel will pucker and pull the surrounding ribbing inward. Keep your tension relaxed and consistent.
Finished Measurements
| Measurement | Inches | Centimeters |
|---|---|---|
| Circumference (unstretched) | 12 in | 30.5 cm |
| Length (unfolded) | 10 in | 25.4 cm |
| Folded Cuff Height | 7 in | 17.8 cm |
Materials You Will Need
| Material | Type / Color | Amount |
|---|---|---|
| Yarn | Bulky (No. 5) / Honey Mustard | 120 yards / 110 meters |
| Hook | US K/10.5 (6.5 mm) crochet hook | 1 hook |
| Notions | Yarn needle, locking stitch markers | 1 needle, 2 markers |
Yarn Suggestions
| Yarn Line | Weight | Skein Yardage | Notes |
|---|---|---|---|
| Lion Brand Hue + Me | Bulky (No. 5) | 137 yards | Excellent stitch definition for cables |
| Bernat Softee Chunky | Bulky (No. 5) | 108 yards | Soft acrylic with great spring |
| WeCrochet Brava Bulky | Bulky (No. 5) | 136 yards | Durable, machine washable |
⚠️ Note: Avoid fuzzy mohair or novelty eyelash yarns for this project. They obscure the intricate cable stitches and make post placement difficult to see.
Gauge
- 11 sts x 10 rows = 4 in / 10 cm in back loop single crochet ribbing.
- Take time to check your gauge to ensure a proper fit around your calf.
Abbreviations
- approx: approximately
- beg: beginning
- BLO: back loop only
- Bpdc: back post double crochet
- ch: chain
- dc: double crochet
- Fpdc: front post double crochet
- Fptr: front post treble crochet
- hdc: half double crochet
- rep: repeat
- rnd(s): round(s)
- row(s): row(s)
- sc: single crochet
- sk: skip
- sl st: slip stitch
- st(s): stitch(es)
- tr: treble crochet
- yo: yarn over
- [ ]: work instructions within brackets as directed
UK terms equivalent: sc = dc, hdc = htr, dc = tr.
Special Stitches Explained
- Back Loop Only (BLO): Insert hook under the back loop only of the designated stitch, leaving the front loop unworked.
- Front Post Double Crochet (Fpdc): Yo, insert hook from front to back to front around the post of the indicated stitch from the row below, yo, pull up a loop, [yo, pull through 2 loops] twice.
- Front Post Treble Crochet (Fptr): Yo twice, insert hook from front to back to front around the post of the indicated stitch from the row below, yo, pull up a loop, [yo, pull through 2 loops] 3 times.
- 4-Stitch Cable Cross (C4F): Sk next 2 sts, work 1 Fptr around each of the next 2 skipped sts, then work 1 Fptr around each of the 2 skipped sts behind the ones just made.
Pattern Instructions
Pattern Notes
- Make 2 identical cuffs.
- The boot cuff is worked flat in rows of ribbing first, then seamed into a tube, and the top cuff and bottom trim are worked in joined rounds.
- Ch 1 at the start of a row does not count as a stitch.
Section 1: Cuff Ribbing Band (Honey Mustard, make 2)
Row 1: Ch 15, working in back bumps of foundation chain, sc in 2nd ch from hook and in each ch across, turn. (14 sc)
Row 2: Ch 1, working in BLO, sc in each st across, turn. (14 sc)
Rows 3 to 28: Rep Row 2. (14 sc per row)
Do not fasten off after Row 28. Bring the first and last rows together and slip stitch them through both thicknesses to form a seamless ribbed tube. Turn the tube right side out so the seam is on the inside.
Section 2: Cable Body and Upper Cuff (Honey Mustard, make 2)
Rnd 1 (Setup Rnd): Turn tube to work along the raw edge of the ribbing rows. Ch 1, work 30 sc evenly spaced around the top edge of the tube, join with a sl st to first sc. (30 sc)
Rnd 2: Ch 1, [hdc in next 4 sts, work cable panel across next 6 sts (sk 2 sts, Fptr around each of next 2 sts, working behind those sts, Fptr around each of 2 skipped sts), hdc in next 4 sts, sc in next 16 sts], join with sl st to first hdc. (30 sts)
Rnds 3 to 10: Rep Rnd 2, maintaining the cable pattern on the front 14 stitches and hdc/sc background around the rest of the tube. (30 sts per rnd)
✅ Checkpoint: At the end of Rnd 10, your cable panel should display four distinct twists, measuring approximately 7 inches tall before folding.
Fasten off and weave in all ends securely.
Assembly
- Fold the top 2 inches of the cuff downward over the outside of the ribbed band, allowing the cable panel to sit prominently at the outer side of your leg when worn.
- Position the cuffs over your boots with the cable facing outward.
Size Customization Tips
- To make it wider: Add rows to the initial ribbing band in multiples of 2 rows (each 2-row repeat adds approximately 0.75 inches to the circumference). Adjust Rnd 1 setup round to match your new row count.
- To make it narrower: Subtract 2 rows from the initial ribbing band length before seaming.
Care Instructions
Hand wash in cool water with mild wool detergent. Lay flat on a clean towel to dry and reshape. Do not wring or tumble dry.
FAQ
Can I use worsted weight yarn instead of bulky?
Worsted weight yarn will yield a much smaller cuff. If you prefer worsted weight, hold two strands together or increase your initial chain and row counts to maintain the same finished dimensions.
How do I stop the cuffs from sliding down my boots?
Ensure your initial ribbing band is snug around your bare calf or jeans. The natural grip of the back-loop ribbing against denim or tights prevents slipping.
Can I machine wash these boot cuffs?
Only if you use a machine washable bulky acrylic yarn (like Brava Bulky). Check your yarn ball band first; wool blends require gentle hand washing to prevent felting.
Happy Crocheting!
I hope you enjoyed making these cable boot cuffs! Save this pattern to your Pinterest winter accessories board and leave a comment below to let me know what color yarn you used for your pair.
📄 Your free PDF pattern
⏳ Preparing your free PDF… 30s
Like this one? Save it for later.