Plump Turkey Gnome Crochet Shelf Sitter Free Thanksgiving Pattern
Reader Favorites











Slouchy Hooded Crochet Scarf Free Winter Pattern

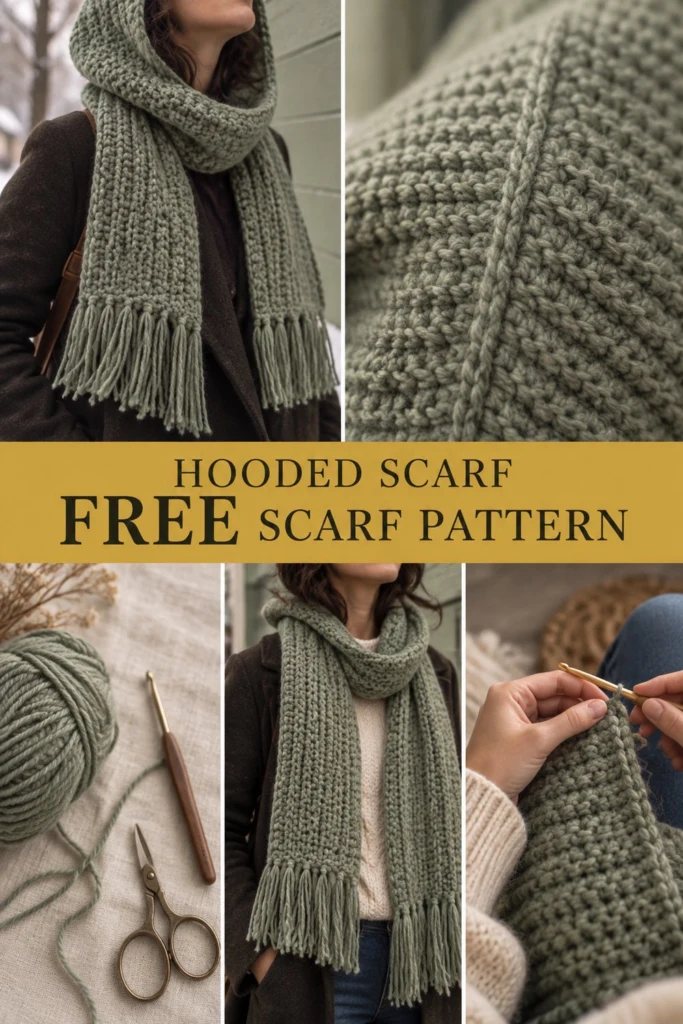
When the biting winter winds start sweeping through the streets, there is nothing quite like pulling up a warm, hand-crocheted hood that keeps both your neck and head completely sheltered. This cozy accessory is worked as a single long rectangle, folded precisely, and joined with a simple back seam to create a beautifully draped hood with long scarf ends and stylish fringe.
Slouchy Hooded Crochet Scarf Free Winter Pattern
Quick Facts
- Skill level: Easy Beginner
- Finished size: Scarf length: 68 inches (173 cm) excluding fringe; Width: 10 inches (25.5 cm); Hood depth: 14 inches (35.5 cm) when folded
- Yarn: Bulky weight (No. 5) wool-blend yarn, Sage Green, approx. 850 yards (777 meters)
- Hook: 6.5 mm (US K/10.5) crochet hook
- Stitches used: Ch, sl st, hdc
- Time to make: 2 weekends
Size tips and customization options are included further down the page.
What Makes This Scarf Special
The magic of this crochet hooded scarf lies in its ingenious construction. Instead of shaping complex curves for the neck and shoulders, you crochet one long rectangular panel using textured half double crochet stitches worked into the third loop, creating a knitted-rib effect without the need for knitting needles. Folding the rectangle and stitching a short vertical seam at the crown instantly transforms a simple scarf into a functional hood that frames the face with effortless slouch.
Skill Level
- Basic understanding of foundation chains and turning
- Familiarity with half double crochet stitches
- Ability to work into the third loop of hdc for texture
- Willingness to add simple fringe
- Reassurance: If you can work a straight row of half double crochet, you have all the skills needed to complete this project.
Finished Measurements
| Dimension | Inches | Centimeters |
|---|---|---|
| Total Scarf Length (with fringe) | 78 | 198 |
| Scarf Width | 10 | 25.5 |
| Hood Depth (from crown seam) | 14 | 35.5 |
| Hood Height | 16 | 40.5 |
Materials You Will Need
| Item | Description | Qty / Amount |
|---|---|---|
| Yarn | Bulky (5) wool-blend yarn, Sage Green | 850 yards (777 meters) |
| Crochet Hook | 6.5 mm (US K/10.5) | 1 hook |
| Notions | Tapestry needle for weaving ends and seaming | 1 needle |
| Notions | Scissors | 1 pair |
| Notions | Measuring tape | 1 tape |
| Notions | Locking stitch markers | 2 markers |
Yarn Suggestions
| Yarn Line | Weight | Skein Yardage | Notes |
|---|---|---|---|
| Lion Brand Hue + Me | Bulky (5) | 137 yards (125 meters) | Excellent stitch definition and gorgeous sage palette |
| Knit Picks Brava Bulky | Bulky (5) | 136 yards (124 meters) | Machine washable, durable, and budget-friendly |
| Cascade Yarns Pacific Bulky | Bulky (5) | 120 yards (110 meters) | Soft acrylic-wool blend with wonderful warmth |
⚠️ Note: Avoid novelty yarns with eyelash textures or heavy fuzz, as they obscure the third-loop stitch definition and make it difficult to count your rows.
Gauge
- 11 sts x 9 rows = 4 inches (10 cm) in half double crochet worked in the third loop.
- Tip: Take time to check your gauge before starting. Adjust your hook size up if your work is too tight, or down if it is too loose.
Abbreviations
- ch: chain
- hdc: half double crochet
- blo: back loop only
- flo: front loop only
- 3rd loop: the horizontal loop sitting behind the top V of the hdc stitch facing away from you
- st(s): stitch(es)
- sl st: slip stitch
- rep: repeat
- sk: skip
- trow: turning row
UK terms translation: sc = dc, hdc = htr, dc = tr.
Special Stitches Explained
- Half Double Crochet in the Third Loop (hdc-3rd): When you look at the top of a half double crochet row from the front, you see the front and back loops. Tilted slightly downward on the back of the work is a third horizontal loop. Working your hdc into this third loop pushes the top V forward, creating a raised ribbed texture that mimics knit fabric.
Pattern Instructions
Pattern Notes
- The turning chain 2 at the beginning of rows does not count as a stitch unless specified. Always place your first hdc in the very first stitch of the row.
- Mark the center point of your long panel with a stitch marker to make the final folding step foolproof.
Section 1: The Scarf Panel (Sage Green, make 1)
Ch 29.
Row 1: Working in the back bumps of the foundation chain, hdc in the 3rd ch from hook and in each ch across, turn. (27 hdc)
Row 2: Ch 2, working in the 3rd loop (the loop pushed to the back of the work just below the top loops), hdc in each st across, turn. (27 hdc)
Rows 3 to 154: Rep Row 2 until your panel measures approximately 68 inches (173 cm) in length. Fasten off, leaving a long tail of about 24 inches (61 cm) for seaming.
✅ Checkpoint: Measure your completed panel. It should be roughly 10 inches wide by 68 inches long, with consistent vertical ribbing running lengthwise.
Section 2: Assembly and Hood Formation
- Lay your long scarf panel flat on a clean surface.
- Fold the scarf in half matching the two short ends together to find the exact center fold point. Place a locking stitch marker at the center fold.
- Measure outward from the center fold point along the top fold line by 7 inches (18 cm) in both directions and place markers. This creates a 14-inch (35.5 cm) opening for your head/face.
- Using the long tail left from your panel, fold the rectangle so the right sides face inward (if working with a designated right side, though this stitch is reversible). Sew a straight vertical seam starting from the back fold point downward for about 11 to 12 inches (28 to 30 cm) along the back of the head.
- Securely knot and weave in all loose ends. Turn the hood right-side out.
Section 3: Fringe (Sage Green)
- Cut 50 strands of yarn, each measuring 14 inches (35.5 cm) long.
- Group the strands into sets of 5.
- Attach 5 fringes evenly spaced across each of the two short bottom ends of the scarf (10 fringe bundles total). Fold each bundle in half, insert your crochet hook through the edge stitch, pull the folded loop through, and draw the loose ends through the loop to secure. Trim ends evenly to 6 inches (15 cm).
💡 Designer Tip: Use a sharp pair of crafting scissors and a piece of cardboard cut to 7 inches as a template to wrap and cut your fringe quickly and evenly.
Size Customization Tips
- To make the scarf longer: Add repeat rows in increments of 2 rows, keeping in mind that each additional 2 rows adds roughly 0.8 inches (2 cm) to the total length.
- To make the hood deeper: Before seaming the crown, add extra rows to the initial panel length. Each 4 rows adds about 1.6 inches (4 cm) to the hood depth.
Care Instructions
- Hand wash gently in cool water using mild wool detergent.
- Do not bleach or wring out aggressively.
- Roll in a clean towel to press out excess moisture, then lay flat on a flat surface away from direct heat to dry completely. Do not hang to dry, as the weight of the wool will stretch out the scarf length.
FAQ
Can I use a different yarn weight for this pattern?
Yes, you can substitute a worsted weight (No. 4) yarn, but keep in mind your gauge will be smaller, resulting in a narrower scarf and shorter hood. You will need to increase your starting chain count and work more rows to reach the same dimensions.
How do I prevent the edges of my scarf from curling?
The half double crochet in the third loop naturally creates a balanced, stable fabric that resists heavy curling. However, working an even tension and blocking your finished piece will ensure crisp, straight edges.
Is this pattern suitable for complete beginners?
Absolutely! While it involves working into the third loop for texture, practicing on a small swatch for a few rows will quickly build your confidence before diving into the main panel.
Happy Crocheting!
I hope you love making and wearing your new slouchy hooded scarf as much as I loved designing it for you. Be sure to save this pin on Pinterest to your winter crochet boards, and leave a comment below letting me know what shade of yarn you chose for yours!
📄 Your free PDF pattern
⏳ Preparing your free PDF… 30s
Like this one? Save it for later.