Plump Turkey Gnome Crochet Shelf Sitter Free Thanksgiving Pattern
Reader Favorites











Easy Ripple Crochet Stitch Tutorial Free Crochet Pattern

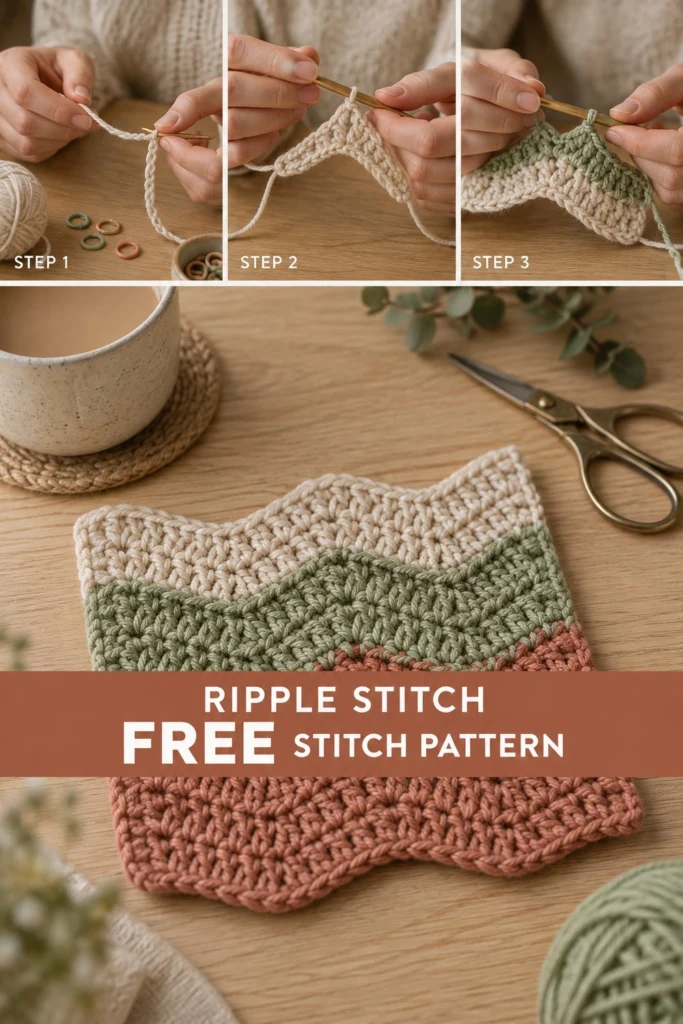
If your ripple rows keep leaning to one side, this short lesson sorts it out. You practise the peaks and valleys on a small swatch in three stripes, marking every increase and decrease so the count stays honest across the row. Once the rhythm clicks, the same repeat scales up to any afghan or scarf.
Easy Ripple Crochet Stitch Tutorial Free Crochet Pattern
Quick Facts
- Skill level: Intermediate beginner
- Finished size: Approximately 8 inches (20 cm) square swatch
- Yarn: Worsted weight yarn in three colors (Cream, Sage Green, and Terracotta)
- Hook: 5.0 mm (US H/8) crochet hook
- Stitches used: Ch, sc, dc, ripple increase, ripple decrease
- Time to make: 2 to 3 hours
Size tips and customization guidelines are included further down in this guide.
What Makes This Ripple Stitch Swatch Special
Mastering the ripple stitch—often called chevron crochet—comes down to understanding where your peaks and valleys live. In this pattern, every valley dips down by skipping stitches and working decreases, while every peak builds up by working multiple stitches into a single space. The photo shows a clean three-color block featuring Cream, Sage Green, and Terracotta, which helps you track how the wave pattern shifts row by row.
Skill Level
- Basic crochet foundation chains
- Single crochet and double crochet stitches
- Working multiple stitches into one stitch (increases)
- Working decreases across multiple stitches
- Changing yarn colors cleanly at the end of a row
Don’t worry if your first row feels tricky—counting your stitches carefully will keep your waves sharp and even.
Finished Measurements
| Dimension | Inches | Centimeters |
|---|---|---|
| Width | 8 in | 20.3 cm |
| Height | 8 in | 20.3 cm |
Materials You Will Need
| Color Name | Yarn Weight | Fiber | Yards | Meters |
|---|---|---|---|---|
| Cream | Worsted (4) | 100% Acrylic | 35 yds | 32 m |
| Sage Green | Worsted (4) | 100% Acrylic | 35 yds | 32 m |
| Terracotta | Worsted (4) | 100% Acrylic | 35 yds | 32 m |
- Crochet Hook: 5.0 mm (US H/8)
- Notions: Yarn needle for weaving ends, scissors, stitch markers (optional to mark peaks and valleys)
Yarn Suggestions
| Yarn Line | Weight | Skein Yardage | Notes |
|---|---|---|---|
| Lion Brand Basic Stitch Anti-Pilling | Worsted (4) | 185 yds / 170 m | Excellent stitch definition for ripples |
| Caron Simply Soft | Worsted (4) | 315 yds / 288 m | Beautiful drape and sheen |
| Red Heart Super Saver | Worsted (4) | 364 yds / 333 m | Budget-friendly and holds shape well |
⚠️ Note: Avoid novelty yarns with a heavy halo or eyelash texture for your first ripple project, as they obscure stitch definition and make it difficult to locate your peak and valley increases and decreases.
Gauge
- 16 sts x 9 rows = 4 in / 10 cm in ripple pattern using a 5.0 mm hook.
Abbreviations
| Abbreviation | Meaning |
|---|---|
| ch | chain |
| sc | single crochet |
| dc | double crochet |
| st(s) | stitch(es) |
| sk | skip |
| sp | space |
| rep | repeat |
| alt | alternate |
| RS | right side |
| WS | wrong side |
| PM | place marker |
UK: sc = dc, hdc = htr, dc = tr.
Special Stitches Explained
- Ripple Increase (3-dc shell): Work 3 double crochet stitches into the designated stitch or chain space to build a peak.
- Ripple Decrease (dc3tog): Yarn over, insert hook in indicated st, yarn over and pull up loop, yarn over and draw through 2 loops (2 loops on hook). [Yarn over, insert hook in next st, yarn over and pull up loop, yarn over and draw through 2 loops] 2 times (4 loops on hook), yarn over and draw through all 4 loops on hook. This forms a valley by compressing three stitches into one.
Pattern Instructions
Section 1: Swatch Construction
Pattern Notes:
– The foundation chain is worked in multiples of 14 plus 3 for the turning chain.
– Color changes occur every 6 rows: Rows 1 to 6 are worked in Terracotta, Rows 7 to 12 in Sage Green, and Rows 13 to 18 in Cream.
– Turning chain 3 counts as the first double crochet of the row.
Row 1 (Terracotta – RS): Ch 31. Working in the 4th ch from hook (the 3 skipped chs count as first dc), work 1 dc in same ch, *dc in next 4 ch, sk next 2 ch, dc in next 4 ch, (3 dc, ch 1, 3 dc) in next ch for peak* rep from * across until 11 ch remain; dc in next 4 ch, sk next 2 ch, dc in next 4 ch, work 2 dc in last ch, turn *(29 dc, 1 ch-sp)*.
Row 2 (Terracotta – WS): Ch 3 (counts as dc here and throughout), 1 dc in first st, *dc in next 4 sts, sk next 2 sts (valley), dc in next 4 sts, (2 dc, ch 1, 2 dc) in next ch-1 sp* rep from * across, working last 2 dc in top of turning ch, turn *(29 dc, 1 ch-sp)*.
Rows 3 to 6: Rep Row 2. Fasten off Terracotta at the end of Row 6.
✅ Checkpoint: At the end of Row 6, your Terracotta section should display two distinct valleys and one central peak, maintaining a steady stitch count of 29 double crochets and 1 chain space per row.
Row 7 (Sage Green – RS): Join Sage Green with a sl st in first st, ch 3, 1 dc in first st, *dc in next 4 sts, sk next 2 sts, dc in next 4 sts, (2 dc, ch 1, 2 dc) in next ch-1 sp* rep from * across, working last 2 dc in top of turning ch, turn *(29 dc, 1 ch-sp)*.
Rows 8 to 12: Rep Row 7. Fasten off Sage Green at the end of Row 12.
Row 13 (Cream – RS): Join Cream with a sl st in first st, ch 3, 1 dc in first st, *dc in next 4 sts, sk next 2 sts, dc in next 4 sts, (2 dc, ch 1, 2 dc) in next ch-1 sp* rep from * across, working last 2 dc in top of turning ch, turn *(29 dc, 1 ch-sp)*.
Rows 14 to 18: Rep Row 13. Fasten off Cream at the end of Row 18.
Assembly
- This swatch is worked as a single solid piece; no assembly is required.
Finishing
- Weave in all loose yarn tails securely along the wrong side of the color change boundaries using your yarn needle.
- Block the swatch lightly with steam or by pinning it to measurements on a blocking mat to ensure the ripples lie flat and uniform.
Size Customization Tips
To scale this stitch pattern up into a full blanket, scarf, or table runner, adjust your foundation chain using multiples of 14, then add 3 stitches for the turning chain setup. Each complete 14-stitch repeat adds approximately 3.5 inches (9 cm) of width to your project when using worsted weight yarn and a 5.0 mm hook.
Care Instructions
- Machine wash gentle in cool water with mild detergent.
- Lay flat to dry out of direct sunlight.
- Do not iron directly on acrylic yarn; use a low-heat steam setting if necessary.
FAQ
Why are my ripple edges slanting sideways instead of staying straight?
This usually happens when you miss an increase at a peak or fail to skip the correct stitches at a valley. Always count your stitches between peaks and valleys to ensure your counts balance out.
Can I use cotton yarn instead of acrylic for this stitch?
Yes! Cotton yarn creates a crisper, more defined ripple with less stretch, making it ideal for dishcloths, placemats, or summer throws.
How do I change colors smoothly without lumps?
Work the final pull-through of the last stitch of the old color using the new color, then secure both tails on the wrong side before turning your work.
Happy Crocheting!
I hope this ripple stitch tutorial helps you conquer chevron crochet with confidence. Be sure to save this pin on Pinterest to your crochet boards, and leave a comment below letting me know what colors you chose for your swatch!
📄 Your free PDF pattern
⏳ Preparing your free PDF… 30s
Like this one? Save it for later.