Plump Turkey Gnome Crochet Shelf Sitter Free Thanksgiving Pattern
Reader Favorites









Friendsgiving Crochet Pie Carrier Basket Free Thanksgiving Pattern

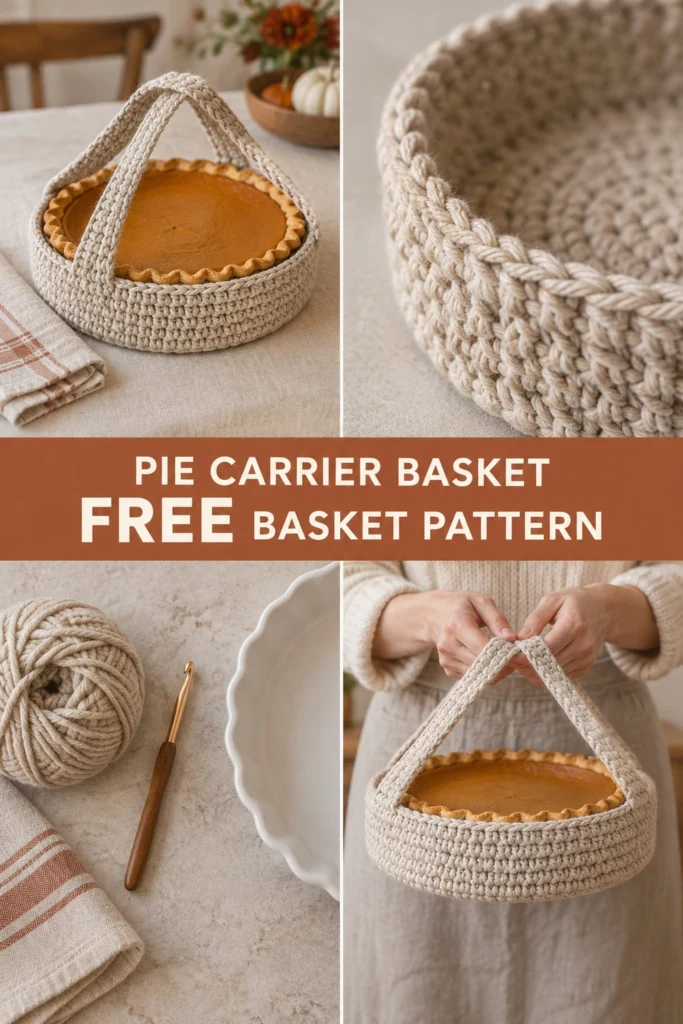
Arrive at your Friendsgiving table with the star of the dessert course sitting perfectly level and secure. This charming low round carrier basket holds a standard 9-inch pie dish, featuring a sturdy flat base and a single back-loop round that creates a crisp, vertical sidewall. Two robust handles arch across the top for effortless one-handed carrying, leaving your other hand free for a bottle of wine or a casserole dish.
Friendsgiving Crochet Pie Carrier Basket Free Thanksgiving Pattern
Quick Facts
- Skill level: Intermediate
- Finished size: 9.5 inches (24 cm) in diameter, 2.5 inches (6.5 cm) high (excluding handles)
- Yarn: Chunky weight cotton or jute-blend cord (approx. 220 yards / 200 meters)
- Hook: 6.5 mm (US K/10.5) crochet hook
- Stitches used: Ch, sl st, sc, esc (extended single crochet), BLO (back loop only)
- Time to make: 3 to 4 hours
Size tips and gauge adjustments are included further down to fit various pie dish dimensions.
What Makes This Crochet Pie Carrier Special
The structure of this basket relies entirely on clever crochet engineering rather than hidden plastic inserts or wire frames. Working the base in tight single crochet rounds creates a dense, supportive floor for heavy glass or ceramic pie plates. A single round worked in the back loops only forces a sharp 90-degree turn, pushing the sidewalls straight up to hug your dish securely. The heavy-duty handles are worked directly into the top edge and reinforced with multiple passes, ensuring they never stretch or snap while you walk.
Skill Level
- Working in the round (spiral and joined)
- Reading basic crochet stitch counts
- Working in the back loops only (BLO)
- Seaming and reinforcing handle ends
Don’t worry if you haven’t made a basket before—every step is explained clearly with exact stitch counts.
Finished Measurements
| Dimension | Inches | Centimeters |
|---|---|---|
| Base Diameter | 9.0 in | 23.0 cm |
| Total Diameter | 9.5 in | 24.0 cm |
| Basket Height | 2.5 in | 6.5 cm |
| Handle Drop | 6.0 in | 15.0 cm |
Materials You Will Need
| Material | Description | Amount |
|---|---|---|
| Natural Beige Yarn | Chunky weight cotton cord or t-shirt yarn | 220 yards / 200 meters |
| Crochet Hook | 6.5 mm (US K/10.5) | 1 hook |
| Notions | Stitch markers (2), Tapestry needle for weaving ends | As needed |
Yarn Suggestions
| Yarn Line | Skein Yardage | Notes |
|---|---|---|
| Lion Brand Hometown USA (Natural) | 81 yards / 74 meters per skein | Use 3 skeins; holds shape well for structured baskets. |
| Bernat Maker Home Dec (Cream) | 317 yards / 290 meters per skein | Use 1 large spool; tubular construction prevents stretching. |
| Hoooked Ribbon XL (Ecru) | 130 yards / 120 meters per skein | Use 2 spools; 100% recycled cotton gives an authentic rustic look. |
⚠️ Note: Avoid stretchy acrylic or fuzzy wool yarns for this project. Wool and acrylic lack the rigid structure needed to keep a heavy pie dish level, and fuzzy yarns obscure your stitch definition. Stick to sturdy cotton, jute, or jersey cord blends.
Gauge
- 9 sc and 10 rows = 4 inches (10 cm) using a 6.5 mm hook in standard single crochet.
- Rnds 1 to 6 of the flat circle base measure 4.0 inches (10 cm) across.
Abbreviations
- ch: chain
- sl st: slip stitch
- sc: single crochet
- esc: extended single crochet
- BLO: back loop only
- inc: increase (2 sc in the same stitch)
- dec: decrease (sc 2 stitches together)
- st(s): stitch(es)
- rnd(s): round(s)
- rep: repeat
- sk: skip
- [ ]: work instructions within brackets as many times as directed
UK terms equivalent: sc = dc, hdc = htr, dc = tr, sl st = sl st.
Special Stitches Explained
- Magic Ring: Wrap working yarn around your index finger twice to create a ring, insert hook into the center, draw up a loop, ch 1, and work the first round of stitches into the center of the ring. Pull the tail to close.
- Extended Single Crochet (esc): Insert hook into stitch, yarn over, pull up a loop (2 loops on hook), yarn over, pull through 1 loop on hook (2 loops on hook), yarn over, pull through both loops on hook. This adds height to match the sturdy basket walls.
Pattern Instructions
Pattern Notes
- Work in continuous spirals for the base unless otherwise instructed. Use a stitch marker to keep track of the first stitch of each round.
- When working the sidewalls, switch to joined rounds to keep the rim level.
Section 1: Basket Base (Natural Beige, make 1)
- Rnd 1: Start 6 sc in a magic ring. Pull tail tight to close. (6 sc)
- Rnd 2: [Inc] around. (12 sc)
- Rnd 3: [1 sc, inc] around. (18 sc)
- Rnd 4: [2 sc, inc] around. (24 sc)
- Rnd 5: [3 sc, inc] around. (30 sc)
- Rnd 6: [4 sc, inc] around. (36 sc)
- Rnd 7: [5 sc, inc] around. (42 sc)
- Rnd 8: [6 sc, inc] around. (48 sc)
- Rnd 9: [7 sc, inc] around. (54 sc)
- Rnd 10: [8 sc, inc] around. (60 sc)
- Rnd 11: [9 sc, inc] around. (66 sc)
- Rnd 12: [10 sc, inc] around. (72 sc)
- Rnd 13: [11 sc, inc] around. (78 sc)
- Rnd 14: [12 sc, inc] around. (84 sc)
- Rnd 15: [13 sc, inc] around. (90 sc)
- Rnd 16: [14 sc, inc] around. (96 sc)
- Rnd 17: [15 sc, inc] around. (102 sc)
- Rnd 18: [16 sc, inc] around. (108 sc)
✅ Checkpoint: Your flat base should now measure exactly 9 inches across and lie completely flat on a table without curling.
Section 2: Sidewalls (Natural Beige, make 1)
- Rnd 19: Working in BLO only, sc in each st around. Join with a sl st to the first sc, ch 1. (108 sc)
- Rnds 20 to 23: Sc in each st around. Join with a sl st to the first sc, ch 1. (108 sc)
- Rnd 24: Sc in each st around. Do not join; continue straight into handle placement. (108 sc)
Section 3: Handles (Natural Beige, make 2)
- Row 1 (First Handle): Sc in next 10 sts, turn. (10 sc)
- Rows 2 to 26: Ch 1, esc in each st across, turn. (10 sc)
- Fasten off, leaving a 12-inch (30 cm) tail.
- Count 44 sts along the opposite rim from the base of the first handle. Attach yarn with a sl st and repeat Rows 1 to 26 for the second handle.
- Align the top of Handle 1 with the opposite rim (directly across from its base) and secure with whip stitches using the long tail. Repeat for Handle 2. Weave in all loose ends securely.
Assembly
- Place your empty 9-inch pie dish inside the basket base to verify the fit; the sidewalls should hug the outer rim snugly.
- Check handle alignment: bring both handle loops together in the center above the pie dish. Ensure the basket hangs level when lifted by both handles together.
Finishing
- Steam-block the basket lightly if the cotton cord feels stiff or misshapen from working.
- Trim all yarn tails to 1/2 inch and hide them inside the stitches of the sidewall.
Size Customization Tips
- To fit a larger 10-inch pie dish, continue the base increases for two more rounds ([17 sc, inc] around for 114 sts, then [18 sc, inc] around for 120 sts). Each extra 6-stitch increase round adds approximately 0.6 inches to the overall base diameter. Adjust the handle starting points proportionately, placing them directly opposite each other across the new diameter.
Care Instructions
Spot clean with a damp cloth and mild soap. If heavily soiled, hand wash in lukewarm water with gentle detergent, press out excess water in a clean towel, and reshape over a round bowl or inverted pie dish to dry completely. Do not machine wash or tumble dry.
FAQ
Can I use t-shirt yarn instead of cotton cord?
Yes! T-shirt yarn works wonderfully for this pattern and provides a wonderfully soft yet thick structure. Just ensure your yarn width remains consistent throughout the ball so your sidewalls stay even.
Will this basket stretch out over time when carrying a heavy pie?
Cotton and cord fibers have minimal stretch, but working the base in standard single crochet and the handles in extended single crochet creates a dense fabric that holds its shape. For extra security, you can slip a cardboard circle cut to 9 inches inside the bottom of the basket beneath your pie plate.
Is this safe to set directly on a hot pie dish?
The cotton cord is heat-resistant for normal cooling pies, but it is always best to let your freshly baked pie cool slightly on a wire rack before placing it into the carrier basket to protect both the fibers and your tabletop.
Happy Crocheting!
I hope you love making and gifting your new Friendsgiving Pie Carrier Basket. Be sure to save this pin on Pinterest and leave a comment below sharing what color cord you chose for your Thanksgiving table!
📄 Your free PDF pattern
⏳ Preparing your free PDF… 30s
Like this one? Save it for later.