Plump Turkey Gnome Crochet Shelf Sitter Free Thanksgiving Pattern
Reader Favorites











Slouchy Pleated Crochet Hobo Bag Free Crochet Pattern

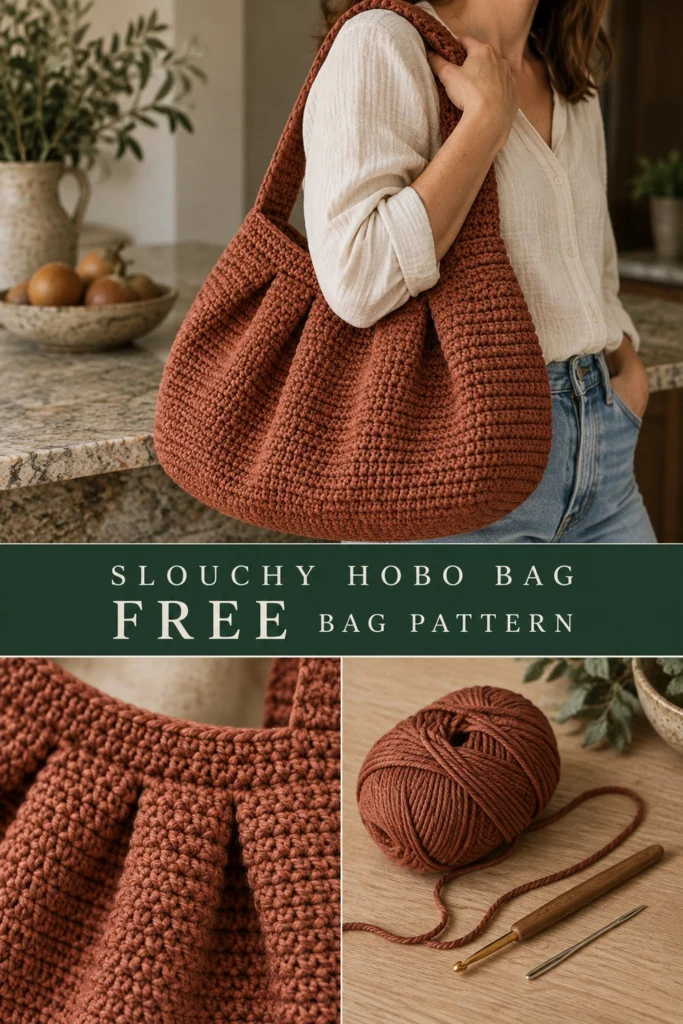
The slouchy pleated hobo bag is the ultimate everyday accessory, combining a relaxed, effortless shape with the structure of a firm single-crochet fabric. Designed to tuck comfortably under your arm or hang softly against your hip, this bag carries everything you need while maintaining its gorgeous drape. In rich terracotta, it brings warmth and earthy charm to any outfit.
Slouchy Pleated Crochet Hobo Bag Free Crochet Pattern
Quick Facts
- Skill level: Confident Beginner
- Finished size: 15 inches wide by 11 inches deep (excluding strap)
- Yarn: Worsted-weight cotton or cotton-blend yarn (approx. 550 yards / 503 meters)
- Hook: US H/8 (5.0 mm) crochet hook
- Stitches used: Chain (ch), single crochet (sc), slip stitch (sl st), back loop only (BLO)
- Time to make: 8 to 12 hours
Size customization tips and adjustments are included further down the page.
What Makes This Slouchy Crochet Bag Special
The secret to this bag’s gorgeous silhouette is its clever construction: rather than relying on complex shaping, the slouch comes from four simple, hand-sewn pleats gathered neatly into a narrow top band. The base is worked as a flat, sturdy oval in firm single crochet to prevent sagging, and a single round in the back loop only creates a sharp, clean transition where the sides turn up. A wide, reinforced shoulder strap distributes weight comfortably for all-day wear.
Skill Level
- Working in flat oval rounds and straight rows
- Basic single crochet stitches and back-loop-only techniques
- Gathering and sewing pleats securely
- Attaching a strap and optional fabric lining
Don’t worry if you are new to shaping bags—each step is explained clearly below with checkpoints to keep you on track.
Finished Measurements
| Dimension | Inches | Centimeters |
|---|---|---|
| Width (at widest point) | 15.0 in | 38.0 cm |
| Depth / Height (excl. strap) | 11.0 in | 28.0 cm |
| Base Width | 10.0 in | 25.5 cm |
| Base Depth | 4.0 in | 10.0 cm |
| Strap Length | 24.0 in | 61.0 cm |
Materials You Will Need
| Material / Item | Specification | Quantity |
|---|---|---|
| Terracotta Yarn | Worsted weight (4), cotton/acrylic blend | 550 yds / 503 m |
| Crochet Hook | US H/8 (5.0 mm) | 1 hook |
| Stitch Markers | Locking stitch markers | 4 markers |
| Tapestry Needle | Large eye for weaving ends and sewing | 1 needle |
| Optional Lining Fabric | Cotton canvas or matching cotton fabric | 0.5 yard |
| Sewing Thread & Needle | Matching terracotta color | 1 spool / needle |
Yarn Suggestions
| Yarn Line | Skein Yardage | Notes |
|---|---|---|
| Lion Brand 24/7 Cotton | 186 yds / 170 m per skein (3.5 oz) | Excellent stitch definition, firm structure |
| Lily Sugar’n Cream | 120 yds / 109 m per skein (2.5 oz) | Classic 100% cotton, highly durable |
| Dishie by WeCrochet | 190 yds / 174 m per skein (3.5 oz) | Soft matte finish, great drape |
⚠️ Note: Avoid novelty yarns, fuzzy alpaca, or ultra-stretchy acrylics for this project. The bag needs a firm, stable yarn like cotton or a cotton blend to hold its pleated slouch without stretching out of shape under a heavy load.
Gauge
- Stitch Gauge: 16 sc x 18 rows = 4 in / 10 cm using US H/8 (5.0 mm) hook in single crochet.
- Base Gauge: Rnds 1 to 4 of the flat oval base measure approximately 5 inches long by 2.5 inches wide.
Abbreviations
- ch: chain
- sc: single crochet
- sl st: slip stitch
- BLO: back loop only
- inc: increase (work 2 sc in the same st)
- dec: decrease (work 2 sc together as 1 st)
- st(s): stitch(es)
- Rnd(s): round(s)
- Row(s): row(s)
- sk: skip
- rep: repeat
- [ ]: work instructions within brackets as directed
UK terms equivalent: sc = dc, hdc = htr, dc = tr.
Special Stitches Explained
- Oval Foundation Base: Started with a foundation chain, working around both sides of the chain to create an oval shape before spiraling outward with increases at each end.
- BLO Turn Round: Working in the back loop only for a single round creates a crisp, architectural ridge that naturally transitions the flat horizontal base into vertical side walls.
- Pleat Gathering: Folding the upper edge of the bag into four overlapping pleats before securing them into a narrow finishing band.
Pattern Instructions
Pattern Notes:
– The bag body is worked in continuous spiral rounds without joining unless specified. Use a stitch marker to track the first stitch of each round.
– The strap and top band are worked in turned rows.
Section 1: Base (Terracotta, make 1)
Ch 32.
Rnd 1: 2 sc in 2nd ch from hook, sc in next 29 ch, 4 sc in last ch. Working along the opposite side of the foundation chain, sc in next 29 ch, 2 sc in last ch. Do not join; work in spiral. (66 sc)
Rnd 2: [Inc] twice, sc in next 29 ch, [inc] 4 times, sc in next 29 ch, [inc] twice. (74 sc)
Rnd 3: [Sc in next st, inc] twice, sc in next 29 ch, [sc in next st, inc] 4 times, sc in next 29 ch, [sc in next st, inc] twice. (82 sc)
Rnd 4: [Sc in next 2 sts, inc] twice, sc in next 29 ch, [sc in next 2 sts, inc] 4 times, sc in next 29 ch, [sc in next 2 sts, inc] twice. (90 sc)
✅ Checkpoint: Your flat oval base should now measure approximately 10 inches long by 4 inches wide and lie completely flat.
Section 2: Body Sides (Terracotta, make 1)
Rnd 5: Working in BLO only for this round, sc in each st around. (90 sc)
Rnds 6 to 35: Sc in each st around. (90 sc per rnd)
At the end of Rnd 35, sl st into the next st to smooth the edge. Fasten off, leaving a 12-inch tail.
Section 3: Strap (Terracotta, make 1)
Ch 11.
Row 1: Sc in 2nd ch from hook and in each ch across, turn. (10 sc)
Rows 2 to 96: Ch 1, sc in each st across, turn. (10 sc per row)
Fasten off, leaving a long 24-inch tail for sewing the strap to the bag sides.
Section 4: Top Band (Terracotta, make 1)
The top band gathers the upper edge and neatens the opening.
Ch 9.
Row 1: Sc in 2nd ch from hook and in each ch across, turn. (8 sc)
Rows 2 to 64: Ch 1, sc in each st across, turn. (8 sc per row)
Fasten off, leaving a 12-inch tail.
Assembly
- Lay the bag body flat. Measure and place stitch markers on the front and back panels to indicate where you want the four deep pleats (two on the front, two on the back, evenly spaced about 3 inches apart).
- Fold each pleat inward by about 1.5 inches to create a rich, gathered slouch. Pin securely through all layers.
- Wrap the Top Band around the pleated upper opening of the bag, sandwiching the raw edges inside. Whipstitch the short ends of the band together, then sew the band firmly to the bag body while catching the pleats in your stitches.
- Align each end of the Strap securely to opposite sides of the bag (just below the top band), reinforcing with a sturdy box-stitch using the long yarn tail.
- (Optional) Cut your cotton lining fabric to match the interior dimensions of the bag, sew the side seams on a sewing machine, slip it inside the crochet bag, and hand-stitch the upper edge neatly just below the top band.
Finishing
Weave in all remaining loose ends securely using your tapestry needle. Gently steam or block the base if needed to crisp up the edges.
Size Customization Tips
- Making it wider: Add chains in multiples of 2 to your starting foundation chain, keeping the end increases symmetrical.
- Making it deeper: Work additional straight sc rounds in Section 2 before fastening off (each additional 5 rounds adds roughly 1 inch of height).
Care Instructions
Hand wash gently in cool water with mild wool-and-cotton detergent. Do not wring or twist. Lay flat on a clean towel, reshape to original dimensions, and allow to dry completely away from direct sunlight.
FAQ
Can I use acrylic yarn instead of cotton?
While you can use acrylic, it has much more stretch than cotton. Your bag may slouch more and stretch out of shape faster when loaded with heavy items. Cotton or a cotton-blend yarn is strongly recommended.
How do I stop the bottom from sagging?
Working a firm base in single crochet and adding an optional fabric lining inside the finished bag provides incredible structural support, keeping the base flat and preventing heavy items from pulling the bottom down.
Can I make the strap longer or shorter?
Absolutely! Simply adjust the number of rows in Section 3 to suit your preferred shoulder or crossbody length before attaching the strap to the bag body.
Happy Crocheting!
I hope you love making and wearing your new slouchy hobo bag. Be sure to save this pin on Pinterest to share with fellow makers, and leave a comment below letting me know what color you chose for yours!
📄 Your free PDF pattern
⏳ Preparing your free PDF… 30s
Like this one? Save it for later.