Plump Turkey Gnome Crochet Shelf Sitter Free Thanksgiving Pattern
Reader Favorites











Cream Lace Crochet Christmas Angel Free Christmas Pattern

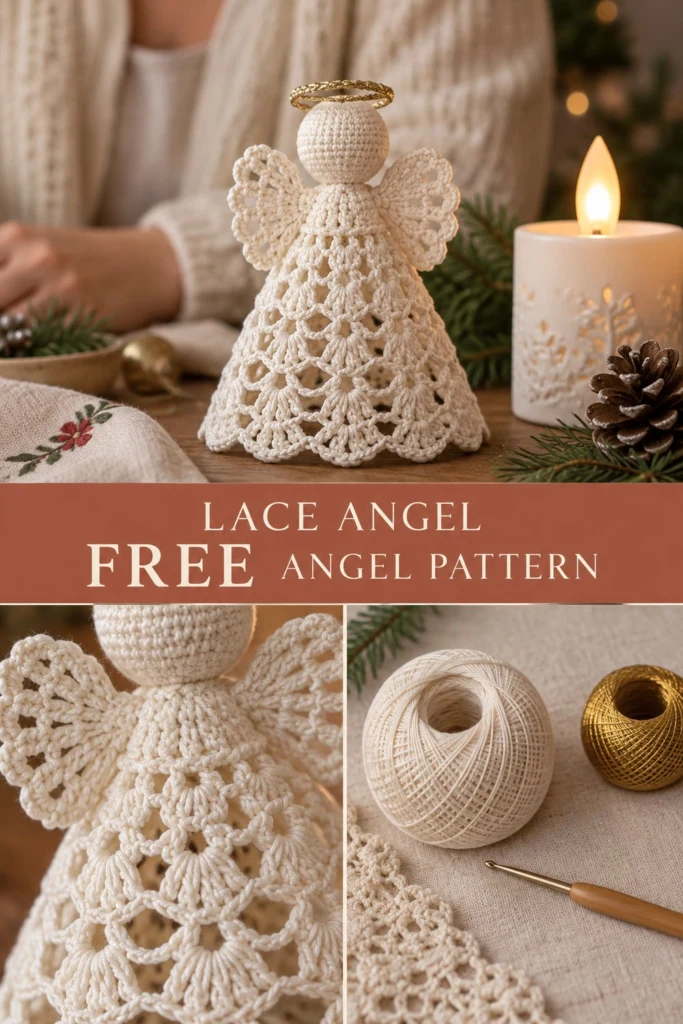
Some decorations feel like they should have come from your grandmother’s cupboard, and this angel is one of those. The skirt is a bell of lace worked in joined rounds, the wings are two small shells and the halo is a single loop of gold thread. A light stiffening lets her stand on a shelf or sit on a branch, bringing a classic, heirloom touch to your holiday home.
Cream Lace Crochet Christmas Angel Free Christmas Pattern
Quick Facts
- Skill level: Intermediate
- Finished size: 6 inches (15 cm) tall, 4.5 inches (11.5 cm) skirt diameter at base
- Yarn: Size 10 crochet cotton thread in Cream (approx. 80 yards), metallic gold crochet thread (approx. 5 yards)
- Hook: 1.5 mm steel crochet hook (US steel hook size 7)
- Stitches used: ch, sl st, sc, dc, 5-dc shell, tr
- Time to make: 4 to 6 hours
Size tips and customization options are included further down the page.
What Makes This Crochet Christmas Angel Special
Working with cotton thread creates crisp, delicate stitch definition that standard yarn simply cannot match. The skirt is built on a bell-shaped foundation using stacked chain spaces and shell fans that gradually expand to create a stable, freestanding cone. Two identical delicate fan motifs form the wings, while a simple wrapped gold thread loop forms the halo.
Skill Level
- Working in joined rounds with slip stitches
- Following chain-space lace stitch charts or written instructions
- Basic shaping and joining of small crochet components
- Stiffening thread projects with fabric stiffener or sugar water
Don’t worry if thread crochet is new to you—take it slow, use good lighting, and you will see your angel take shape stitch by stitch.
Finished Measurements
| Measurement | Inches | Centimeters |
|---|---|---|
| Total Height | 6.0 in | 15.0 cm |
| Skirt Base Diameter | 4.5 in | 11.5 cm |
| Wingspan | 4.0 in | 10.0 cm |
| Head Diameter | 1.2 in | 3.0 cm |
Materials You Will Need
| Material | Color | Type / Weight | Quantity |
|---|---|---|---|
| Main Yarn | Cream | Size 10 Crochet Cotton Thread | 80 yards (73 meters) |
| Accent Yarn | Gold | Metallic Thread / Cord | 5 yards (4.5 meters) |
| Crochet Hook | N/A | 1.5 mm Steel Hook (US 7) | 1 hook |
| Stuffing | White | Polyfill Fiber Stuffing | Small handful |
| Notions | N/A | Yarn needle, scissors, stitch markers, fabric stiffener, small funnel or cone form | 1 set |
Yarn Suggestions
| Brand | Line | Skein Yardage | Notes |
|---|---|---|---|
| DMC | Cebelia Crochet Cotton Art. 165 | 284 yards / 50g | Gives superior stiffness and stitch definition. |
| Aunt Lydia’s | Classic Crochet Thread Size 10 | 350 yards / 300g | Widely available, excellent color consistency. |
| Hobbii | Rainbow Cotton 8/4 | N/A | Heavier alternative; will result in a larger angel. |
⚠️ Note: Avoid stretchy acrylic yarns or fuzzy mohair blends for this project. The delicate lace pattern requires a smooth, non-stretch cotton thread to hold its shape when stiffened.
Gauge
- Lace Skirt: Rnds 1 to 5 measure approximately 2.0 inches (5 cm) across.
- Head: Rnds 1 to 6 of amigurumi sphere measure 1.2 inches (3 cm) across.
- Exact gauge is not critical for this decoration, but matching tension ensures proper proportions.
Abbreviations (US Terms)
- beg: beginning
- ch: chain
- dc: double crochet
- dec: decrease (sc2tog)
- inc: increase (2 sc in same stitch)
- rep: repeat
- rnd(s): round(s)
- sc: single crochet
- sk: skip
- sl st: slip stitch
- st(s): stitch(es)
- tr: treble crochet
- yo: yarn over
UK conversion note: sc = dc, hdc = htr, dc = tr.
Special Stitches Explained
- Magic Ring: Wrap yarn around your fingers to create a loop, insert hook into loop, pull up a working loop and ch 1 to secure.
- Invisible Decrease (inv-dec): Insert hook into front loop only of next two stitches, yo, draw through both front loops, yo and draw through 2 loops on hook.
- 5-dc Shell: Work 5 dc stitches into the same specified chain space or stitch.
- Picot: Ch 3, sl st in the 3rd ch from the hook.
Pattern Instructions
Section 1: Head (Cream, make 1)
Worked in continuous spiral rounds. Stuff firmly before closing.
- Rnd 1: 6 sc in magic ring (6 sc)
- Rnd 2: Inc in each st around (12 sc)
- Rnd 3: (1 sc, inc) x 6 (18 sc)
- Rnd 4: (2 sc, inc) x 6 (24 sc)
- Rnds 5 to 9: Sc in each st around (24 sc)
- Rnd 10: (2 sc, dec) x 6 (18 sc)
- Rnd 11: (1 sc, dec) x 6 (12 sc). Stuff head firmly with polyfill.
- Rnd 12: Dec x 6 (6 sc). Fasten off, leaving a 10-inch tail. Weave tail through final 6 stitches and pull tightly to close.
Section 2: Body and Skirt (Cream, make 1)
The body begins at the neckline, flares out into the lace skirt bell, and is worked in joined rounds. Join each round with a sl st to the first st unless otherwise noted.
- Rnd 1: Ch 24, join with sl st to form a ring, ch 1, sc in same ch and in each ch around, join (24 sc)
- Rnd 2: Ch 3 (counts as first dc here and throughout), 1 dc in same st, sk 1 st, *(2 dc, ch 2, 2 dc) in next st, sk 1 st; rep from * around, join with sl st to top of beg ch-3 *(6 shell groups)*
- Rnd 3: Sl st into the first ch-2 space, ch 3, (1 dc, ch 2, 2 dc) in same ch-2 space, *ch 3, (2 dc, ch 2, 2 dc) in next ch-2 space; rep from * around, ch 3, join *(6 shell groups, 6 ch-3 spaces)*
- Rnd 4: Sl st into the first ch-2 space, ch 3, (1 dc, ch 2, 2 dc) in same ch-2 space, *ch 3, sc in next ch-3 space, ch 3, (2 dc, ch 2, 2 dc) in next ch-2 space; rep from * around, ch 3, sc in last ch-3 space, ch 3, join *(6 shell groups)*
- Rnds 5 to 12: Continue expanding the lace pattern by working (2 dc, ch 2, 2 dc) in each shell ch-2 space, and increasing the chain spaces between shells by 1 ch each couple of rounds (ch 4 in Rnds 7–9, ch 5 in Rnds 10–12) to flare the bell skirt outward. End after Rnd 12. Fasten off and weave in ends (6 expanded shell groups).
✅ Checkpoint: At the end of Rnd 12, the skirt should form a stable, flared bell shape measuring about 4.5 inches across the base.
Section 3: Wings (Cream, make 2)
Worked in rows, then edged.
- Row 1: Ch 10, sc in 2nd ch from hook and across (9 sc), turn.
- Row 2: Ch 3 (counts as dc), dc in next st, *(ch 2, sk 1 st, 2 dc in next st); rep from * across, turn.
- Row 3: Sl st across to the first ch-2 space, work a 5-dc shell in each ch-2 space across the row, ending with a sl st in the final dc. Fasten off, leaving a 6-inch tail for assembly.
Section 4: Halo (Gold, make 1)
- Row 1: Using metallic gold thread, wrap thread around a pencil or small marker 3 times to form a ring, remove and secure with 15 sc tightly worked around the ring loop. Join with sl st to first sc. Fasten off, leaving a 4-inch tail to attach to the head.
Assembly
- Head to Body: Using the tail from the head, firmly stitch the bottom of the head (Rnd 12) to the top neckline ring (Rnd 1 of the body/skirt). Secure tightly and weave in ends.
- Wings: Position the two wing pieces on the upper back of the body, just below the neckline. Whipstitch the straight edge of each wing securely to Rnds 1 and 2 of the body, angling them slightly outward.
- Halo: Position the gold halo ring centered above the top of the head. Secure with small, neat stitches using the remaining gold thread tail at the back of the head.
Finishing
- Blocking & Stiffening: Mix a 1:1 solution of white craft glue and water (or use a commercial fabric stiffener). Submerge the finished angel into the mixture, gently squeeze out excess liquid, and place over a small cone form or inverted funnel. Spread the lace skirt out evenly so the pattern opens up.
- Drying: Allow the angel to dry completely for 24 hours in a warm, dry area until completely rigid.
- Final Check: Trim any stray thread ends. Your lace crochet angel is now ready to stand proudly on your mantel or hang from your holiday tree!
Size Customization Tips
- Larger Angel: Use Size 3 crochet cotton thread with a 2.25 mm hook. Each additional shell repeat added to the skirt increases the base diameter by roughly 0.8 inches.
- Smaller Ornament: Use Size 30 crochet thread with a 1.0 mm steel hook for a delicate tree ornament measuring under 4 inches tall.
Care Instructions
- Dust gently with a dry, soft-bristled brush or canned air.
- Do not wash or submerge in water after stiffening, as moisture will dissolve the stiffener and cause the lace to lose its rigid shape.
- Store wrapped in acid-free tissue paper in a sturdy box between holiday seasons.
FAQ
Can I make this angel without stiffener?
You can, but the skirt will be too soft to stand on its own. A light spray starch or fabric stiffener is necessary to give the lace bell its rigid, freestanding shape.
Can I use regular acrylic yarn instead of crochet thread?
Regular acrylic worsted-weight yarn is far too thick and fluffy for this pattern. It will obscure the delicate chain-space lace details. Stick to Size 10 crochet cotton for the exact look shown.
How do I make the halo stay upright?
To keep the gold halo standing upright, you can insert a tiny piece of stiff floral wire or a clear nylon thread loop anchored from the back of the head up into the gold ring.
Happy Crocheting!
I hope you enjoyed creating this timeless holiday treasure. Save this pattern to your Pinterest board for later, and leave a comment below sharing what color thread you decided to use for your angel!
📄 Your free PDF pattern
⏳ Preparing your free PDF… 30s
Like this one? Save it for later.